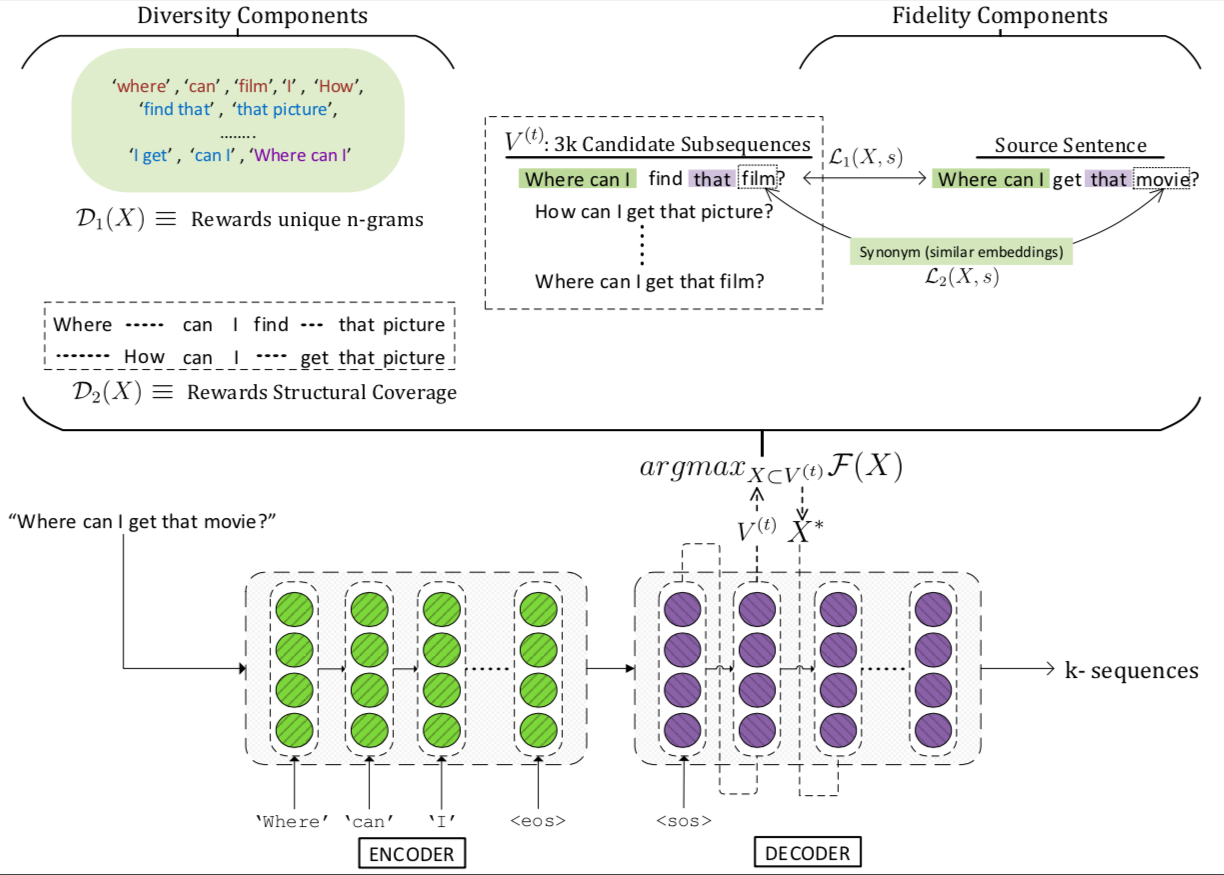
Overview of DiPS during decoding to generate k paraphrases. At each time step, a set of N sequences V(t) is used to determine k < N sequences (X∗) via submodular maximization . The above figure illustrates the motivation behind each submodular component. Please see Section 4 in the paper for details.
Extract and place them in the data directory. Path : data/<dataset-folder-name>.
A sample dataset folder might look like data/quora/<train/test/val>/<src.txt/tgt.txt>.
Please cite the following paper if you find this work relevant to your application
@inproceedings{dips2019,
    title = "Submodular Optimization-based Diverse Paraphrasing and its Effectiveness in Data Augmentation",
    author = "Kumar, Ashutosh  and
      Bhattamishra, Satwik  and
      Bhandari, Manik  and
      Talukdar, Partha",
    booktitle = "Proceedings of the 2019 Conference of the North {A}merican Chapter of the Association for Computational Linguistics: Human Language Technologies, Volume 1 (Long and Short Papers)",
    month = jun,
    year = "2019",
    address = "Minneapolis, Minnesota",
    publisher = "Association for Computational Linguistics",
    url = "https://www.aclweb.org/anthology/N19-1363",
    pages = "3609--3619"
}
Wonderland Engine Body-Tracking by Tristan(Shaepic) based on Wonderland Engine hand-tracking component.

Features:

Rendering of tracked joints.
Rendering of tracked body.
Under-the-hood joint hierarchy remapping/reassembly to meet WebXR specified joint order.
Joint debugger for locating mapping errors.

Before you start:

It is important to be sure that your app is requesting WebXR body-tracking by enabling the feature request in Wonderland Editor.
To do this, open the project settings tab, then open the 'Runtime' dropdown.
In either the 'Required WebXR Features' or 'Optional WebXR Features' coulomb, check body-tracking(if listed).
If body-tracking is not listed, enter 'body-tracking' in the text field below either coulomb. The coulomb you chose will reflect
weather your app necessitates body-tracking for the experience or if it is simply an added feature.

How-To:

The use of the WLE body-tracking component follows the implementation instructions of all Wonderland Engine custom components.
Simply drag the body-tracking.js file into the desired folder in your Wonderland Editor or to the project folder on your OS.

In the Editor, attach the body-tracking script to either an empty object on the scene(for simple joint tracking) or to the avatar mesh object you want to
body track.

If you are joint tracking, open the body-tracking component dropdown menu and in the jointObject menu select an object mesh to represent your joint
then in the jointMaterial menu, select a material for your joints.


If you are body tracking, open the body-tracking component dropdown menu and in the bodySkin menu select a skin you would like your body to be
rendered as.
Your body skin MUST contain all joints listed in the WebXR specified joint list https://github.com/immersive-web/body-tracking/blob/main/index.bs
with the exception of the "root" joint.

Debugging:

If you run intro joint problems (there can be many if it is your first rig) you may want to use the text object debugger. Simply create a text object
in the scene and position it high enough to list all of the 80+joints in vertically descending order. (you can adjust font size as well)
In your body-tracking component dropdown menu, select the text object in the textObject menu.
If a joint fails to map because of a naming error(or it being null) the debugger will list all valid joints up until the problem joint.

3/31/24
NOTE: There are some reported issues when installing AllenNLP on Mac OS X 10.14 [Mojave] (especially with a Jsonnet module error). If the installation failed, run the following commands:
xcode-select --install
open /Library/Developer/CommandLineTools/Packages/macOS_SDK_headers_for_macOS_10.14.pkg
Then run again the install_requirements script. If problems persist, try one of these workarounds:
Pre-process and build datasets that our models can read
Train a model
Predict new outputs using a trained model
Pre-processing
All models require JSON Files as input. In the pre-processing folder we include the script CoNLL_to_JSON.py to transform
files following the CoNLL-U data formats into a suitable input JSON dataset.
It is also possible to transform any text files into our JSON format (including parallel Machine Translation files) with the Text_to_JSON.py script.
The simplest case is to transform a CoNLL file into JSON where the source sequence is a sentence (only words) and the target sequence is the tagged sentence. To build a monolingual dataset for training run:
The script pre-processing/make_all_trial.py inlcudes all the pre-processing options and dataset types available.
Train a Model
Model Configurations are found in training_config folder and subfolders. Note that inside this configuration file one can manipulate the model hyperparameters and also point to the desired datasets.
To train a model, choose an experiment config file (for example training_config/test/en_copynet-srl-conll09.json) and run in the main directory the following command:
Results and training info will be stored in the saved_models/example-srl-en directory.
NOTE: The model hyperparameters for experiments from the paper are included inside the training_config and shall be trained the same way.
Use a Trained Model
Convert txt-file into JSON
At inference time, it is only necessary to provide a file.txt with one sentence per line. With this, we can use Flair to predict the predicates inside the sentences and then use our model to predict the SRL labels for each predicate.
First, we need to transform the input into JSON format and give a desired target language (for example, if we want labeled german we should indicate the tgt_key as ):
We included the configuration files for each experimental setup (monolingual, multilingual and cross-lingual)
in the training_config folder of this repository. They must run in a similar manner as the previous tutorial showed.
Interested in translating a new language? Discuss on Gitter or create a new issue to unlock the language on Crowdin.
Thanks in advance!
Features
Xournal++ (/ˌzɚnl̟ˌplʌsˈplʌs/) is a hand note-taking software written in C++ with the target of flexibility, functionality and speed.
Stroke recognizer and other parts are based on Xournal Code, which you can find at SourceForge.
Xournal++ features:
Supports pressure-sensitive styluses and digital pen tables (e.g. Wacom, Huion, XP Pen, etc. tablets)
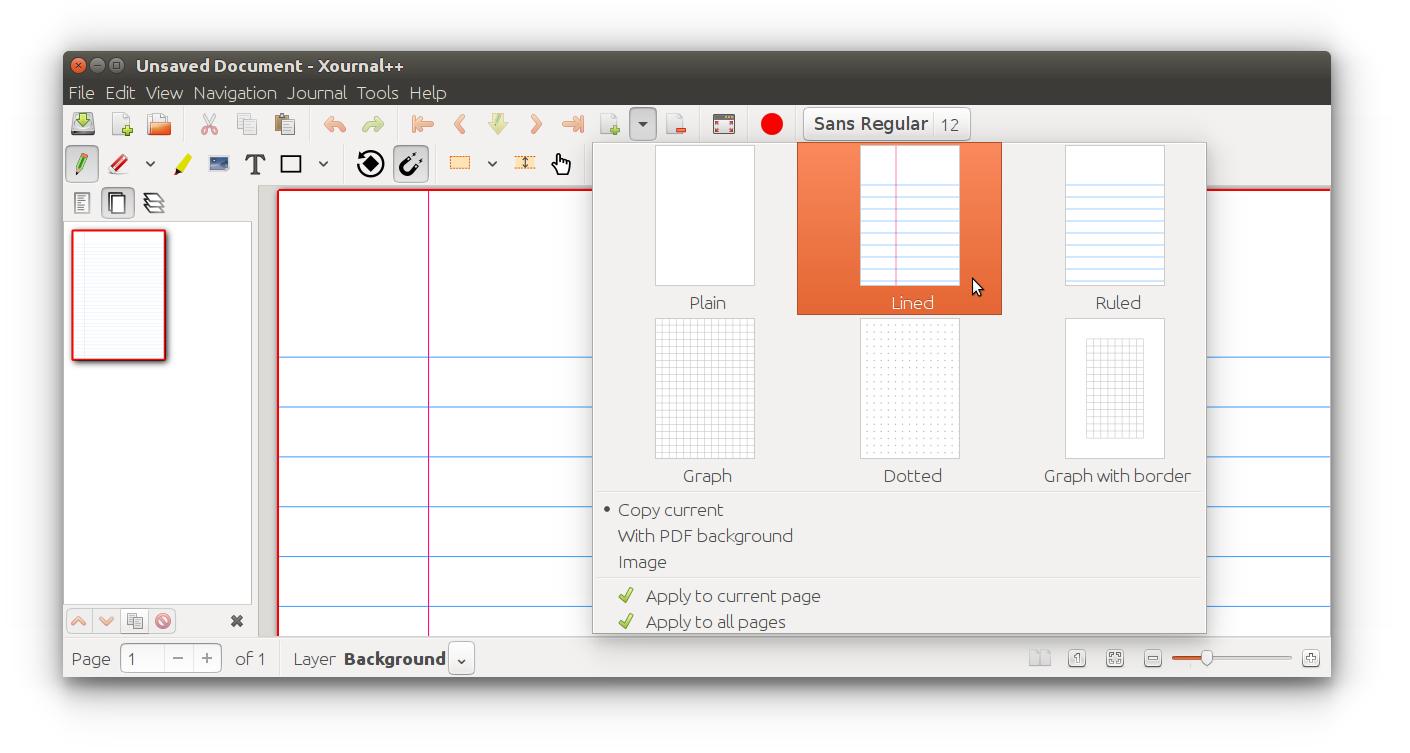
Paper backgrounds for note-taking, scratch paper, or whiteboarding
Annotate on top of PDFs
Select text from the background PDF, copy, highlight or underline it or strike it through
Follow links from the background PDF
Export to a variety of formats including SVG, PNG and PDF, both from the GUI and command line
Different drawing tools (e.g. pen, highlighter) and stroke styles (e.g. solid, dotted)
Use the set-square and compass tools for measurements or as a guide for drawing straight lines, circular arcs and radii
Fill shape functionality
Shape resizing and rotation
Rotation and grid snapping for precise alignment of objects
Input stabilization for smoother writing/drawing
Text tool for adding text in different fonts, colors, and sizes
Enhanced support for image insertion
Eraser with multiple configurations
LaTeX support (requires a working LaTeX installation) with customizable template and a resizable editor with syntax highlighting
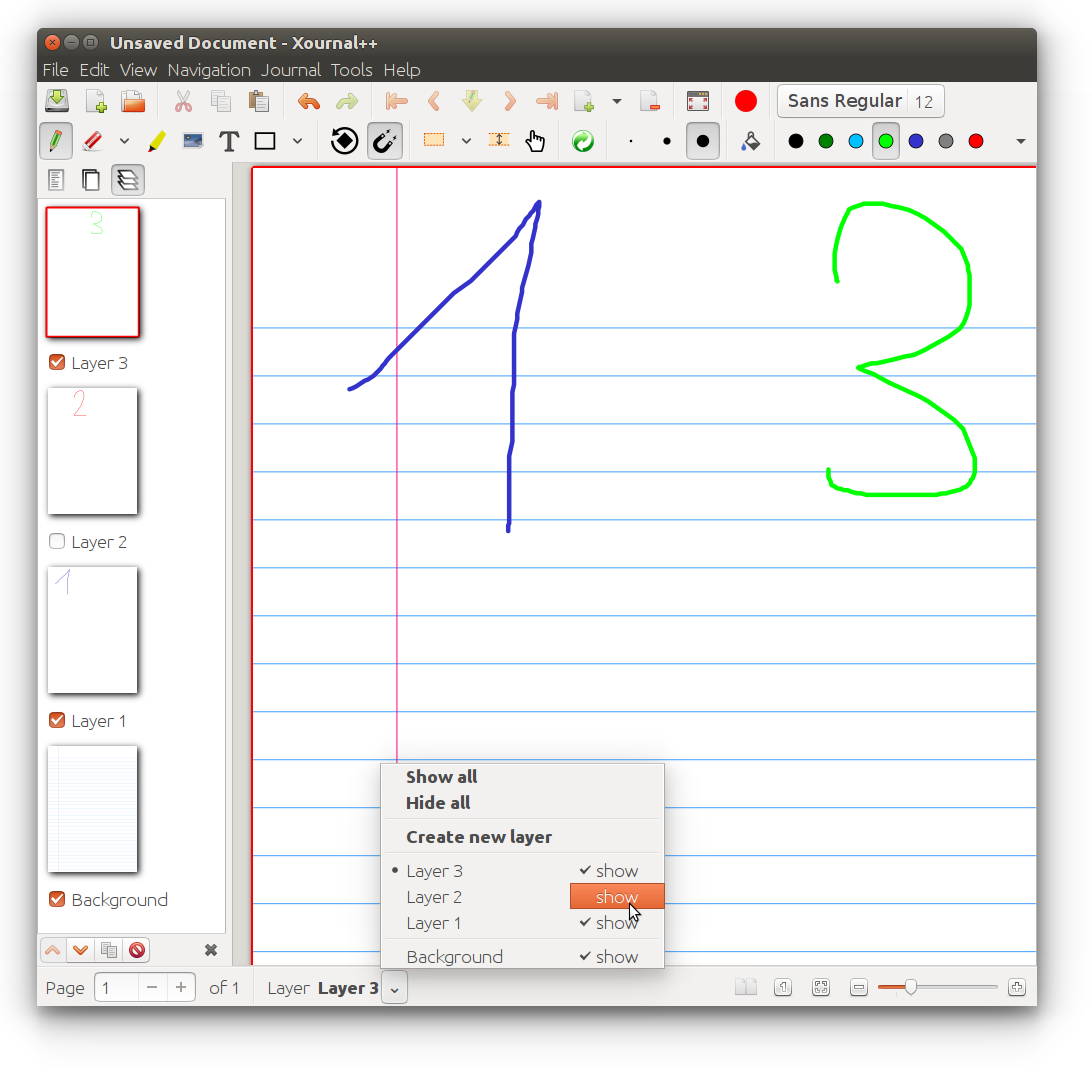
Sidebar containing page previews with advanced page sorting, PDF bookmarks and layers (can be individually hidden/edited)
Allows mapping different tools/colors etc. to stylus/mouse buttons
Customizable toolbar with multiple configurations, e.g. to optimize toolbar for portrait/landscape
Custom color palette support using the .gpl format
Page template definitions
Bug reporting, auto-save, and auto backup tools
Audio recording and playback alongside with handwritten notes
Multi language support (over 20 languages supported)
Plugins using Lua scripting
Mobile & web app
From mid 2020 to May 2021, a Flutter-written mobile app for Android, Chrome OS and iOS (unreleased) and the web
has been developed, which supports the file format and most of the basic features of Xournal++.
Unfortunately development has stalled and we have lost contact to the (single) developer. The web app is no longer available.
You can still check out the separate repository on GitLab or
Get it on Google Play
GNU/Linux
Windows 10
macOS Catalina
Xournal++ Mobile on Chromium OS
Toolbar / Page Background / Layer
Multiple page background, easy selectable on the toolbar
Layer sidebar and advanced layer selection
Multiple predefined and fully customizable toolbars
User Manual and FAQ
For general usage, consult the User
Manual. Answers to
some common questions can be found in the
FAQ.
Experimental Features
Sometimes a feature is added that might not be rock solid, or the developers aren’t sure if it is useful.
Try these out and give us some feedback.
Here are a few under development that you can play with now:
Assign a mouse button or stylus button to bring up a toolbox of toolbars right under the cursor. You can also modify what is in the toolbox through the usual View → Toolbars → Customize although it won’t appear unless you’ve assigned a button in preferences: mouse or stylus (or selected a toolbar configuration that uses it).
This is an experimental feature because not everything you can put in the toolbox behaves. So be aware.
Keep your eyes out for other experimental features in preferences as seen here:
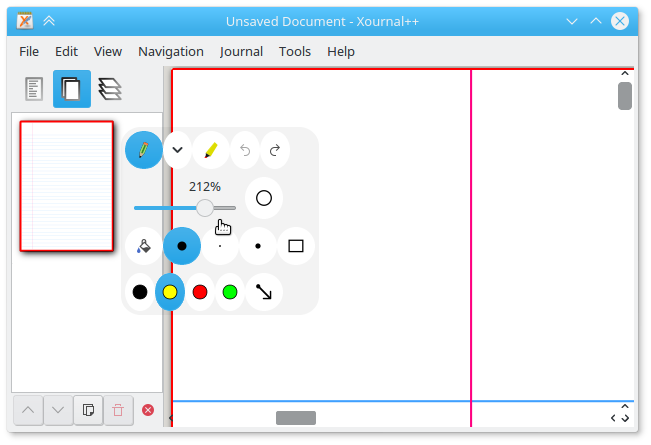
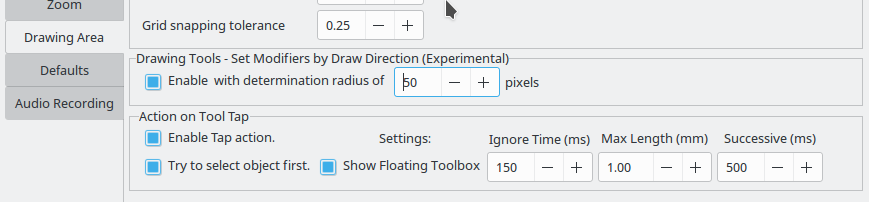
DrawingTools: When drawing a box, circle etc, simulate ctrl or shift modifiers by the initial direction you move the mouse.
Action on Tool Tap: Allow a brief tap on the screen to bring up the floating toolbox and/or select an object. May work with pen and highlighter only.
Installing
The official releases of Xournal++ can be found on the
Releases page. We provide
binaries for Debian, Ubuntu, MacOS and Windows.
For other GNU/Linux distributions (or older/newer ones), we also provide an
AppImage that is binary compatible with any distribution released around or
after Ubuntu 22.04. For installing Xournal++ Mobile on handheld devices, please check out Xournal++ Mobile’s instructions
A note for Ubuntu/Debian users: The official binaries that we provide are
only compatible with the specific version of Debian or Ubuntu indicated by the
file name. For example, if you are on Ubuntu 20.04, the binary whose name
contains Ubuntu-bionic is only compatible with Ubuntu 18.04. If your system
is not one of the specific Debian or Ubuntu versions that are supported by the
official binaries, we recommend you use either the PPA (Ubuntu only), the Flatpak, or the
AppImage.
There is also an unstable, automated nightly
release that
includes the very latest features and bug fixes.
With the help of the community, Xournal++ is also available on official repositories
of some popular GNU/Linux distros and platforms.
Debian
On Debian bookworm and Debian sid the xournalpp package (stable version) is contained in the official repositories. Simply install via
On distros based on Ubuntu 22.04 Jammy Jellyfish (and later) the xournalpp package (stable version) is contained in the official repositories.
Simply install via
sudo apt install xournalpp
Stable PPA
The latest stable version is available via the following unofficial PPA:
This PPA is provided by the Xournal++ team. While it has the latest features and
bug fixes, it has also not been tested thoroughly and may break periodically (we
try our best not to break things, though).
Note that for Xournal++ to work properly, you must have at least one GTK theme
and one icon theme installed on Flatpak. To enable LaTeX support, you will also
need to install the TeX Live extension:
Android is supported by Xournal++ Mobile. It can be downloaded either on the Tags page or from Google Play.
iOS
Unfortunately, the iOS app is not published yet in the Apple App Store. See here to learn, why. Anyway, in the Building section you can learn how to build an early preview.
Windows
Official Windows releases are provided on the Releases
page.
Mac OS X
Mac OS X releases are provided on the Releases
page.
Notes:
There have been compatibility problems with Mac OS X Catalina regarding both
file permissions and stylus support
(#1772 and
#1757). Unfortunately,
we don’t have the resources to adequately support Catalina at this time. Help
would be appreciated!
Xournal++ will be delivered with a patched GTK. Else, pressure sensitivity will not work on Mac
#569.
The file extension .xopp is a gzipped XML file. PDFs are not embedded into the file, so if the PDF is deleted, the background is lost. .xopp is basically the same file format as .xoj, which is used by Xournal. Therefore, Xournal++ is able to read .xoj files, and can also export to .xoj. As soon as notes are exported to a .xoj file, all Xournal++ specific extensions like additional background types, are lost.
.xopp files can theoretically be read by Xournal, as long as you do not use any new features. Xournal does not open files that contain new attributes or unknown values, so Xournal++ will add the extension .xopp to all saved files to indicate the potential presence of Xournal++-only features.
All new files will be saved as .xopp. If an .xoj file that was created by Xournal is opened, the Save-As dialog will be displayed on save. If the .xoj file was created by Xournal++, the file will be overwritten on save and the file extension will not change.
We are currently introducing a new file format that can efficiently store attached PDF files and other attachments internally. We will still allow for attachments that are linked to external files. Please refer to #937 for further details.
Interested in translating a new language? Discuss on Gitter or create a new issue to unlock the language on Crowdin.
Thanks in advance!
Features
Xournal++ (/ˌzɚnl̟ˌplʌsˈplʌs/) is a hand note-taking software written in C++ with the target of flexibility, functionality and speed.
Stroke recognizer and other parts are based on Xournal Code, which you can find at SourceForge.
Xournal++ features:
Supports pressure-sensitive styluses and digital pen tables (e.g. Wacom, Huion, XP Pen, etc. tablets)
Paper backgrounds for note-taking, scratch paper, or whiteboarding
Annotate on top of PDFs
Select text from the background PDF, copy, highlight or underline it or strike it through
Follow links from the background PDF
Export to a variety of formats including SVG, PNG and PDF, both from the GUI and command line
Different drawing tools (e.g. pen, highlighter) and stroke styles (e.g. solid, dotted)
Use the set-square and compass tools for measurements or as a guide for drawing straight lines, circular arcs and radii
Fill shape functionality
Shape resizing and rotation
Rotation and grid snapping for precise alignment of objects
Input stabilization for smoother writing/drawing
Text tool for adding text in different fonts, colors, and sizes
Enhanced support for image insertion
Eraser with multiple configurations
LaTeX support (requires a working LaTeX installation) with customizable template and a resizable editor with syntax highlighting
Sidebar containing page previews with advanced page sorting, PDF bookmarks and layers (can be individually hidden/edited)
Allows mapping different tools/colors etc. to stylus/mouse buttons
Customizable toolbar with multiple configurations, e.g. to optimize toolbar for portrait/landscape
Custom color palette support using the .gpl format
Page template definitions
Bug reporting, auto-save, and auto backup tools
Audio recording and playback alongside with handwritten notes
Multi language support (over 20 languages supported)
Plugins using Lua scripting
Mobile & web app
From mid 2020 to May 2021, a Flutter-written mobile app for Android, Chrome OS and iOS (unreleased) and the web
has been developed, which supports the file format and most of the basic features of Xournal++.
Unfortunately development has stalled and we have lost contact to the (single) developer. The web app is no longer available.
You can still check out the separate repository on GitLab or
Get it on Google Play
GNU/Linux
Windows 10
macOS Catalina
Xournal++ Mobile on Chromium OS
Toolbar / Page Background / Layer
Multiple page background, easy selectable on the toolbar
Layer sidebar and advanced layer selection
Multiple predefined and fully customizable toolbars
User Manual and FAQ
For general usage, consult the User
Manual. Answers to
some common questions can be found in the
FAQ.
Experimental Features
Sometimes a feature is added that might not be rock solid, or the developers aren’t sure if it is useful.
Try these out and give us some feedback.
Here are a few under development that you can play with now:
Assign a mouse button or stylus button to bring up a toolbox of toolbars right under the cursor. You can also modify what is in the toolbox through the usual View → Toolbars → Customize although it won’t appear unless you’ve assigned a button in preferences: mouse or stylus (or selected a toolbar configuration that uses it).
This is an experimental feature because not everything you can put in the toolbox behaves. So be aware.
Keep your eyes out for other experimental features in preferences as seen here:
DrawingTools: When drawing a box, circle etc, simulate ctrl or shift modifiers by the initial direction you move the mouse.
Action on Tool Tap: Allow a brief tap on the screen to bring up the floating toolbox and/or select an object. May work with pen and highlighter only.
Installing
The official releases of Xournal++ can be found on the
Releases page. We provide
binaries for Debian, Ubuntu, MacOS and Windows.
For other GNU/Linux distributions (or older/newer ones), we also provide an
AppImage that is binary compatible with any distribution released around or
after Ubuntu 22.04. For installing Xournal++ Mobile on handheld devices, please check out Xournal++ Mobile’s instructions
A note for Ubuntu/Debian users: The official binaries that we provide are
only compatible with the specific version of Debian or Ubuntu indicated by the
file name. For example, if you are on Ubuntu 20.04, the binary whose name
contains Ubuntu-bionic is only compatible with Ubuntu 18.04. If your system
is not one of the specific Debian or Ubuntu versions that are supported by the
official binaries, we recommend you use either the PPA (Ubuntu only), the Flatpak, or the
AppImage.
There is also an unstable, automated nightly
release that
includes the very latest features and bug fixes.
With the help of the community, Xournal++ is also available on official repositories
of some popular GNU/Linux distros and platforms.
Debian
On Debian bookworm and Debian sid the xournalpp package (stable version) is contained in the official repositories. Simply install via
On distros based on Ubuntu 22.04 Jammy Jellyfish (and later) the xournalpp package (stable version) is contained in the official repositories.
Simply install via
sudo apt install xournalpp
Stable PPA
The latest stable version is available via the following unofficial PPA:
This PPA is provided by the Xournal++ team. While it has the latest features and
bug fixes, it has also not been tested thoroughly and may break periodically (we
try our best not to break things, though).
Note that for Xournal++ to work properly, you must have at least one GTK theme
and one icon theme installed on Flatpak. To enable LaTeX support, you will also
need to install the TeX Live extension:
Android is supported by Xournal++ Mobile. It can be downloaded either on the Tags page or from Google Play.
iOS
Unfortunately, the iOS app is not published yet in the Apple App Store. See here to learn, why. Anyway, in the Building section you can learn how to build an early preview.
Windows
Official Windows releases are provided on the Releases
page.
Mac OS X
Mac OS X releases are provided on the Releases
page.
Notes:
There have been compatibility problems with Mac OS X Catalina regarding both
file permissions and stylus support
(#1772 and
#1757). Unfortunately,
we don’t have the resources to adequately support Catalina at this time. Help
would be appreciated!
Xournal++ will be delivered with a patched GTK. Else, pressure sensitivity will not work on Mac
#569.
The file extension .xopp is a gzipped XML file. PDFs are not embedded into the file, so if the PDF is deleted, the background is lost. .xopp is basically the same file format as .xoj, which is used by Xournal. Therefore, Xournal++ is able to read .xoj files, and can also export to .xoj. As soon as notes are exported to a .xoj file, all Xournal++ specific extensions like additional background types, are lost.
.xopp files can theoretically be read by Xournal, as long as you do not use any new features. Xournal does not open files that contain new attributes or unknown values, so Xournal++ will add the extension .xopp to all saved files to indicate the potential presence of Xournal++-only features.
All new files will be saved as .xopp. If an .xoj file that was created by Xournal is opened, the Save-As dialog will be displayed on save. If the .xoj file was created by Xournal++, the file will be overwritten on save and the file extension will not change.
We are currently introducing a new file format that can efficiently store attached PDF files and other attachments internally. We will still allow for attachments that are linked to external files. Please refer to #937 for further details.
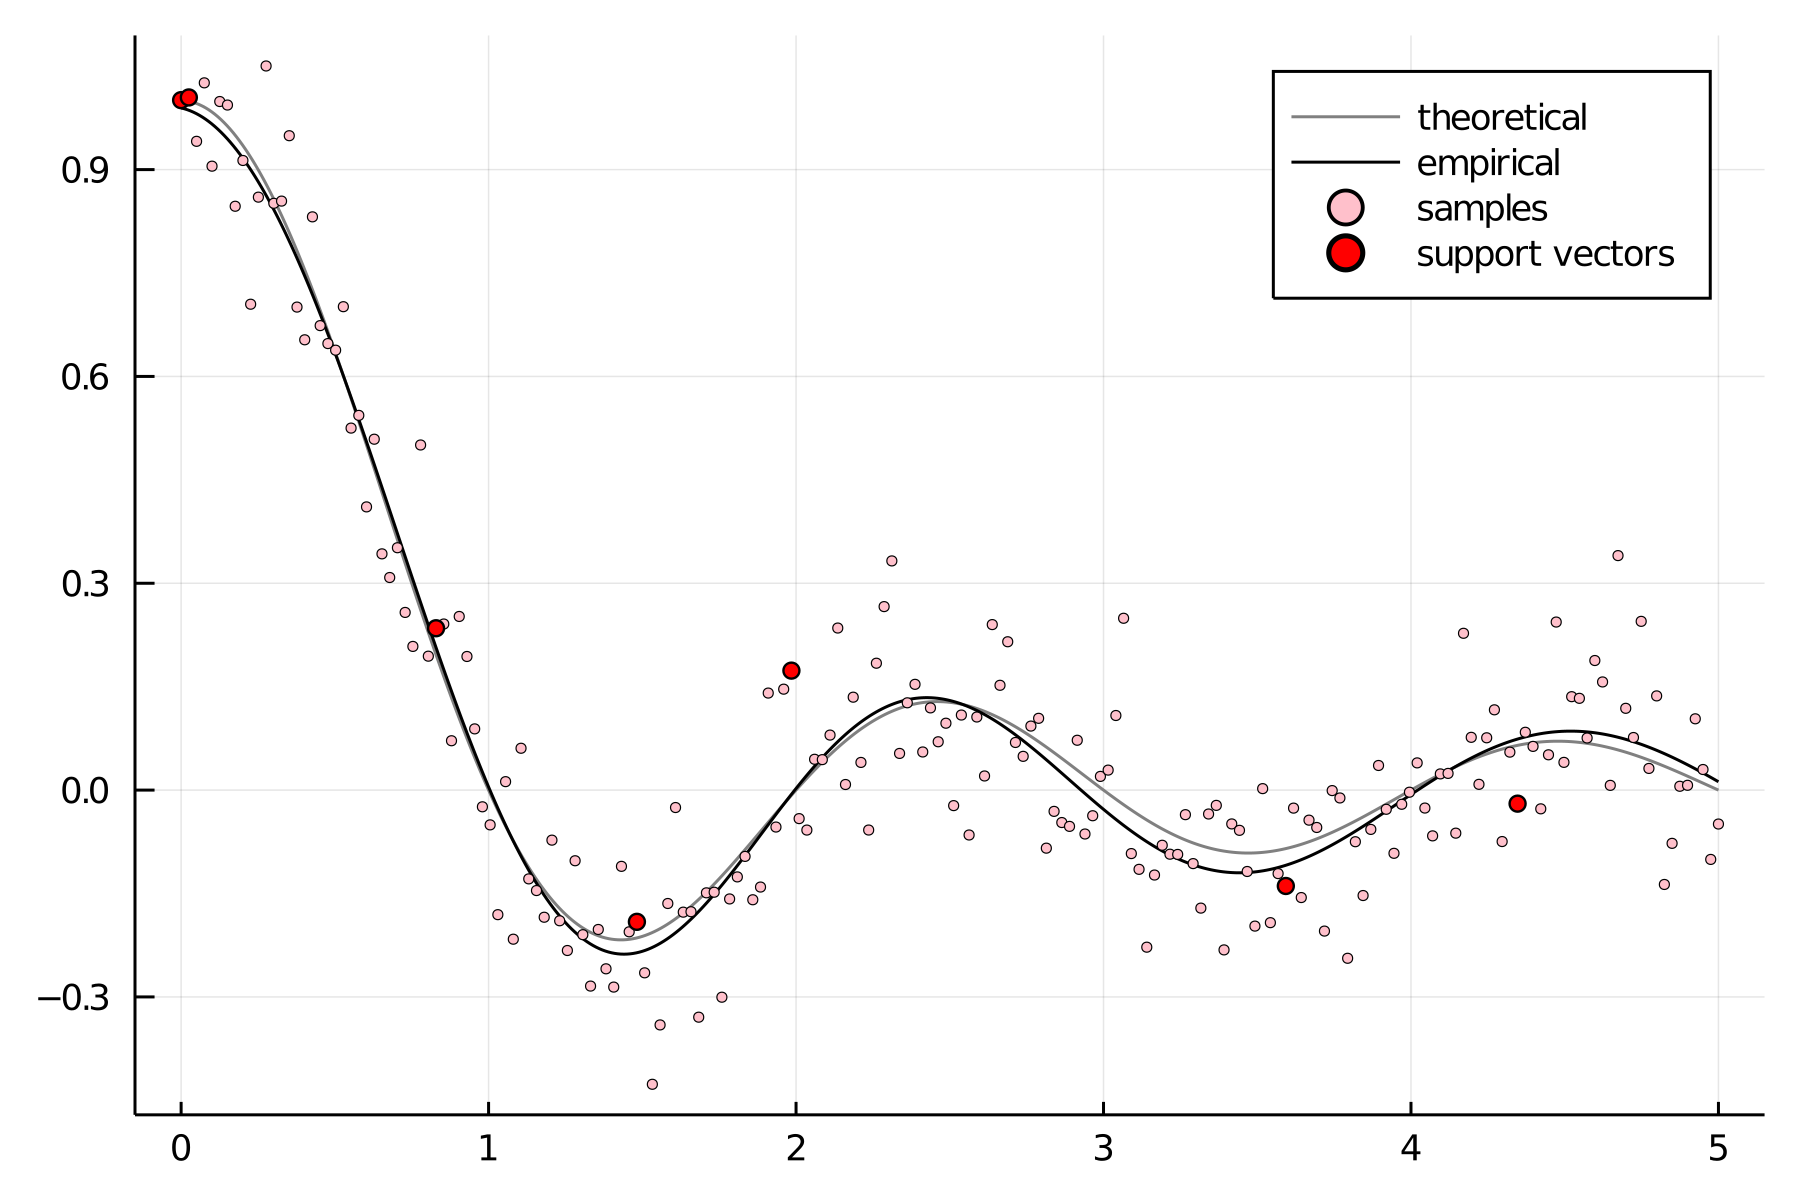
Greedy Sparse Least-Squares (GSLS) SVM and how to use it in regression analysis. This algorithm was invented by Gavin C. Cawley and Nicola L.C. Talbot.
Requirements
There are no requirements for GSLS_SVM function from GSLS-SVM.jl
But if you want to test it with test.jl you should install: Plots Distributions
Launch
From Julia REPL:
julia>include("main.jl")
Description
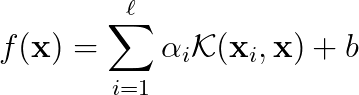
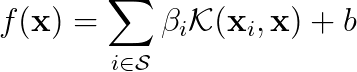
As you might guess, GSLS is a Greedy algorithm. Its purpose is to construct Sparse approximation of the LS-SVM solution to the regularized least-squares regression problem. Given training data
where
LS-SVM with kernel function
determines coefficients
for the solution to the mentioned regression problem
which minimises LS-SVM objective function.
We aim to find such an approximation (which we call sparse) that for some proper subset (which we call dictionary)
coefficients
of the function
will minimise GSLS SVM objective function
as much as possible. γ is the regularization parameter. At each iteration GSLS chooses some new vector from dataset as support vector, calculates value of the objective function and in a greedy maner, incorporates best possible support vector (on current iteration) to the dictionary, than proceeds to the next iteration. This process is terminated once dictionary has reached some pre-determined size. More detailed description of this simple, but efficient algorithm can be found in paper.
Usage
Let’s figure out on how to use GSLS SVM in regression analysis.
Given values X::Vector{Float64} of predictor and outcomes y::Vector{Float64} you have to prepare data to train GSLS SVM like this:
𝑿 = [[x] for x in X]
𝒚 =transpose(y)
Then you have to choose number of support vectors sv_num::Int, regularization parameter γ::Float and kernel function kernel (construct it using higher-order functions kernel = kernel_RBF(σ) or kernel = kernel_polynomial(n, r)) and pass all this stuff to GSLS SVM algorithm like this:
dict_indices, 𝜷, b =GSLS_SVM(kernel, 𝑿, 𝒚, γ, sv_num)
Finally, you have all you need to build the empirical estimation of the theoretical regression model:
f(x) = b +sum([𝜷[i] *kernel(𝑿[dict_indices[i]], [x])
for i=1:length(dict_indices)])


 https://github.com/malllabiisc/DiPS