Greedy Sparse Least-Squares (GSLS) SVM and how to use it in regression analysis. This algorithm was invented by Gavin C. Cawley and Nicola L.C. Talbot.
Requirements
There are no requirements for GSLS_SVM function from GSLS-SVM.jl
But if you want to test it with test.jl you should install: Plots Distributions
Launch
From Julia REPL:
julia>include("main.jl")
Description
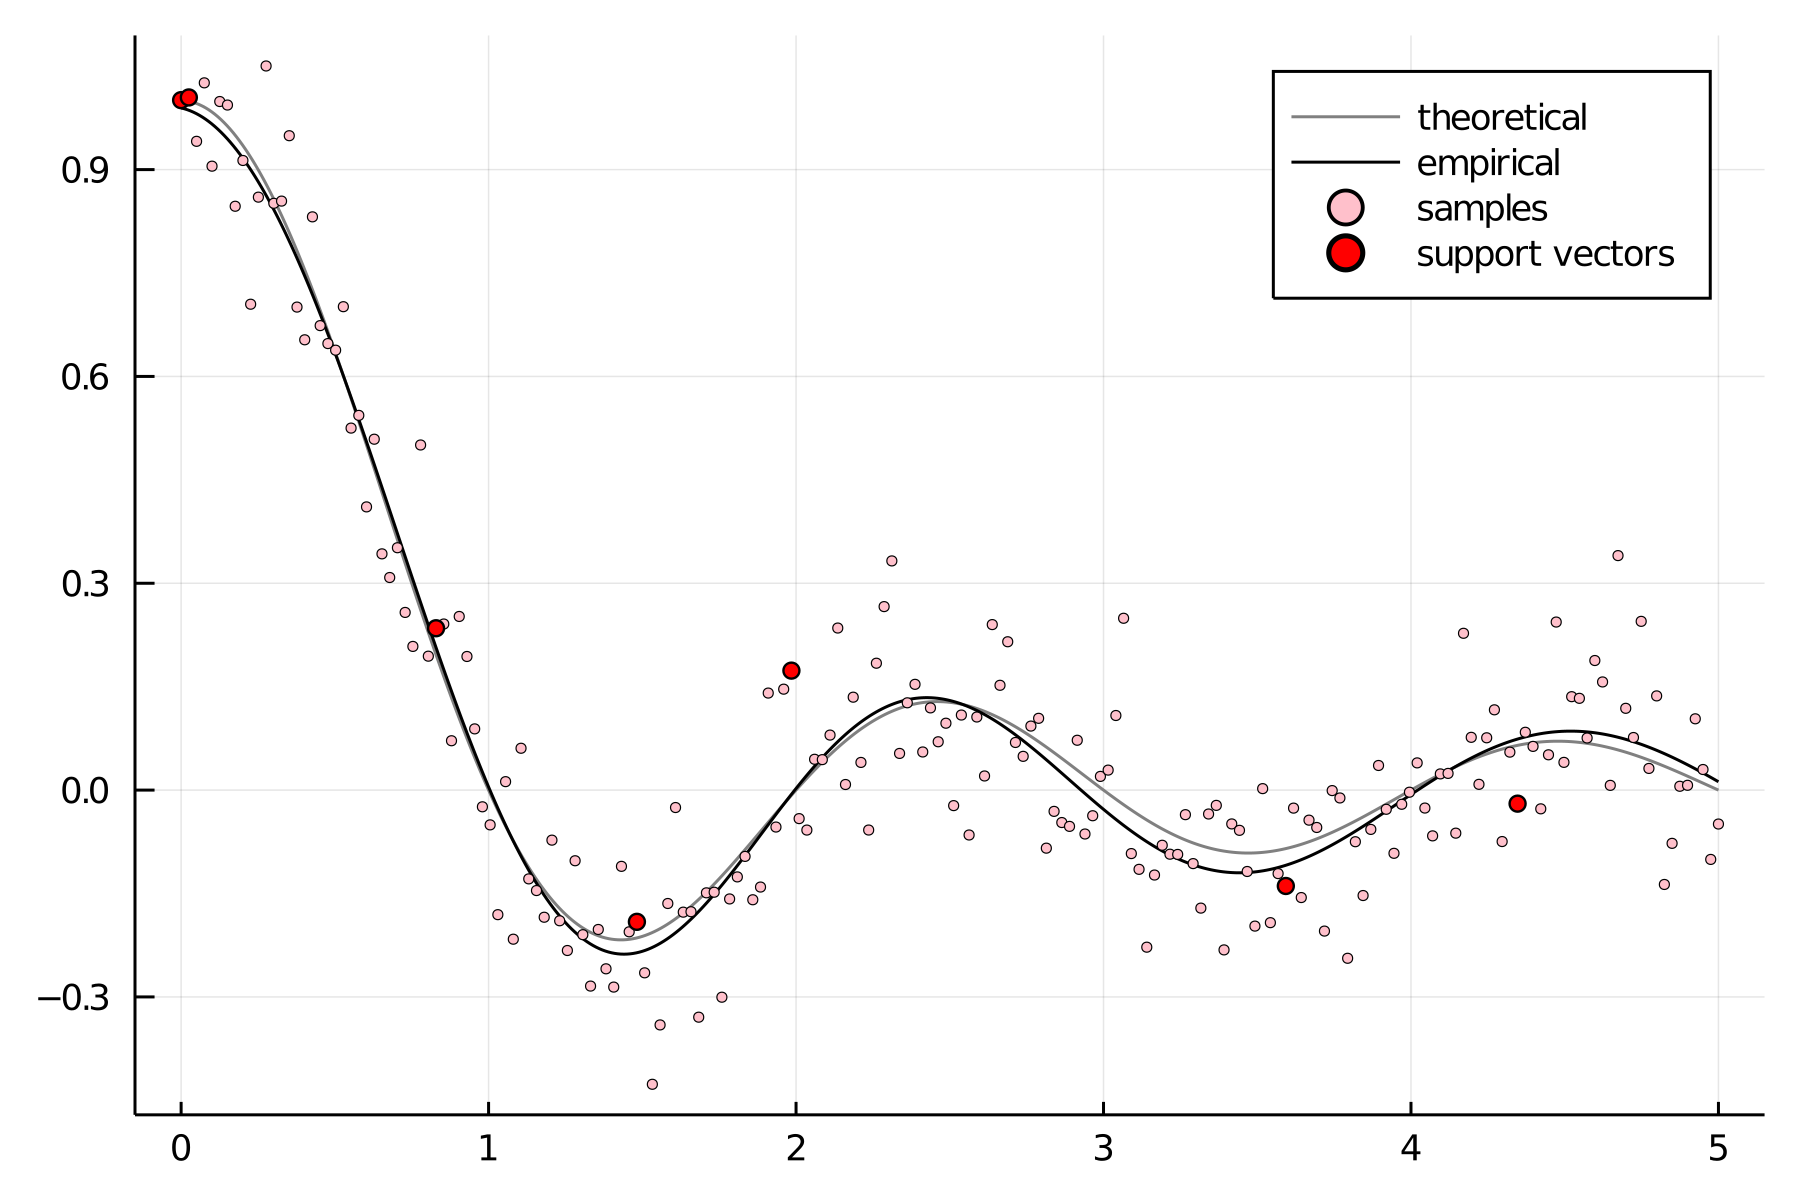
As you might guess, GSLS is a Greedy algorithm. Its purpose is to construct Sparse approximation of the LS-SVM solution to the regularized least-squares regression problem. Given training data
where
LS-SVM with kernel function
determines coefficients
for the solution to the mentioned regression problem
which minimises LS-SVM objective function.
We aim to find such an approximation (which we call sparse) that for some proper subset (which we call dictionary)
coefficients
of the function
will minimise GSLS SVM objective function
as much as possible. γ is the regularization parameter. At each iteration GSLS chooses some new vector from dataset as support vector, calculates value of the objective function and in a greedy maner, incorporates best possible support vector (on current iteration) to the dictionary, than proceeds to the next iteration. This process is terminated once dictionary has reached some pre-determined size. More detailed description of this simple, but efficient algorithm can be found in paper.
Usage
Let’s figure out on how to use GSLS SVM in regression analysis.
Given values X::Vector{Float64} of predictor and outcomes y::Vector{Float64} you have to prepare data to train GSLS SVM like this:
𝑿 = [[x] for x in X]
𝒚 =transpose(y)
Then you have to choose number of support vectors sv_num::Int, regularization parameter γ::Float and kernel function kernel (construct it using higher-order functions kernel = kernel_RBF(σ) or kernel = kernel_polynomial(n, r)) and pass all this stuff to GSLS SVM algorithm like this:
dict_indices, 𝜷, b =GSLS_SVM(kernel, 𝑿, 𝒚, γ, sv_num)
Finally, you have all you need to build the empirical estimation of the theoretical regression model:
f(x) = b +sum([𝜷[i] *kernel(𝑿[dict_indices[i]], [x])
for i=1:length(dict_indices)])
skultrafast is a Python package for ultrafast spectroscopy data analysis. It provides tools
for analyzing various types of time-resolved spectroscopy data, including
pump-probe, transient absorption, and two-dimensional infrared (2D-IR)
spectroscopy. The package includes functionality for data import, visualization,
processing, and fitting. It is built on top of the scientific Python ecosystem,
including NumPy, SciPy, and Matplotlib.
The latest version of the package is available on github. A build of the documentation can be found at Read
the docs. The documentation
includes Installtion notes.
Funding
The package was created and is maintained by Till Stensitzki. The package was
created while being employed in the Heyne group and was therefore founded by the DFG via SFB
1078 and SFB 1114. Recent development
focussed on 2D-spectroscopy is part of my stay in the Ultrafast Structual Dynamics
Group in Potsdam under Müller-Werkmeister.
Scope of the project
I like to include any kind of algorithm or data structure which comes up in
ultrafast spectropy. I am also open to add a graphical interface to the package,
but as experience shows, a GUI brings in a lot of maintenance burden. Hence, the
first target is a interactive data-explorer for the jupyter notebook.
This package also tries its best to follow modern software practices. This
includes version control using git, continues integration testing via
github action and a decent documentation hosted on Read the docs.
Features
The current releases centers around working with time-resolved spectra:
Generate publication-ready plots with minimal effort.
Perform global fitting of transient data, including DAS, SAS, and
compartment modeling.
Analyze polarization-resolved datasets.
Easily process data by selecting, filtering, and recalibrating it.
Correct dispersion automatically in the case of chirped spectra.
Smart and easy-to-use Add-In for Microsoft Office Word for text recovering if keyboard layout was wrong
Overview
The algorithm is pretty straightforward – based on character replacement according the chosen keyboard layout. LoseLess is an enclosure to the algorithm – beautiful Microsoft Office Word plugin with some features and settings.
You can:
rely on our automatic language detector, or
manually switch the languange necessary
normalize Letter Case in text
undo the recovery
Some info
Features
Text is in wrong keyboard layout? Don’t lose it again! Just select it and press “Recovery text”. LoseLess will do the dirty work for you.
Performance
LoseLess recovers 10,000 words 100x faster that Usain Bolt runs 200 meters*.
Intellect
LoseLess knows that “ghbdtn” is “привет” and “рщц фку нщг,” is “how are you?”.
This project also contains the ready project for Visual Studio (Lossless.csproj).
Language support
Currently, LoseLess supports english and russian only. The main difficulty is connected with the support of keyboard layout – special letters. At current state we are limited with the VSTO API, and it is imposible to track when system keys are pressed. Therefore it is impossible to track when the special letters like ā or š are used.
Nevertheless, LoseLess is localized to english, russian and latvian. The plugin detects the language automatically, according the system language of the Word app. Feel free to add other localizations.
How to use
There are two ways to add LoseLess to your Word app:
Find publish folder and run setup.exe. Setup will set up everything automatically.
Find publish folder and manually add LoseLess.vsto to the office app by opening the Add-In settings in Insert section.
To recover the text, just select it and pressrecover text in the Add-In menu.
IMPORTANT: this version of LoseLess supports Microsoft Office Word for Microsoft Windows only.
* Based on 2009 Usain Bolt 200m World Record (19.19 seconds) and LoseLess algorithm speed (~3700000 symbols per second, 7.4 symbols per word). Tested on machine with Intel Pentium P6100 processor, 2Gb RAM, Microsoft Windows 10 Enterprise LTSB 64-bit. LoseLess IgnoreCase switched on.
PRNGine is a pseudo-random number generator library for sequential and parallel Monte Carlo simulations. All PRNG implementations of this library extends the Java RandomGenerator class, which makes it easily usable in other projects. The PRNGs arenotcryptographically strong RNGs.
LCG64ShiftRandom: This class implements a linear congruential PRNG with additional bit-shift transition. It is a port of the trng::lcg64_shift PRNG class of the TRNG library created by Heiko Bauke.
MT19937_32Random: This is a 32-bit version of Mersenne Twister pseudorandom number generator.
MT19937_64Random: This is a 64-bit version of Mersenne Twister pseudorandom number generator.
XOR32ShiftRandom: This generator was discovered and characterized by George Marsaglia [Xorshift RNGs]. In just three XORs and three shifts (generally fast operations) it produces a full period of 232 – 1 on 32 bits. (The missing value is zero, which perpetuates itself and must be avoided.) High and low bits pass Diehard.
XOR64ShiftRandom: This generator was discovered and characterized by George Marsaglia [Xorshift RNGs]. In just three XORs and three shifts (generally fast operations) it produces a full period of 264 – 1 on 64 bits. (The missing value is zero, which perpetuates itself and must be avoided.) High and low bits pass Diehard.
NOTE
All implemented random generators are not thread-safe. If they are used in a multi-threaded environment, they must be synchronized externally.
Requirements
JDK 17: You need Java 17 for building the library.
Building PRNGine
For building the PRNGine library you have to check out the master branch from Github.
The library also contains methods for creating random seed values, which can be used for initializing the available PRNGs.
// Creating a new 64 bit seed value.finallongseed = Seeds.seed();
finalRandomranomd = newLCG64ShiftRandom(seed);
Every random engine has a seedBytes() method, which return the seed byte[] array with the length required by the PRNG.
// This random creation is equivalent to...finalRandomGeneratorrandom1 = newLCG64ShiftRandom();
// ...creating it with the seed bytes of the PRNG. finalbyte[] seed = LCG64ShiftRandom.seedBytes();
finalRandomGeneratorrandom2 = newLCG53ShiftRandom(seed);
All implemented PRNGs has been tested with the dieharder test suite.
PRNG
Passed
Weak
Failed
KISS32Random
113
1
0
KISS64Random
109
5
0
LCG64ShiftRandom
111
3
0
MT19937_32Random
111
3
0
MT19937_64Random
108
6
0
XOR32ShiftRandom
103
6
5
XOR64ShiftRandom
113
1
0
L64X256MixRandom
111
3
0
Runtime performance tests
The runtime performance of the PRNGs was tested with the JMH testing framework on an Intel Core i7-6700HQ CPU @ 2.60GHz with Java SE Runtime Environment (build 1.8.0_112-b15)—Java HotSpot.
Copyright 2017-2021 Franz Wilhelmstötter

Licensed under the Apache License, Version 2.0 (the "License");
you may not use this file except in compliance with the License.
You may obtain a copy of the License at

http://www.apache.org/licenses/LICENSE-2.0

Unless required by applicable law or agreed to in writing, software
distributed under the License is distributed on an "AS IS" BASIS,
WITHOUT WARRANTIES OR CONDITIONS OF ANY KIND, either express or implied.
See the License for the specific language governing permissions and
limitations under the License.
<my-component>Content of my component</my-component><scriptsrc=./src/lego.js></script><script>// Create your own classclassMyComponentextendsComponent{render(){return`My component content: <slot></slot>!`}}// Enable <my-component> HTML elementcustomElements.define('my-component',MyComponent)</script>
Using <template>
<linkrel=importhref=./mycomponent.html><my-component>Content of my component</my-component>
mycomponent.html:
<template>
My component content: <slot></slot>!
</template><scriptsrc=./src/lego.js></script><script>classMyComponentextendsTemplateComponent{}customElements.define('my-component',MyComponent)</script>
Not much happening, but you have a custom web component!
Just a thin layer
When extending Component, you basically add some shortcuts to native HTMLElement.
It’s still fully compatible with native custom elements. No magic behind the scene,
no complexity, just a couple of useful methods to write native web components easier.
It also enables the power of using <template> and <style> with imports.
See the template with import demo.
Available methods
watch(): should return the array of names of attributes to watch for a change.
When the attribute is changed, the component is re-rendered.
defaults(): should return an object with the name of the attributes and their matching
default values. If the attribute is not declared, this value will be taken.
value(attributeName): a method to retrieve the attribute value. If the attribute
has no value, the default value will be taken.
render(): should return a string which is the HTML content of the component.
If <slot></slot> is in the string, it will be replaced by the children of your custom element.
A key challenge for e-commerce businesses is to analyze the trend in the
market to increase their sales. The trend can be easily observed if the
companies can group the customers; based on their activity on the e-commerce site. This grouping can be done by applying different criteria like
previous orders, mostly searched brands and so on.
Problem Statement
Given the e-commerce data, use k-means clustering algorithm to cluster
customers with similar interest.
Dataset Information
Column
Description
Cust_ID
Unique Numbering of Customers
Gender
Gender of Customer
Orders
No. of Past orders placed by the customers
Remaining 35 features (brands) contains the number of times
customers have searched them.
Work Flow
First Import the necessary libraries needed for the project. Below are the libraries that I have used
import pandas as pd
import numpy as np
import matplotlib.pyplot as plt
import seaborn as sns
from sklearn.preprocessing import MinMaxScaler
from sklearn.metrics import silhouette_score
from sklearn.cluster import KMeans
from yellowbrick.cluster import KElbowVisualizer
Load the dataset using pandas.
Understand the data with basic statistics, info, total records, features and their data types also number of null values.
Perform the data cleaning techniques like treating the missing values.
Visualize the data with the help of Matplotlib or Seaborn to get better understanding of the features.
In my project I have used Seaborn’s
Boxplot(To visualize the Outliers present in the data)
Barplot (To get to 10 customer ID based on Total searches)
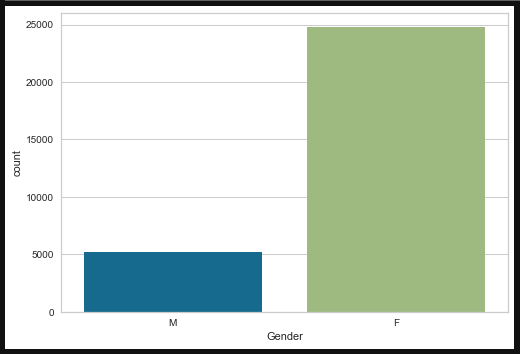
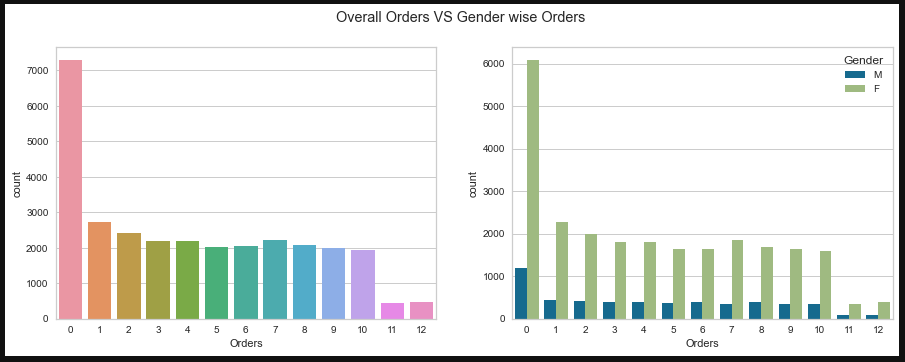
Countplot (To get gender count and Prior orders count)
Heatmap (To find the Correlation)
Histogram (To get know how the data is distributed)
Below are some of the charts that I have plotted
Perform the data scaling using minmaxscaler and data will be scaled between 0 and 1.
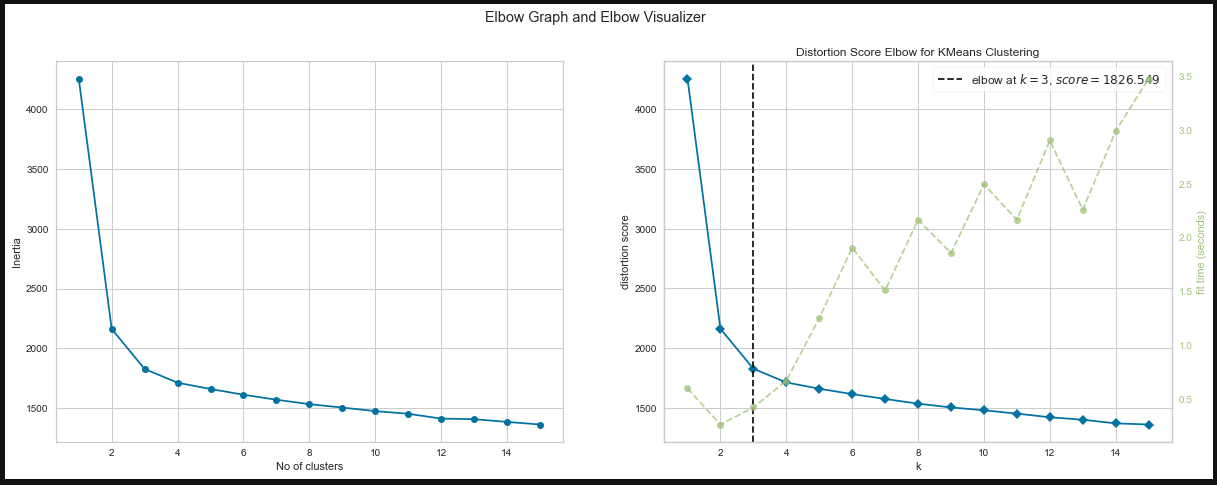
Implement the Elbow method or Silhouette method to find the optimum number of K. Also visualize them with plots.
After getting optimum K value use it as number of clusters and perform the model fit.
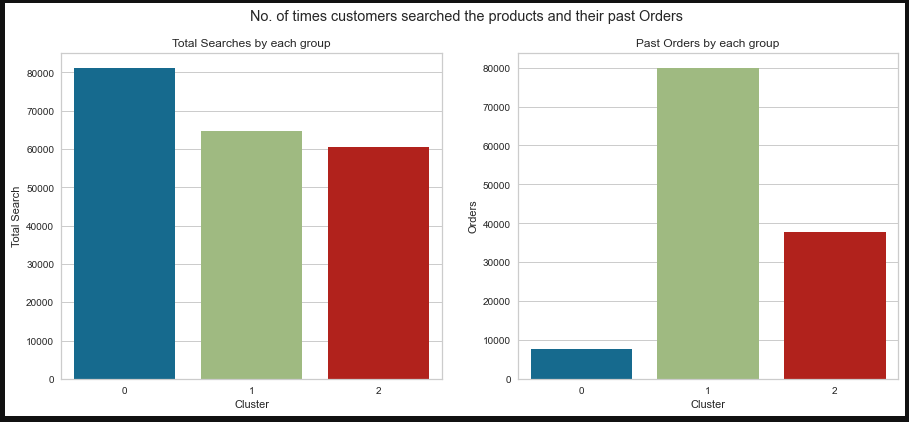
The model will provide the output with different clusters.
Analyed each clusters using visualization techniques to find the insights.
Build and deploy a Java Springboot microservice application on Azure Kubernetes Service (AKS)
Updates:
June 13th 2018:AKS is generally available in 10 regions. The list of supported regions for AKS can be found here.
Sep. 10th 2018: Visual Studio Team Services has been renamed to Azure DevOps Services. Due to this recent change, for the remainder of this text, VSTS, Visual Studio Team Services and Azure DevOps are used interchangably to refer to Microsoft’s Open DevOps Platform.
Description:
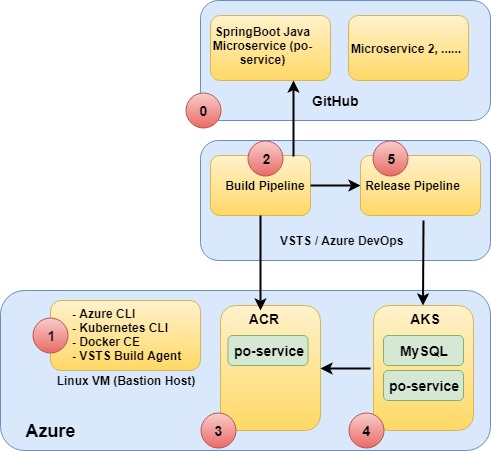
In a nutshell, you will work on the following tasks.
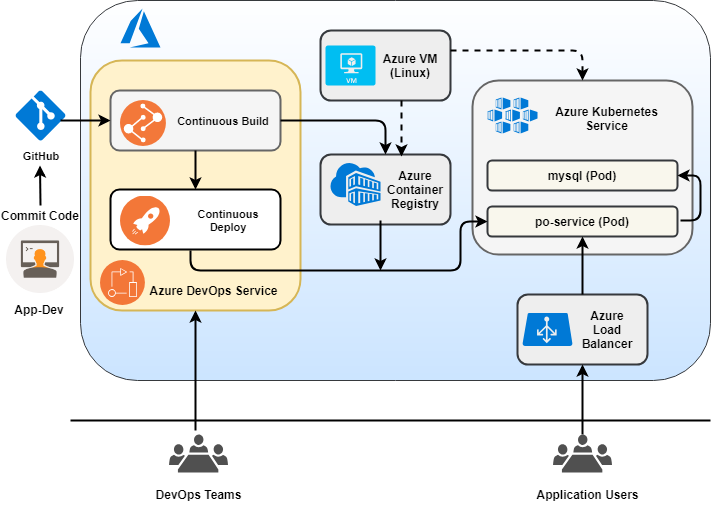
Define a Build Pipeline in Azure DevOps Services. Execute the build pipeline to package a containerized Springboot Java Microservice Application (po-service 1.0) and push it to ACR (Azure Container Registry). This task focuses on the Continuous Integration aspect of the DevOps process. Complete Steps [A] thru [C].
Deploy an AKS (Azure Kubernetes Service) Kubernetes cluster and manually deploy the containerized microservice application on AKS. Complete Step [D].
Define a Release Pipeline in Azure DevOps Services. Execute both build and release pipelines in Azure DevOps in order to update and re-deploy the SpringBoot microservice (po-service 2.0) application on AKS. This task focuses on the Continuous Deployment aspect of the DevOps process. Complete Step [E].
Define Azure DevOps pipelines to build and deploy a custom Jenkins Container on AKS. Then define and execute a Continuous Delivery pipeline in Jenkins to build and deploy the Springboot Java Microservice (po-service) Application on AKS. This task focuses on the Continuous Delivery aspect of the DevOps process. Complete extension Jenkins CI/CD.
This Springboot application demonstrates how to build and deploy a Purchase Order microservice (po-service) as a containerized application on Azure Kubernetes Service (AKS) on Microsoft Azure. The deployed microservice supports all CRUD operations on purchase orders.
Prerequisites:
An active Microsoft Azure Subscription. You can obtain a free Azure subscription by accessing the Microsoft Azure website. In order to execute all the labs in this project, either your Azure subscription or the Resource Groupmust have Owner Role assigned to it.
A GitHub Account to fork and clone this GitHub repository.
A Azure DevOps Services (formerly Visual Studio Team Services) Account. You can get a free account by accessing the Azure DevOps Services web page.
Review Overview of Azure Cloud Shell. Azure Cloud Shell is an interactive, browser accessible shell for managing Azure resources. You will be using the Cloud Shell to create the Bastion Host (Linux VM).
This project assumes readers are familiar with Linux containers (eg., docker, OCI runc, Clear Containers ...), Container Platforms (eg., Kubernetes), DevOps (Continuous Integration/Continuous Deployment) concepts and developing/deploying Microservices. As such, this project is primarily targeted at technical/solution architects who have a good understanding of some or all of these solutions/technologies. If you are new to Linux Containers/Kubernetes and/or would like to get familiar with container solutions available on Microsoft Azure, please go thru the hands-on labs that are part of the MTC Container Bootcamp first.
A terminal emulator is required to login (SSH) into the Linux VM (Bastion) host. Download and install Putty or Windows Sub-System for Linux.
(Optional) Download and install Postman App, a REST API Client used for testing the Web API’s.
Functional Architecture:
For easy and quick reference, readers can refer to the following on-line resources as needed.
AKS is a managed Kubernetes service on Azure. Please refer to the AKS product web page for more details.
This project has been tested on both an unmanaged (Standalone) Kubernetes cluster v1.9.x and on AKS v1.9.1+. Kubernetes artifacts such as manifest files for application Deployments may not work as-is on AKS v1.8.x. Some of these objects are Beta level objects in Kubernetes v1.8.x and therefore version info. for the corresponding API objects will have to be changed in the manifest files prior to deployment to AKS.
Commands which are required to be issued on a Linux terminal window are prefixed with a $ sign. Lines that are prefixed with the # symbol are to be treated as comments.
This project requires all resources to be deployed to the same Azure Resource Group.
Specify either eastus, westus, westus2 or centralus as the location for the Azure Resource Group and the AKS cluster.
A] Deploy a Linux CentOS VM on Azure (~ Bastion Host)
Approx. time to complete this section: 45 minutes
As a first step, we will deploy a Linux VM (CentOS) on Azure and install prerequisite CLI tools on it. This VM will serve as a jump box (Bastion host) and allow us to manage PaaS services on Azure using CLI.
The following tools (binaries) will be installed on this VM.
VSTS build agent (docker container). This build container will be used for running application and container builds.
Azure CLI 2.0 client. Azure CLI will be used to administer and manage all Azure resources including the AKS cluster resources.
Git client. We will be cloning this repository to make changes to the Kubernetes resources before deploying them to the AKS cluster.
OpenJDK, Maven and Jenkins. If you would like to learn how to build and deploy this SpringBoot microservice to AKS using Jenkins CI/CD, then you will also need to install Java run-time (OpenJDK), Maven and Jenkins.
Kubernetes CLI (kubectl). This binary will be used for managing resources on Kubernetes (AKS).
Helm CLI (helm). Helm is a package manager for Kubernetes and is used for automating the deployment of applications comprised of multiple microservices on Kubernetes.
Kubernetes Service Catalog. Service Catalog will be used for dynamically provisioning PaaS services on Azure.
Follow the steps below to create the Bastion host (Linux VM), install pre-requisite software (CLI) on this VM, and run the VSTS build agent.
Login to the Azure Portal using your credentials and use a Azure Cloud Shell session to perform the next steps. Azure Cloud Shell is an interactive, browser-accessible shell for managing Azure resources. The first time you access the Cloud Shell, you will be prompted to create a resource group, storage account and file share. You can use the defaults or click on Advanced Settings to customize the defaults. Accessing the Cloud Shell is described in Overview of Azure Cloud Shell.
An Azure resource group is a logical container into which Azure resources are deployed and managed. From the Cloud Shell, use Azure CLI to create a Resource Group. Azure CLI is already pre-installed and configured to use your Azure account (subscription) in the Cloud Shell. Alternatively, you can also use Azure Portal to create this resource group.
# Create the resource group
$ az group create --name myResourceGroup --location eastus
NOTE: Keep in mind, if you specify a different name for the resource group (other than myResourceGroup), you will need to substitute the same value in multiple CLI commands in the remainder of this project! If you are new to Azure or AKS, it’s best to use the suggested name.
Use the command below to create a CentOS 7.4 VM on Azure. Make sure you specify the correct resource group name and provide a value for the password. Once the command completes, it will print the VM connection info. in the JSON message (response). Note down the Public IP address, Login name and Password info. so that we can connect to this VM using SSH (secure shell).
Alternatively, if you prefer you can use SSH based authentication to connect to the Linux VM. The steps for creating and using an SSH key pair for Linux VMs in Azure is documented here. You can then specify the location of the public key with the --ssh-key-path option to the az vm create ... command.
# Remember to specify the password for the 'labuser'.
$ az vm create --resource-group myResourceGroup --name k8s-lab --image OpenLogic:CentOS:7.4:7.4.20180118 --size Standard_B2s --generate-ssh-keys --admin-username labuser --admin-password <password> --authentication-type password
# When the above command exits, it will print the public IP address, login name (labuser) and password.  Make a note of these values.
NOTE: Use of Cloud Shell to SSH into the VM is NOT recommended.
# SSH into the VM.  Substitute the public IP address for the Linux VM in the command below.
$ ssh labuser@x.x.x.x
#
Install Azure CLI, Kubernetes CLI, Helm CLI, Service Catalog CLI, Git client, Open JDK, Jenkins and Maven on this VM. If you are a Linux power user and would like to save yourself some typing time, use this shell script to install all the pre-requisite CLI tools.
# Install Azure CLI on this VM so that we can to deploy this application to the AKS cluster later in step [D].## Import the Microsoft repository key.
$ sudo rpm --import https://packages.microsoft.com/keys/microsoft.asc
## Create the local azure-cli repository information.
$ sudo sh -c 'echo -e "[azure-cli]\nname=Azure CLI\nbaseurl=https://packages.microsoft.com/yumrepos/azure-cli\nenabled=1\ngpgcheck=1\ngpgkey=https://packages.microsoft.com/keys/microsoft.asc" > /etc/yum.repos.d/azure-cli.repo'## Install with the yum install command.
$ sudo yum install azure-cli
## Test the install
$ az -v
## Login to your Azure account
$ az login -u <user name> -p <password>## View help on az commands, sub-commands
$ az --help
## Install Git client
$ sudo yum install git
## Check Git version number
$ git --version
## Install OpenJDK 8 on the VM.
$ sudo yum install -y java-1.8.0-openjdk-devel
## Check JDK version
$ java -version
## Install Jenkins 2.138.1
$ mkdir jenkins
$ cd jenkins
$ wget http://mirrors.jenkins.io/war-stable/latest/jenkins.war
## Switch back to home directory
$ cd## Install Maven 3.5.4
$ mkdir maven
$ cd maven
$ wget http://www-eu.apache.org/dist/maven/maven-3/3.5.4/binaries/apache-maven-3.5.4-bin.tar.gz
$ tar -xzvf apache-maven-3.5.4-bin.tar.gz
## Switch back to home directory
$ cd## Install Helm v2.11.0# Create a new directory 'Helm' under home directory to store the helm binary
$ mkdir helm
$ cd helm
$ wget https://storage.googleapis.com/kubernetes-helm/helm-v2.11.0-linux-amd64.tar.gz
$ tar -xzvf helm-v2.11.0-linux-amd64.tar.gz
## Switch back to home directory
$ cd## Install Kubernetes CLI# Create a new directory 'aztools' under home directory to store the kubectl binary
$ mkdir aztools
## Install kubectl binary in the new directory
$ az aks install-cli --install-location=./aztools/kubectl
## Install Service Catalog 'svcat' binary in 'aztools' directory
$ cd aztools
$ curl -sLO https://servicecatalogcli.blob.core.windows.net/cli/latest/$(uname -s)/$(uname -m)/svcat
$ chmod +x ./svcat
# Switch back to home directory
$ cd## Finally, update '.bashrc' file and set the path to Maven, Helm and Kubectl binaries
$ KUBECLI=/home/labuser/aztools
$ MAVEN=/home/labuser/maven/apache-maven-3.5.4/bin
$ HELM=/home/labuser/helm/linux-amd64
$ echo"export PATH=$MAVEN:$KUBECLI:$HELM:${PATH}">>~/.bashrc
#
Next, install docker-ce container runtime. Refer to the commands below. You can also refer to the Docker CE install docs for CentOS.
LOGOUT AND RESTART YOUR LINUX VM BEFORE PROCEEDING. You can restart the VM via Azure Portal. Once the VM is back up, log back in to the Linux VM via SSH. Run the command below to verify docker engine is running.
$ docker info
Pull the Microsoft VSTS agent container from docker hub. It will take approx. 20 to 30 minutes to download the image (~ 10+ GB). Take a break and get some coffee!
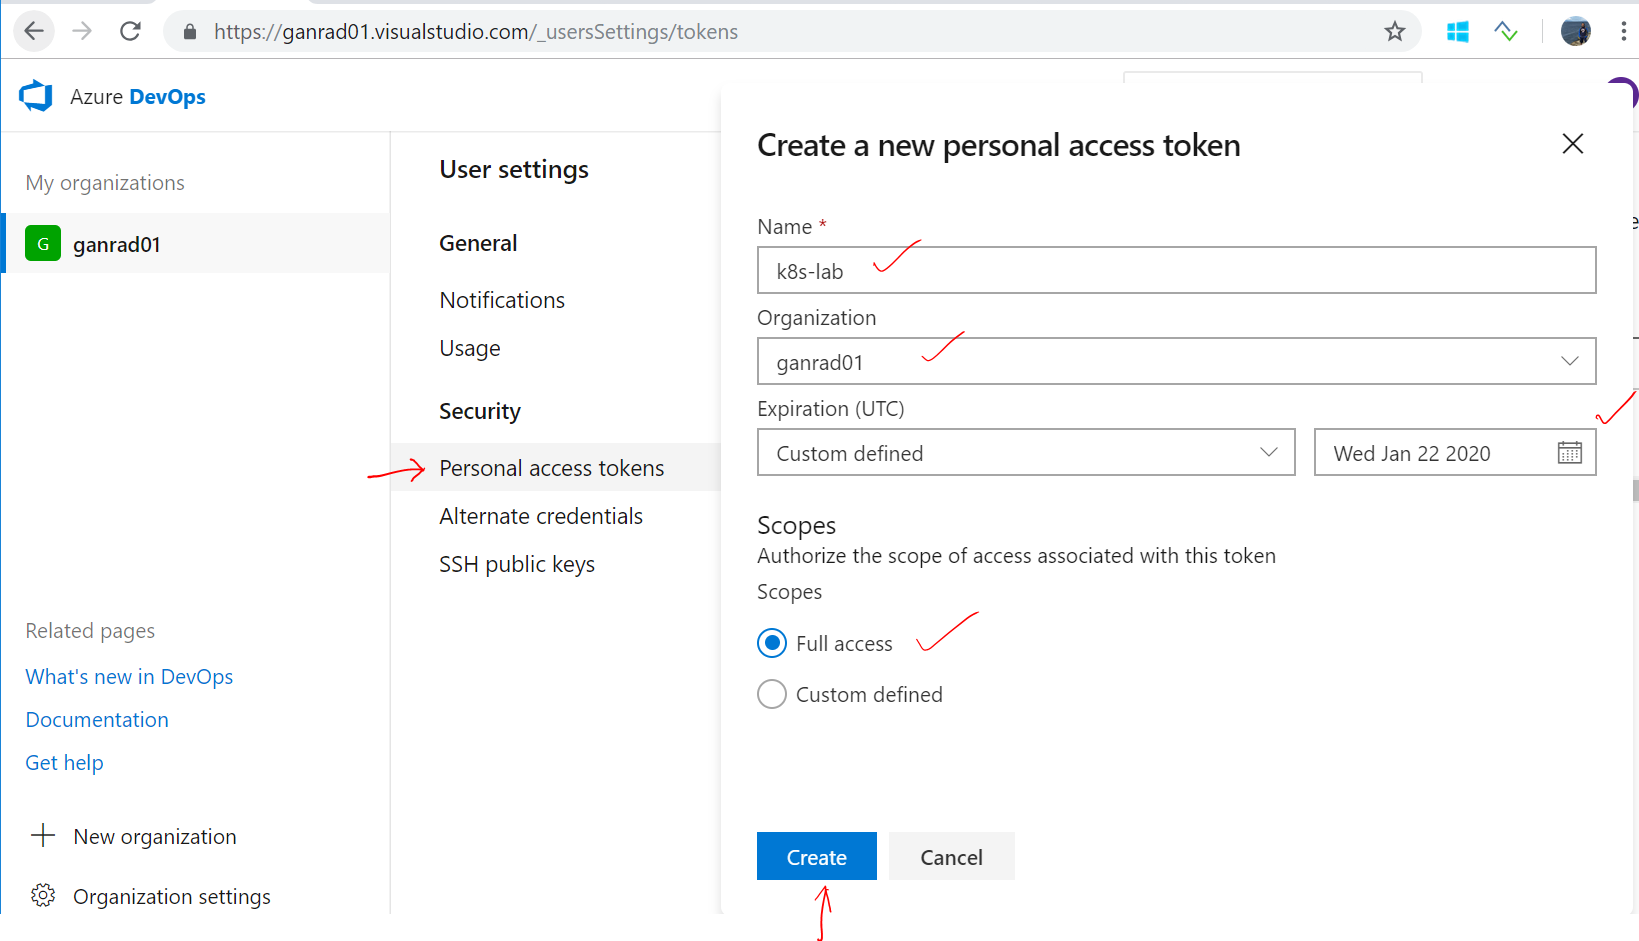
Next, we will generate a Azure DevOps Services personal access token (PAT) to connect our VSTS build agent to your Azure DevOps account. Open a browser tab and login to Azure DevOps using your account ID. In the upper right, click on your profile image and click Security.
Click on + New Token to create a new PAT. In the Create a new personal access token tab, provide a short Name for the token, select Expiration, select Full access for Scopes and click Create. See screenshot below.
In the next page, make sure to copy and store the PAT (token) into a file. Keep in mind, you will not be able to retrieve this token again. Incase you happen to lose or misplace the token, you will need to generate a new PAT and use it to reconfigure the VSTS build agent. Save this PAT (token) to a file.
In the Linux VM terminal window, use the command below to start the VSTS build container. Refer to the table below to set the build container parameter values correctly.
Parameter
Value
VSTS_TOKEN
VSTS PAT Token. This is the value which you copied and saved in a file in the previous step.
VSTS_ACCOUNT
VSTS Organization name. An Org. is a container for DevOps projects in Azure DevOps (VSTS) platform. It’s usually the first part (Prefix) of the VSTS URL (eg., Prefix.visualstudio.com). If you are using Azure DevOps URL, then it is the last part (ContextPath) of the URL (eg., dev.azure.com/ContextPath).
The VSTS build agent will initialize and you should see a message indicating “Listening for Jobs”. See below.
Determining matching VSTS agent...
Downloading and installing VSTS agent...

>> End User License Agreements:

Building sources from a TFVC repository requires accepting the Team Explorer Everywhere End User License Agreement. This step is not required for building sources from Git repositories.

A copy of the Team Explorer Everywhere license agreement can be found at:
  /vsts/agent/externals/tee/license.html


>> Connect:

Connecting to server ...

>> Register Agent:

Scanning for tool capabilities.
Connecting to the server.
Successfully added the agent
Testing agent connection.
2018-09-17 16:59:56Z: Settings Saved.
Scanning for tool capabilities.
Connecting to the server.
2018-09-17 16:59:59Z: Listening for Jobs
Minimize this terminal window for now as you will only be using it to view the results of a VSTS build. Before proceeding, open another terminal (WSL Ubuntu/Putty) window and login (SSH) into the Linux VM.
B] Deploy Azure Container Registry (ACR)
Approx. time to complete this section: 10 minutes
In this step, we will deploy an instance of Azure Container Registry to store container images which we will build in later steps. A container registry such as ACR allows us to store multiple versions of application container images in one centralized repository and consume them from multiple nodes (VMs/Servers) where our applications are deployed.
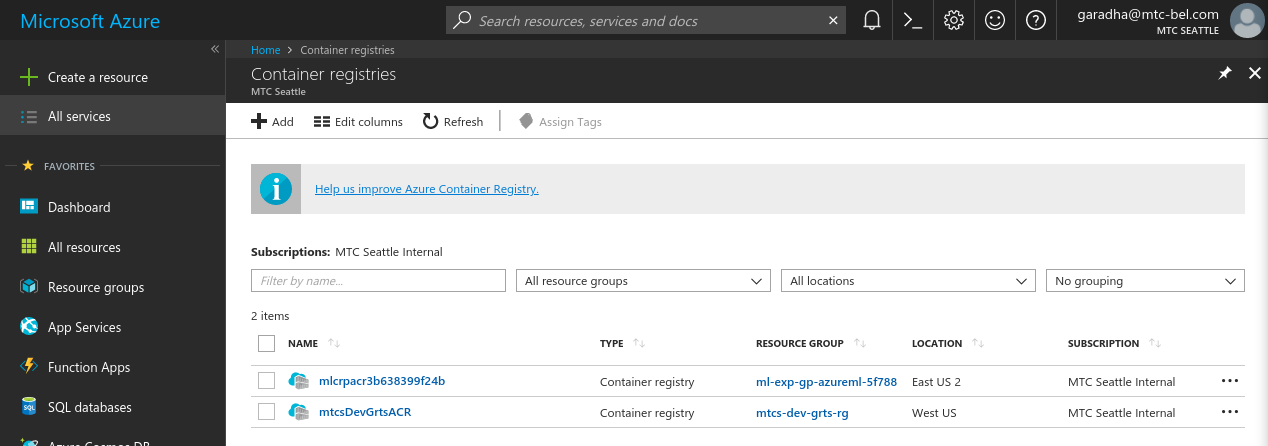
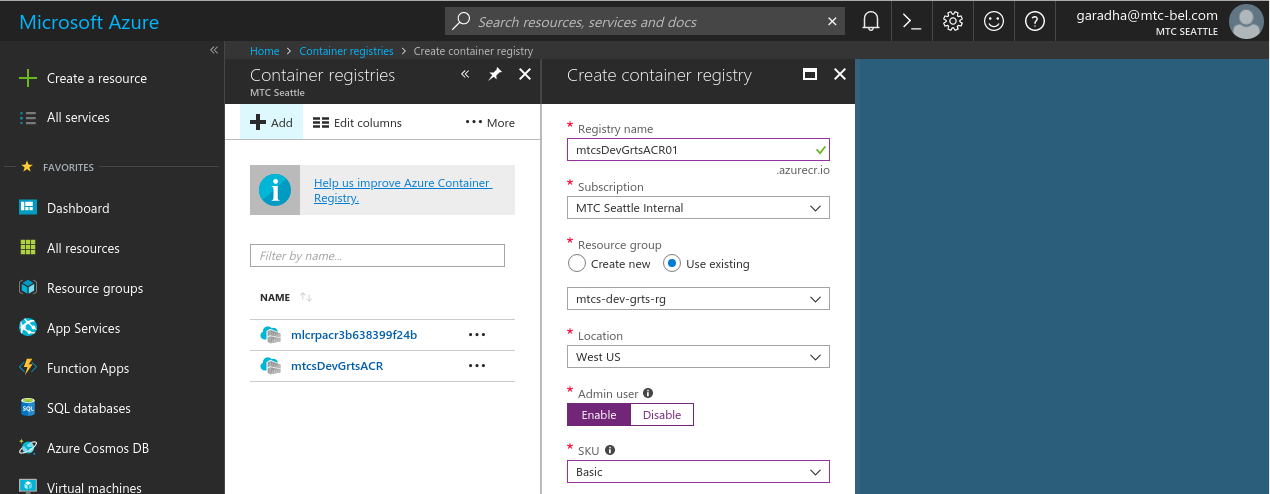
Login to your Azure portal account. Then click on Container registries in the navigational panel on the left. If you don’t see this option in the nav. panel then click on All services, scroll down to the COMPUTE section and click on the star beside Container registries. This will add the Container registries option to the service list in the navigational panel. Now click on the Container registries option. You will see a page as displayed below.
Click on Add to create a new ACR instance. Give a meaningful name to your registry and make a note of it. Select an Azure Subscription, select the Resource group which you created in Section [A] and leave the Location field as-is. The location should default to the location assigned to the resource group. Select the Basic pricing tier. Click Create when you are done.
C] Create a Build Pipeline in Azure DevOps to deploy the Springboot microservice
Approx. time to complete this section: 1 Hour
In this step, we will define the tasks for building the microservice (binary artifacts) application and packaging (layering) it within a docker container. The build tasks use Maven to build the Springboot microservice & docker-compose to build the application container. During the application container build process, the application binary is layered on top of a base docker image (CentOS 7). Finally, the built application container is pushed into ACR which we deployed in step [B] above.
Before proceeding with the next steps, feel free to inspect the dockerfile and source files in the GitHub repository (under src/…). This will give you a better understanding of how continuous integration (CI) can be easily implemented using Azure DevOps.
Fork this GitHub repository to your GitHub account. In the browser window, click on Fork in the upper right hand corner to get a separate copy of this project added to your GitHub account. You must be signed in to your GitHub account in order to fork this repository.
From the terminal window connected to the Bastion host (Linux VM), clone this repository. Ensure that you are using the URL of your fork when cloning this repository.
# Switch to home directory
$ cd# Clone your GitHub repository. This will allow you to make changes to the application artifacts without affecting resources in the forked (original) GitHub project.
$ git clone https://github.com/<YOUR-GITHUB-ACCOUNT>/k8s-springboot-data-rest.git
## Switch to the 'k8s-springboot-data-rest' directory
$ cd k8s-springboot-data-rest
Create an Azure Service Principal (SP) and assign Contributor role access to the ACR created in Section [B]. This SP will be used in a subsequent lab (Jenkins-CI-CD) to push the po-service container image into ACR and re-deploy the microservice to AKS.
Execute the shell script ./shell-scripts/jenkins-acr-auth.sh in the Linux VM (Bastion Host) terminal window. The command output will be displayed on the console and also saved to a file (SP_ACR.txt) in the current directory. Before running the shell script, open it in ‘vi’ editor (or ‘nano’) and specify the correct values for variables ‘ACR_RESOURCE_GROUP’ and ‘ACR_NAME’.
# Enable execute permission for this script
$ chmod 700 ./shell-scripts/jenkins-acr-auth.sh
## Specify the correct values for `ACR_RESOURCE_GROUP` and `ACR_NAME` in this shell script before running it
$ ./shell-scripts/jenkins-acr-auth.sh
# Make sure the 'SP_ACR.txt' file got created in the current working directory
$ cat SP_ACR.txt
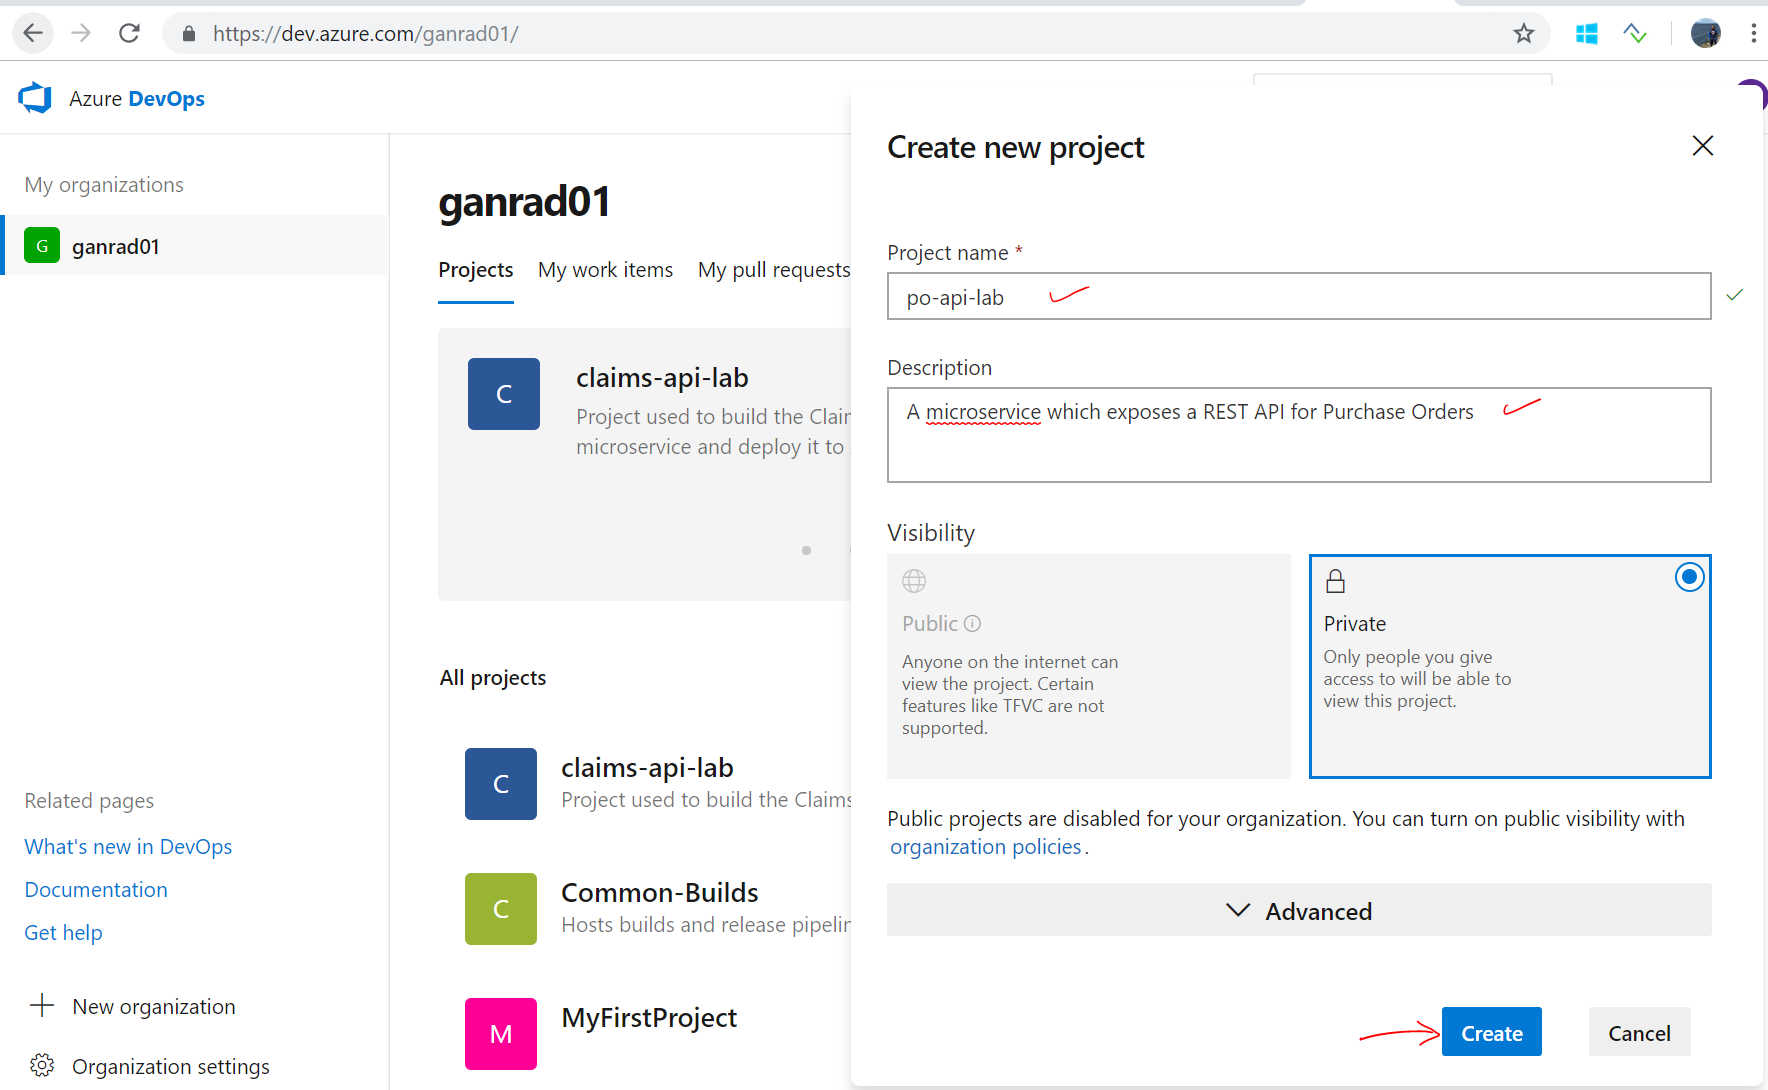
If you haven’t already done so, login to Azure DevOps Services using your Microsoft Live ID (or Azure AD ID) and create an Organization. Give the Organization a meaningful name (eg., Your initials-AzureLab) and then create a new DevOps project. Give a name to your project.
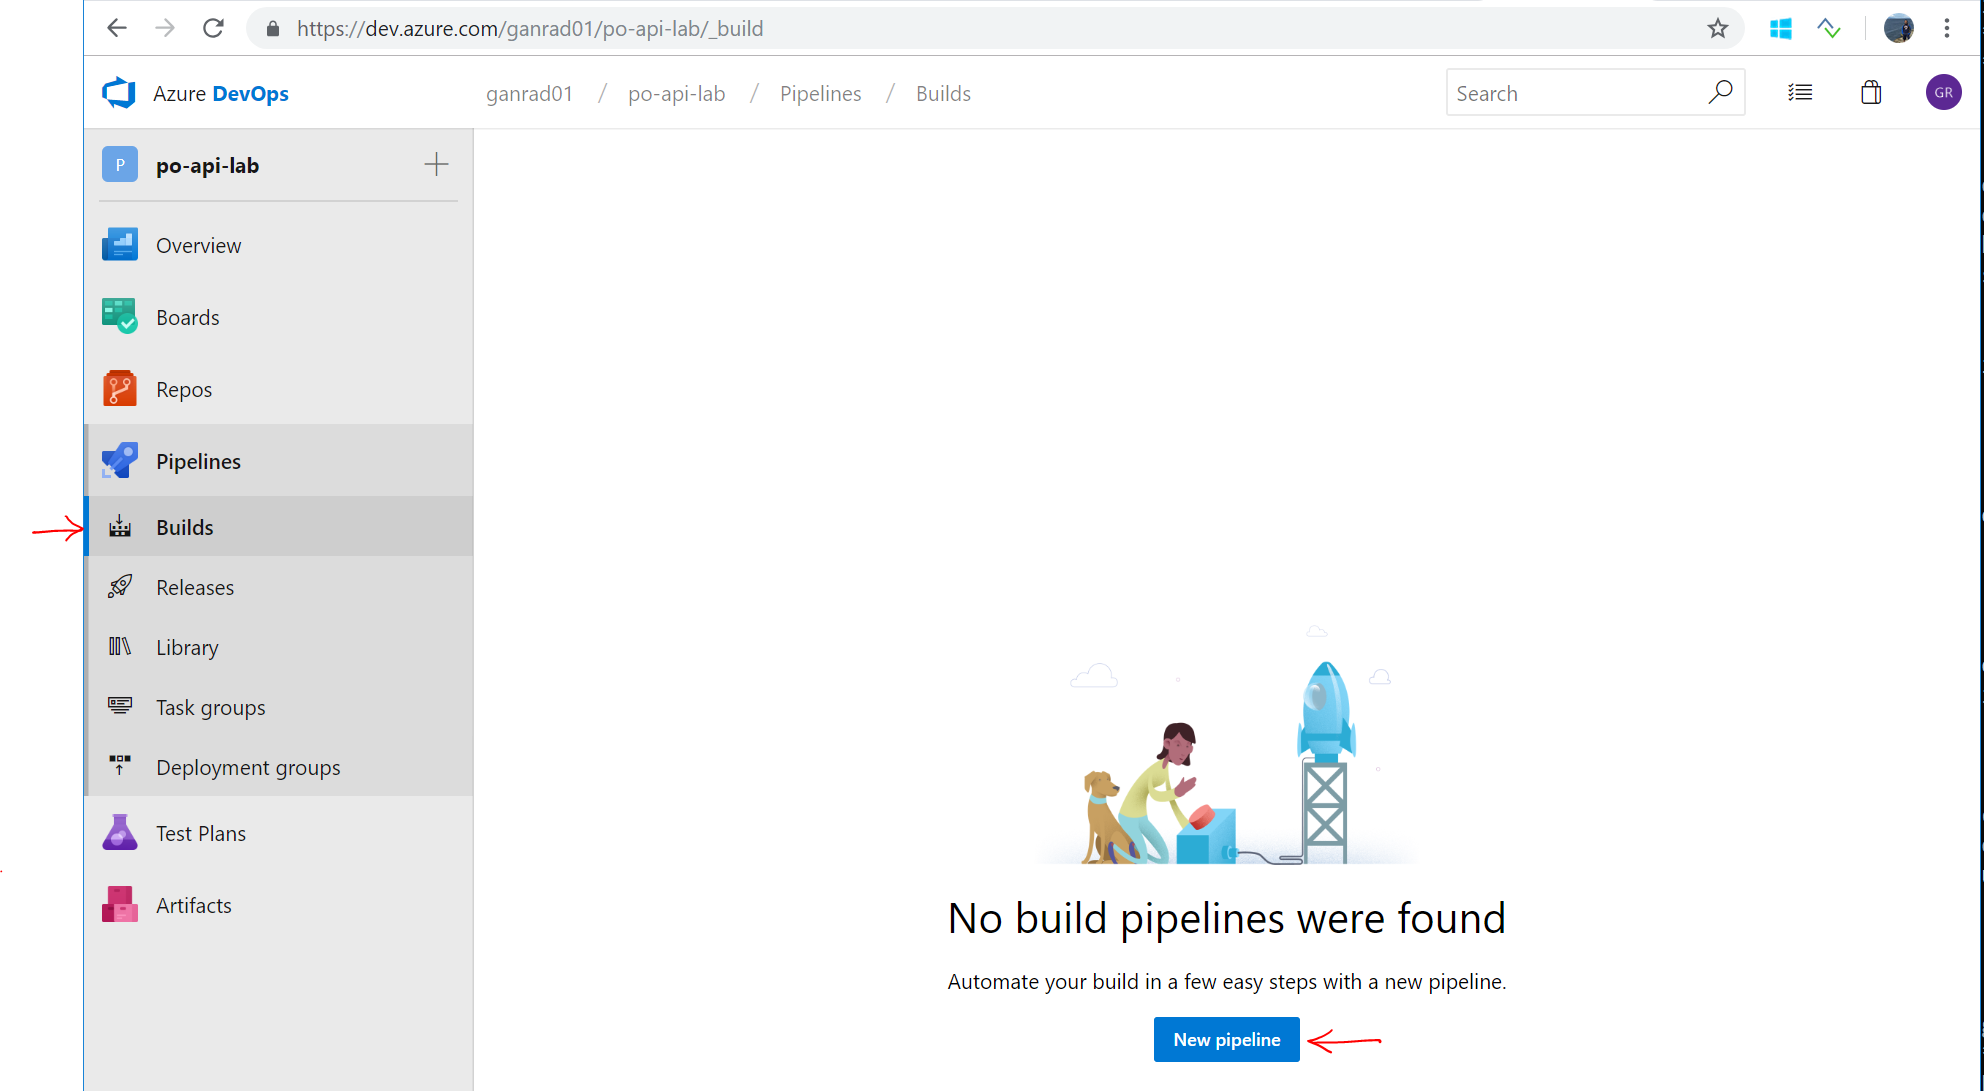
We will now create a Build definition and define tasks which will execute as part of the application build process. Click on Pipelines in the left navigational menu and then select Builds. Click on New pipeline.
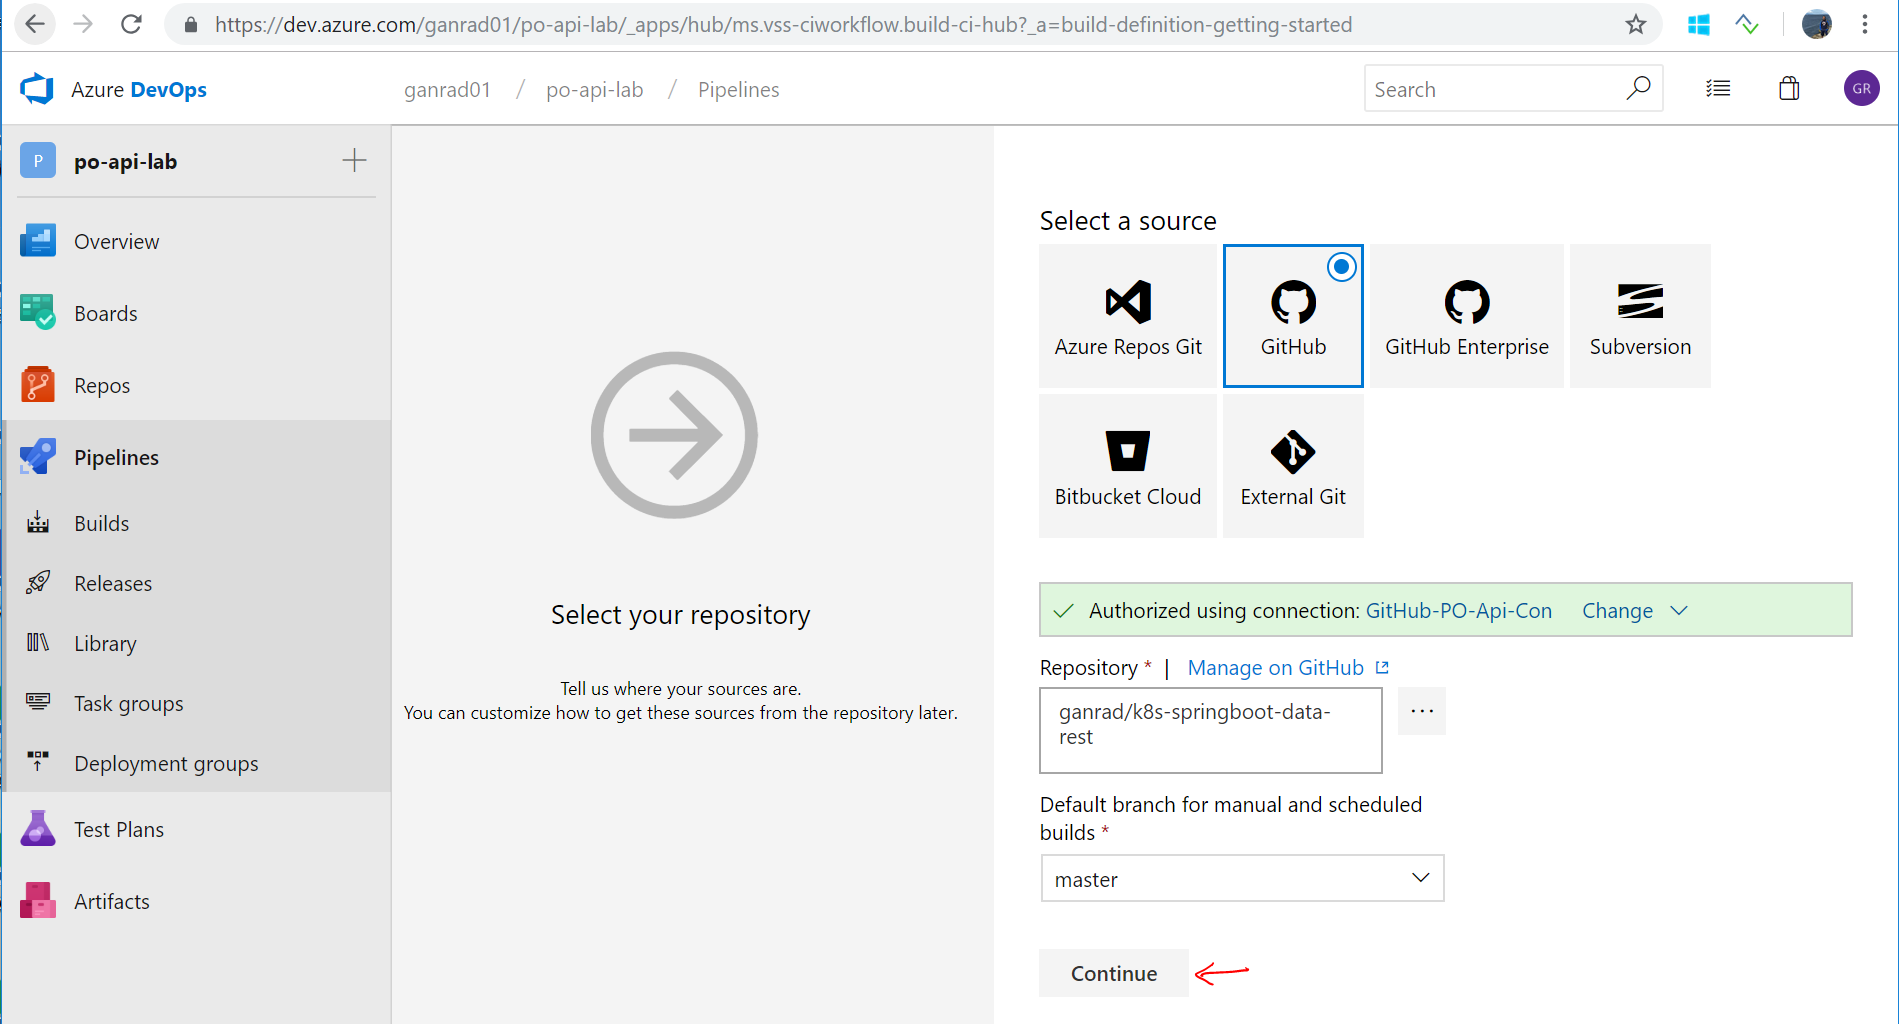
In the Select a source page, select GitHub as the source repository. Give your connection a name and then select Authorize using OAuth link. Optionally, you can use a GitHub personal access token instead of OAuth. When prompted, sign in to your GitHub account. Then select Authorize to grant access to your Azure DevOps account.
Once authorized, select the GitHub Repo which you forked in step [1] above. Make sure you replace the account name in the GitHub URL with your account name. Then hit continue.
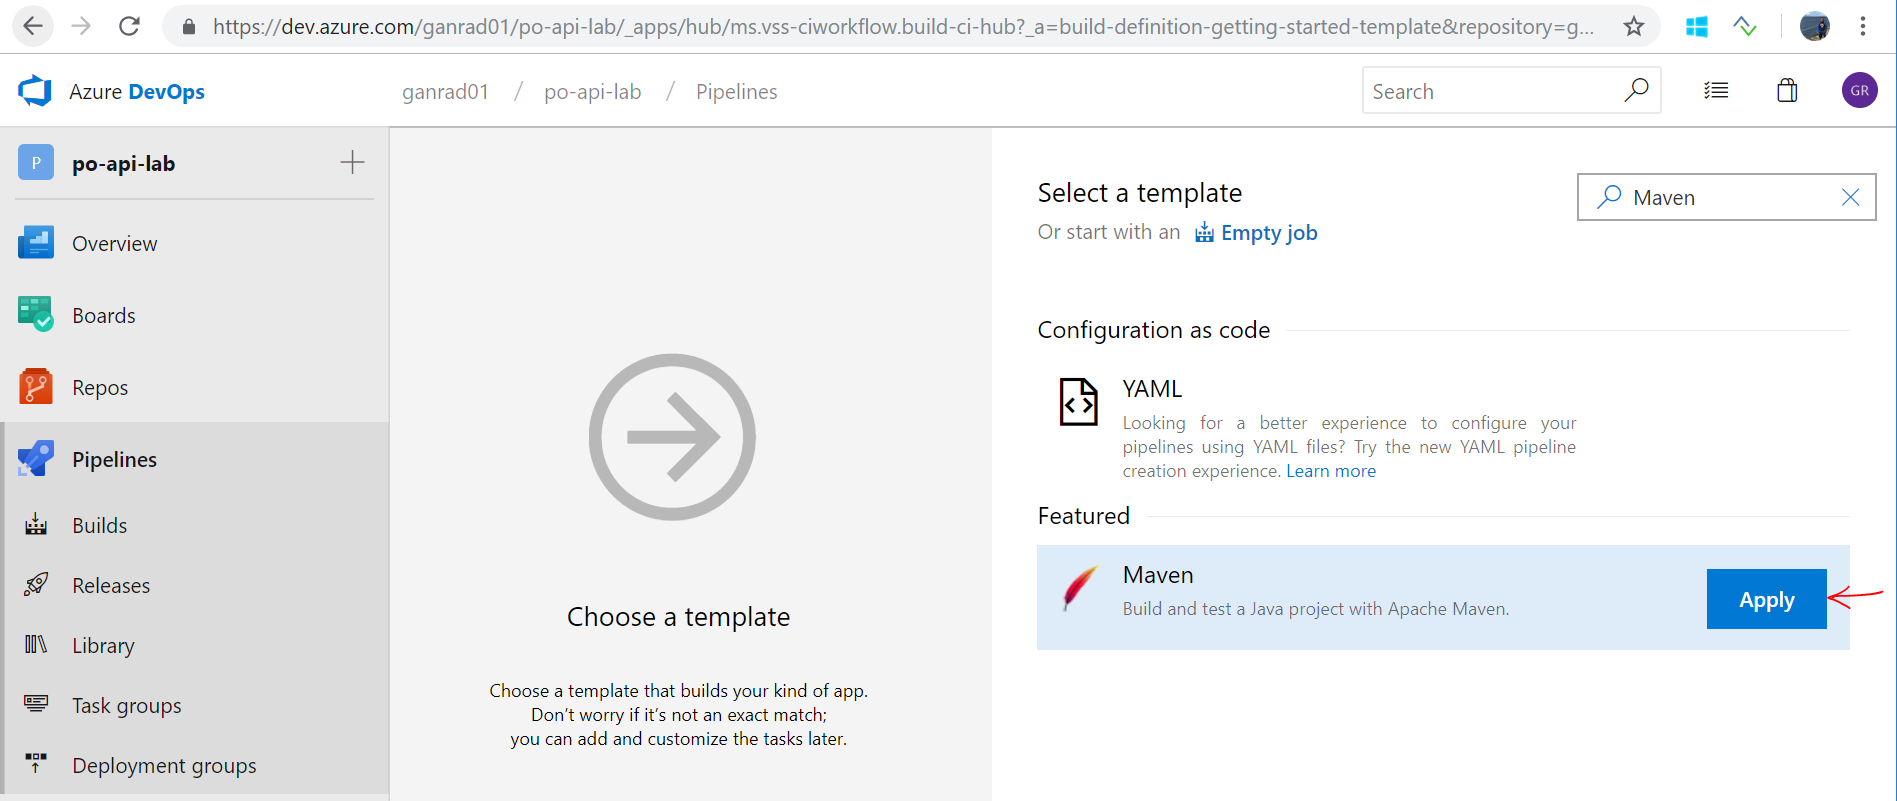
Search for text Maven in the Select a template field and then select Maven build. Then click apply.
Select Default in the Agent Queue field. The VSTS build agent which you deployed in step [A] connects to this queue and listens for build requests.
Save the build pipeline before proceeding.
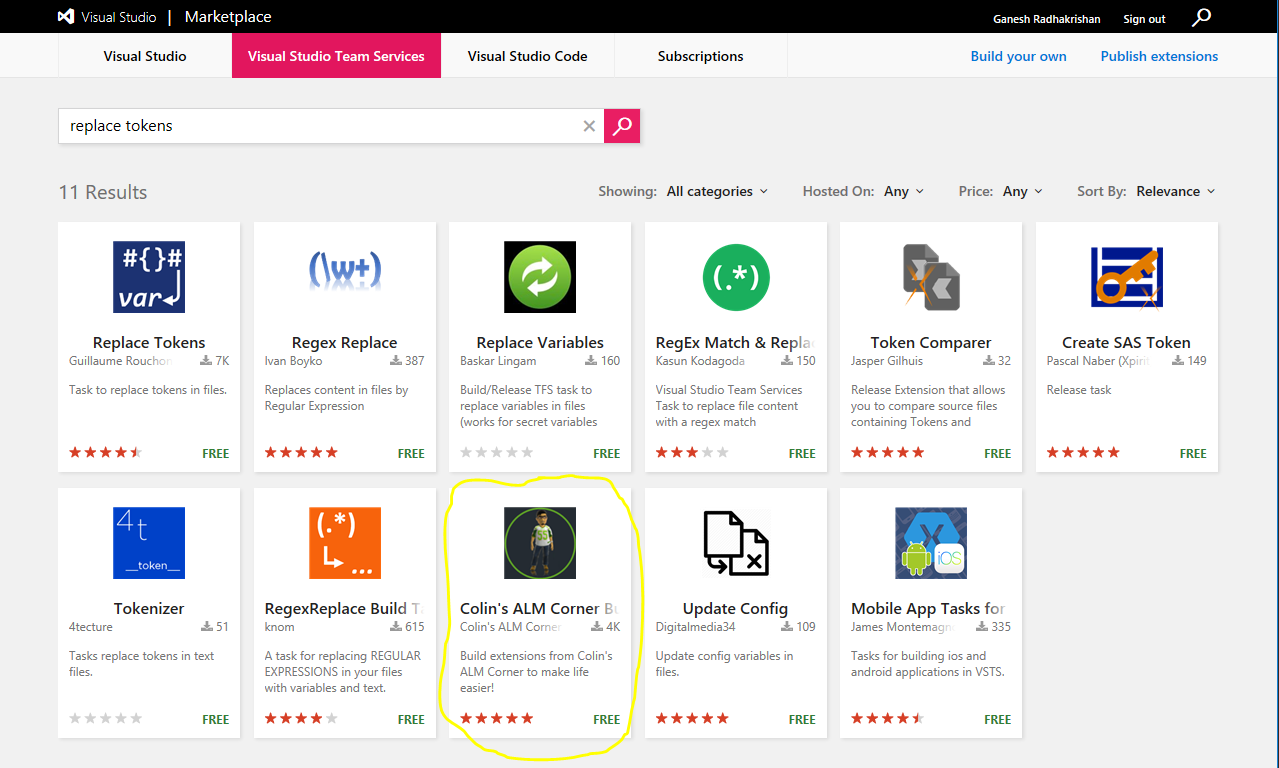
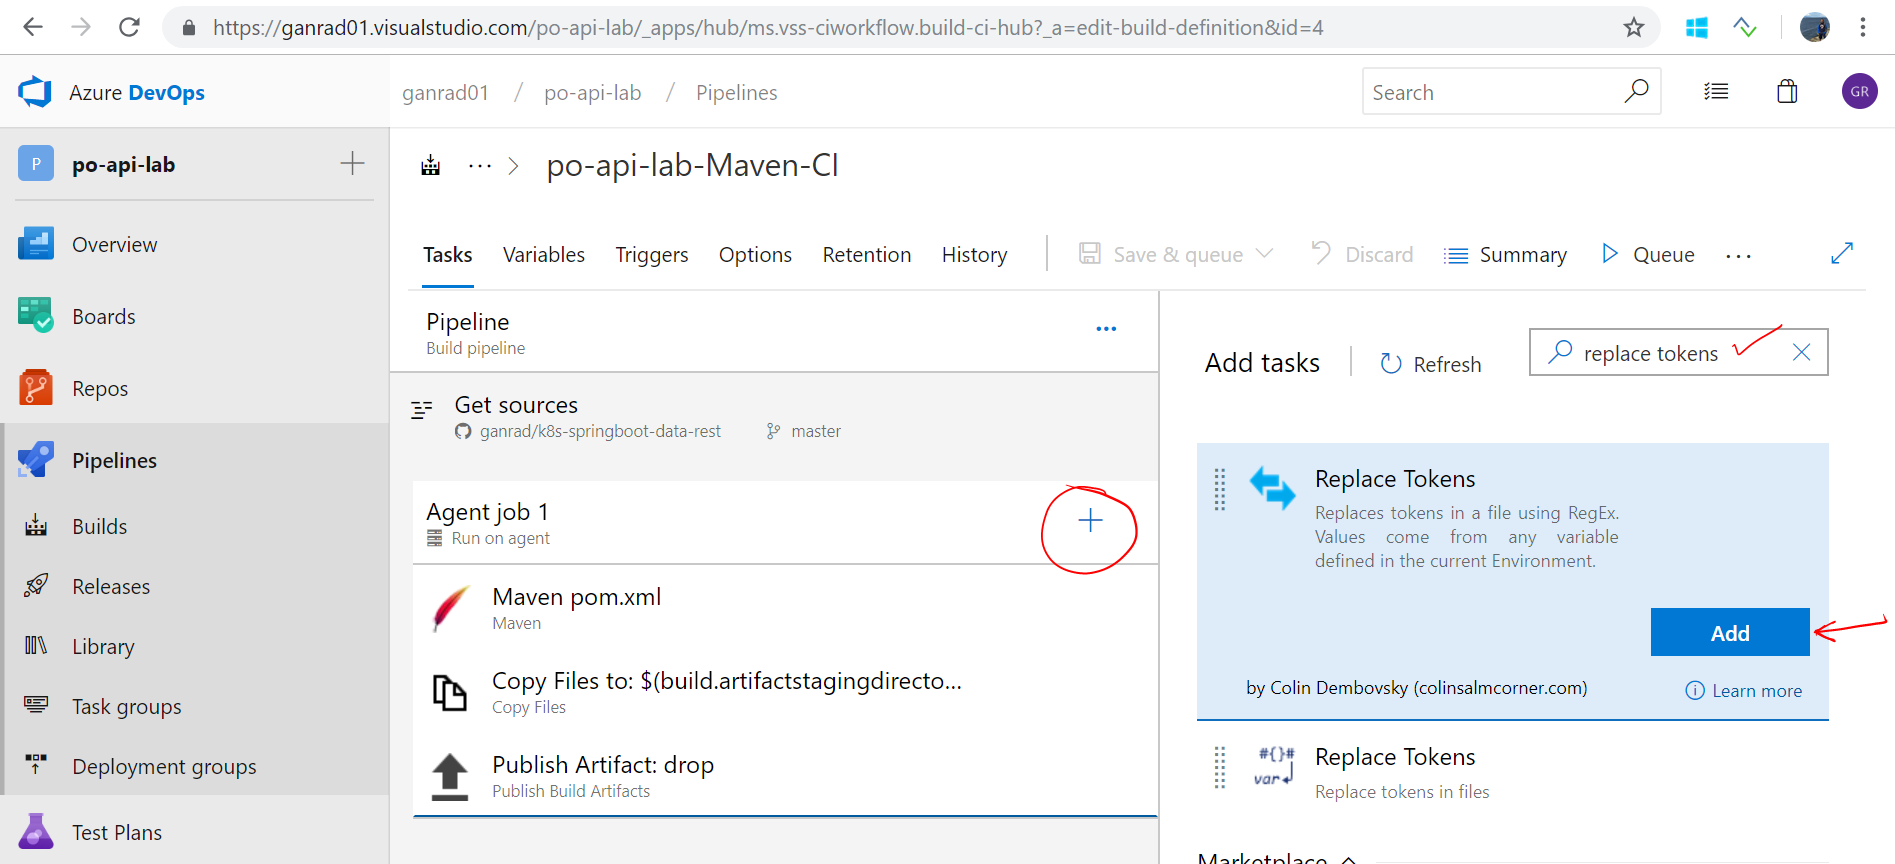
On the top extensions menu in Azure DevOps, click on Browse Markplace (Bag icon). Then search for text replace tokens. In the results list below, click on Colin’s ALM Corner Build and Release Tools (circled in yellow in the screenshot). Then click on Get it free to install this extension in your Azure DevOps account.
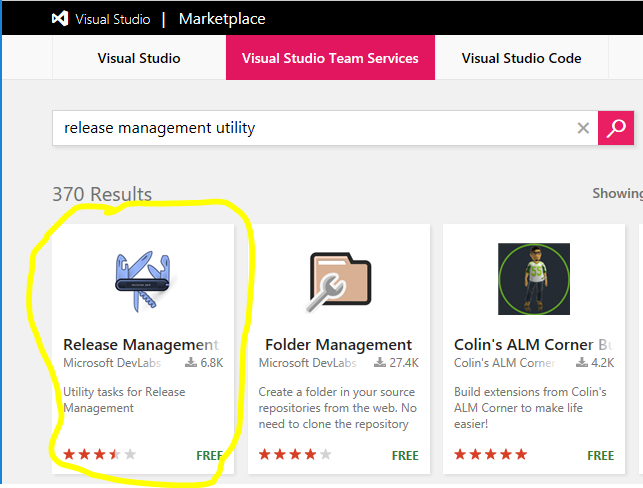
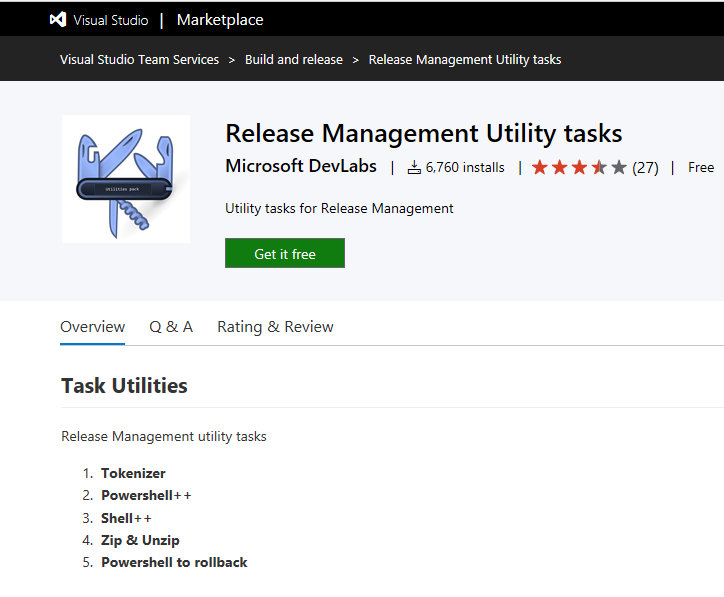
Next, search for text Release Management Utility Tasks extension provided by Microsoft DevLabs. This extension includes the Tokenizer utility which we will be using in a continuous deployment (CD) step later on in this project. Click on Get it free to install this extension in your Azure DevOps account. See screenshot below.
Go back to your build definition and click on the plus symbol beside Agent job 1. Search by text replace tokens and then select the extension Replace Tokens which you just installed in the previous step. Click Add.
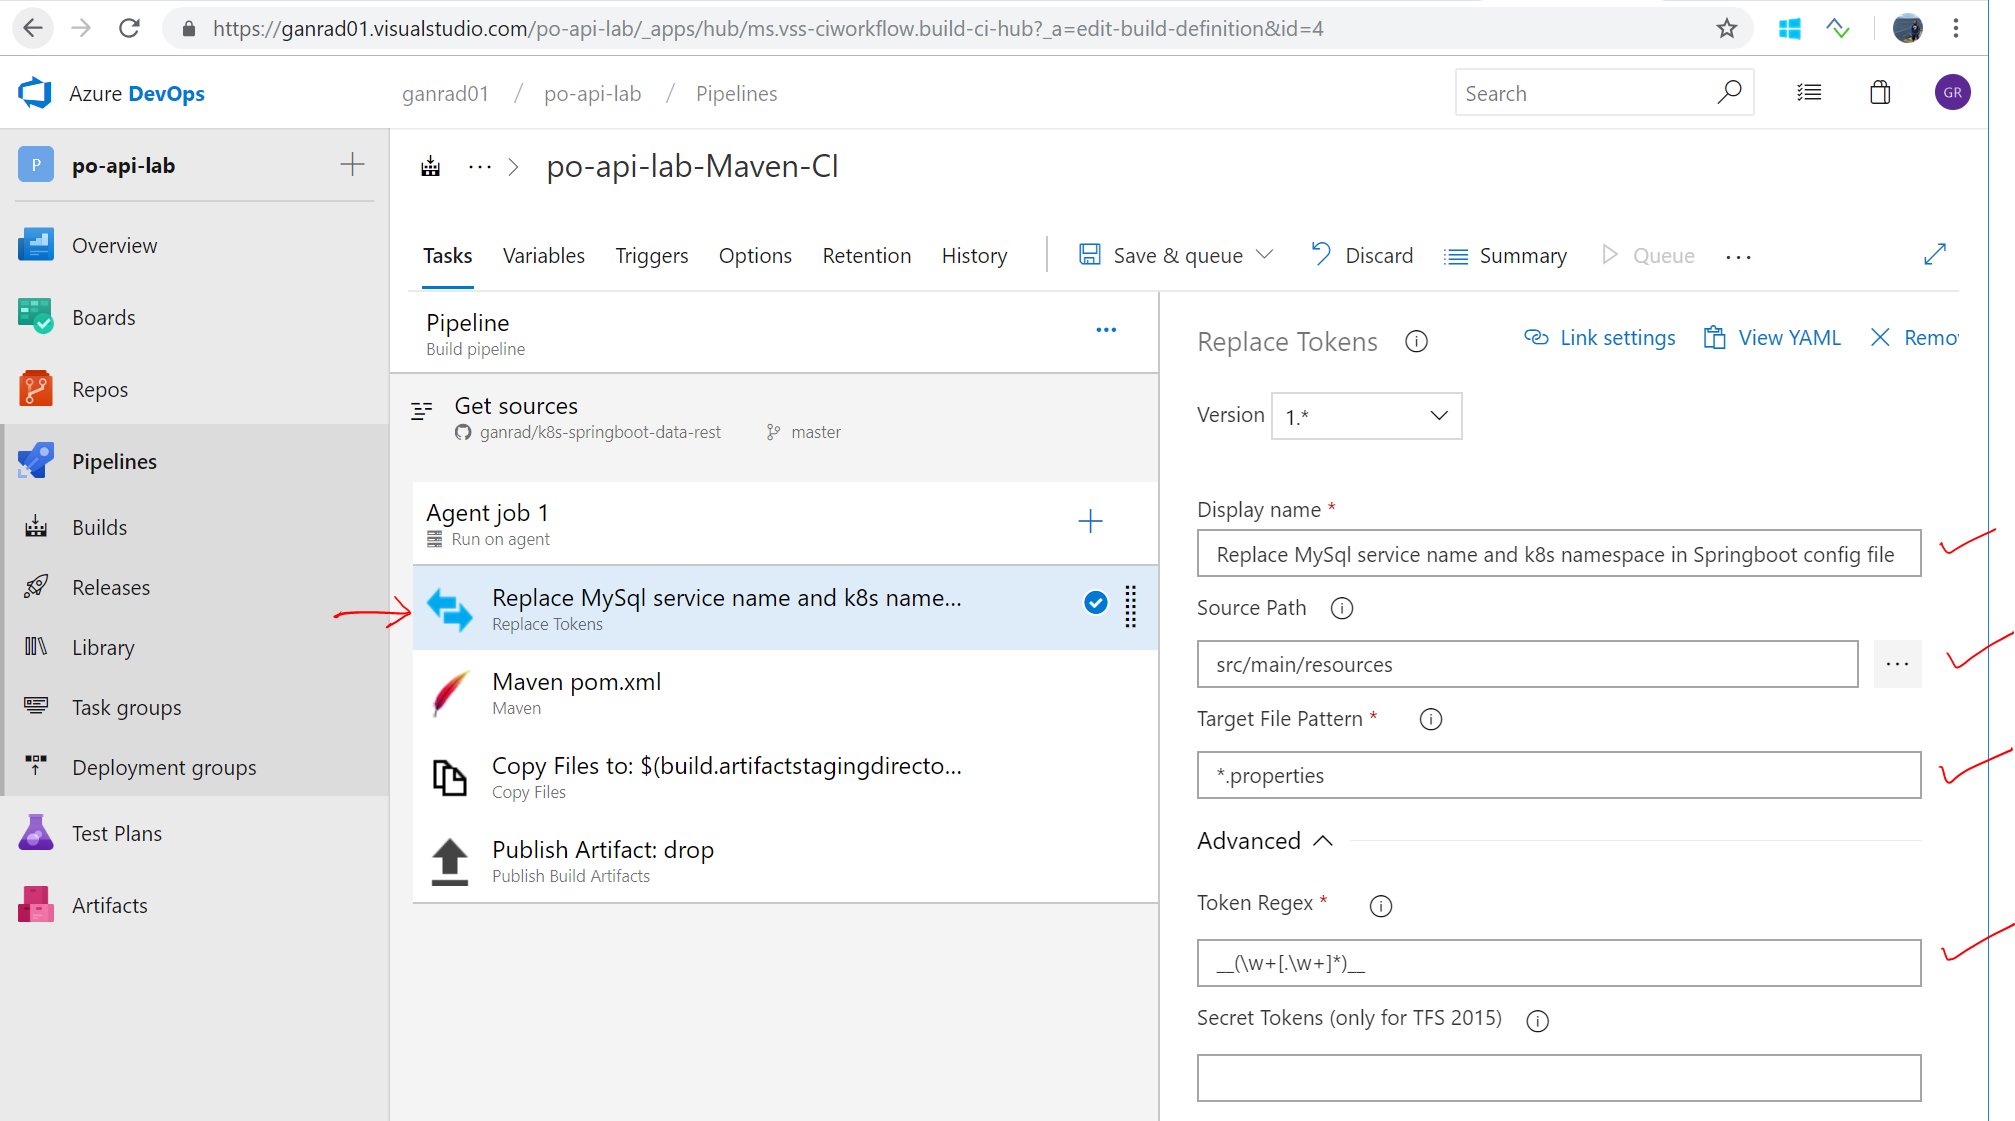
Click on the Replace Tokens task and drag it to the top of the task list. In the Display name field, specify Replace MySql service name and k8s namespace in Springboot config file. In the Source Path field, select src/main/resources and specify *.properties in the Target File Pattern field. Click on Advanced and in the Token Regex field, specify __(\w+[.\w+]*)__ as shown in the screenshot below. In the next step, we will use this task to specify the target service name and Kubernetes namespace name for MySQL.
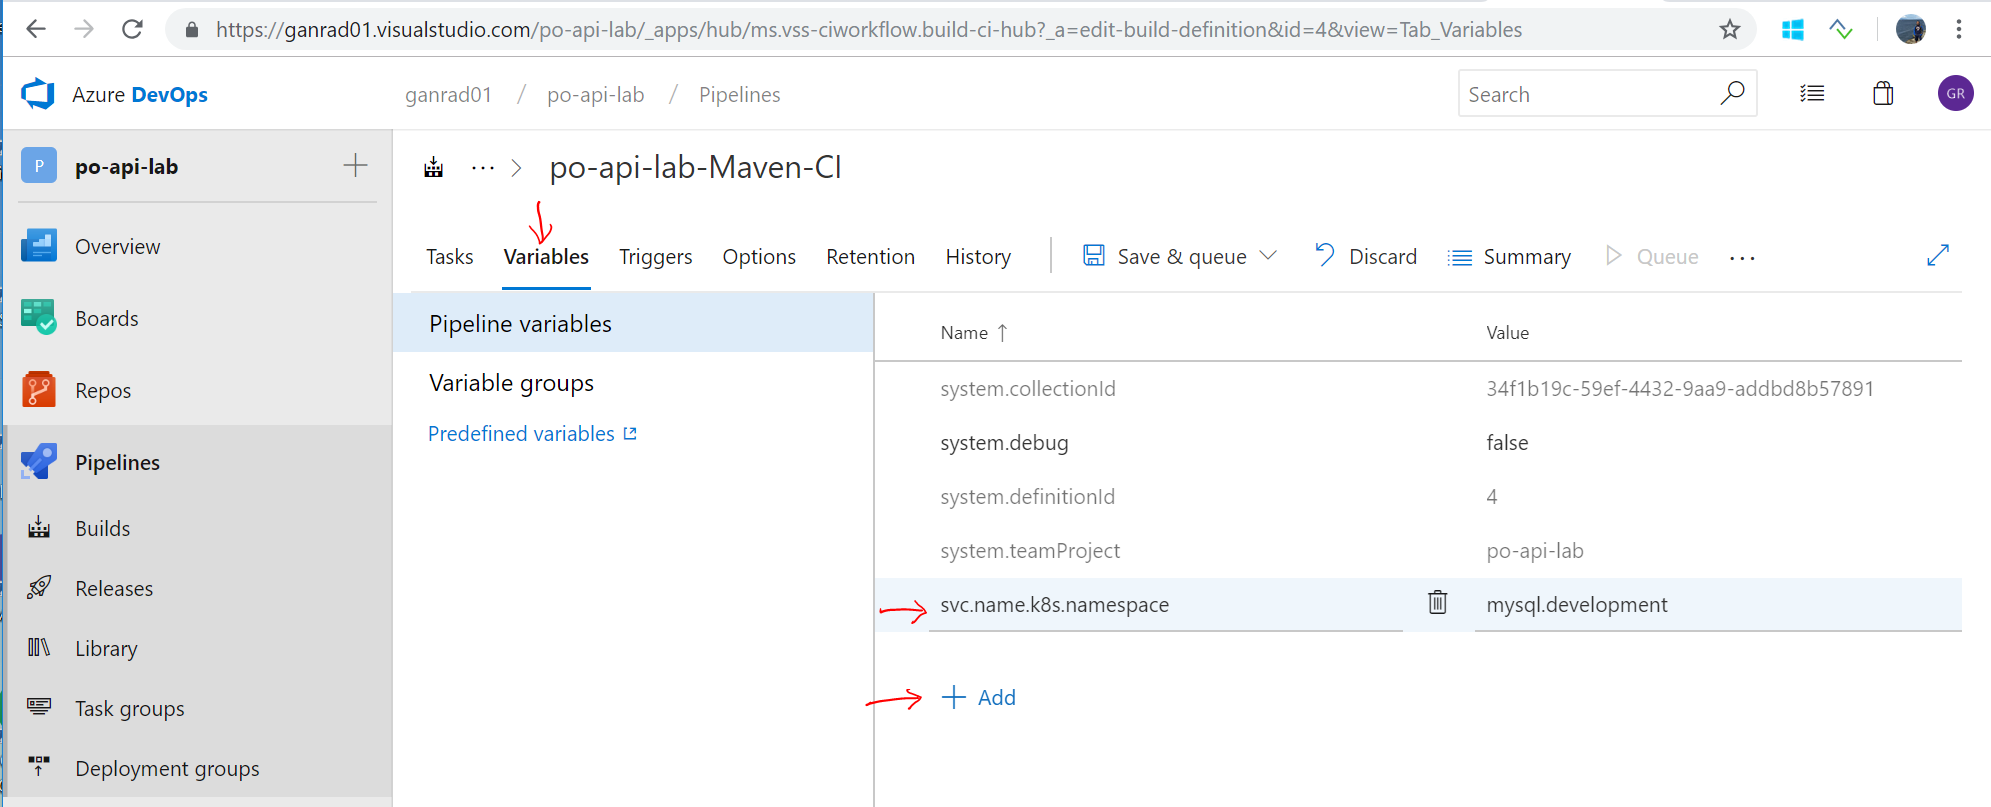
Click on the Variables tab and add a new variable to specify the Kubernetes MySQL service name and namespace name as shown in the screenshot below. When the build pipeline runs, it replaces the value of the variable svc.name.k8s.namespace with mysql.development in file src/main/resources/application.properties. This allows us to modify the connection settings for MySQL service in the PO microservice application without having to change any line of code. As such, the MySQL service could be deployed in any Kubernetes namespace and we can easily connect to that instance by setting this variable at build time.
Variable Name
Value
svc.name.k8s.namespace
mysql.development
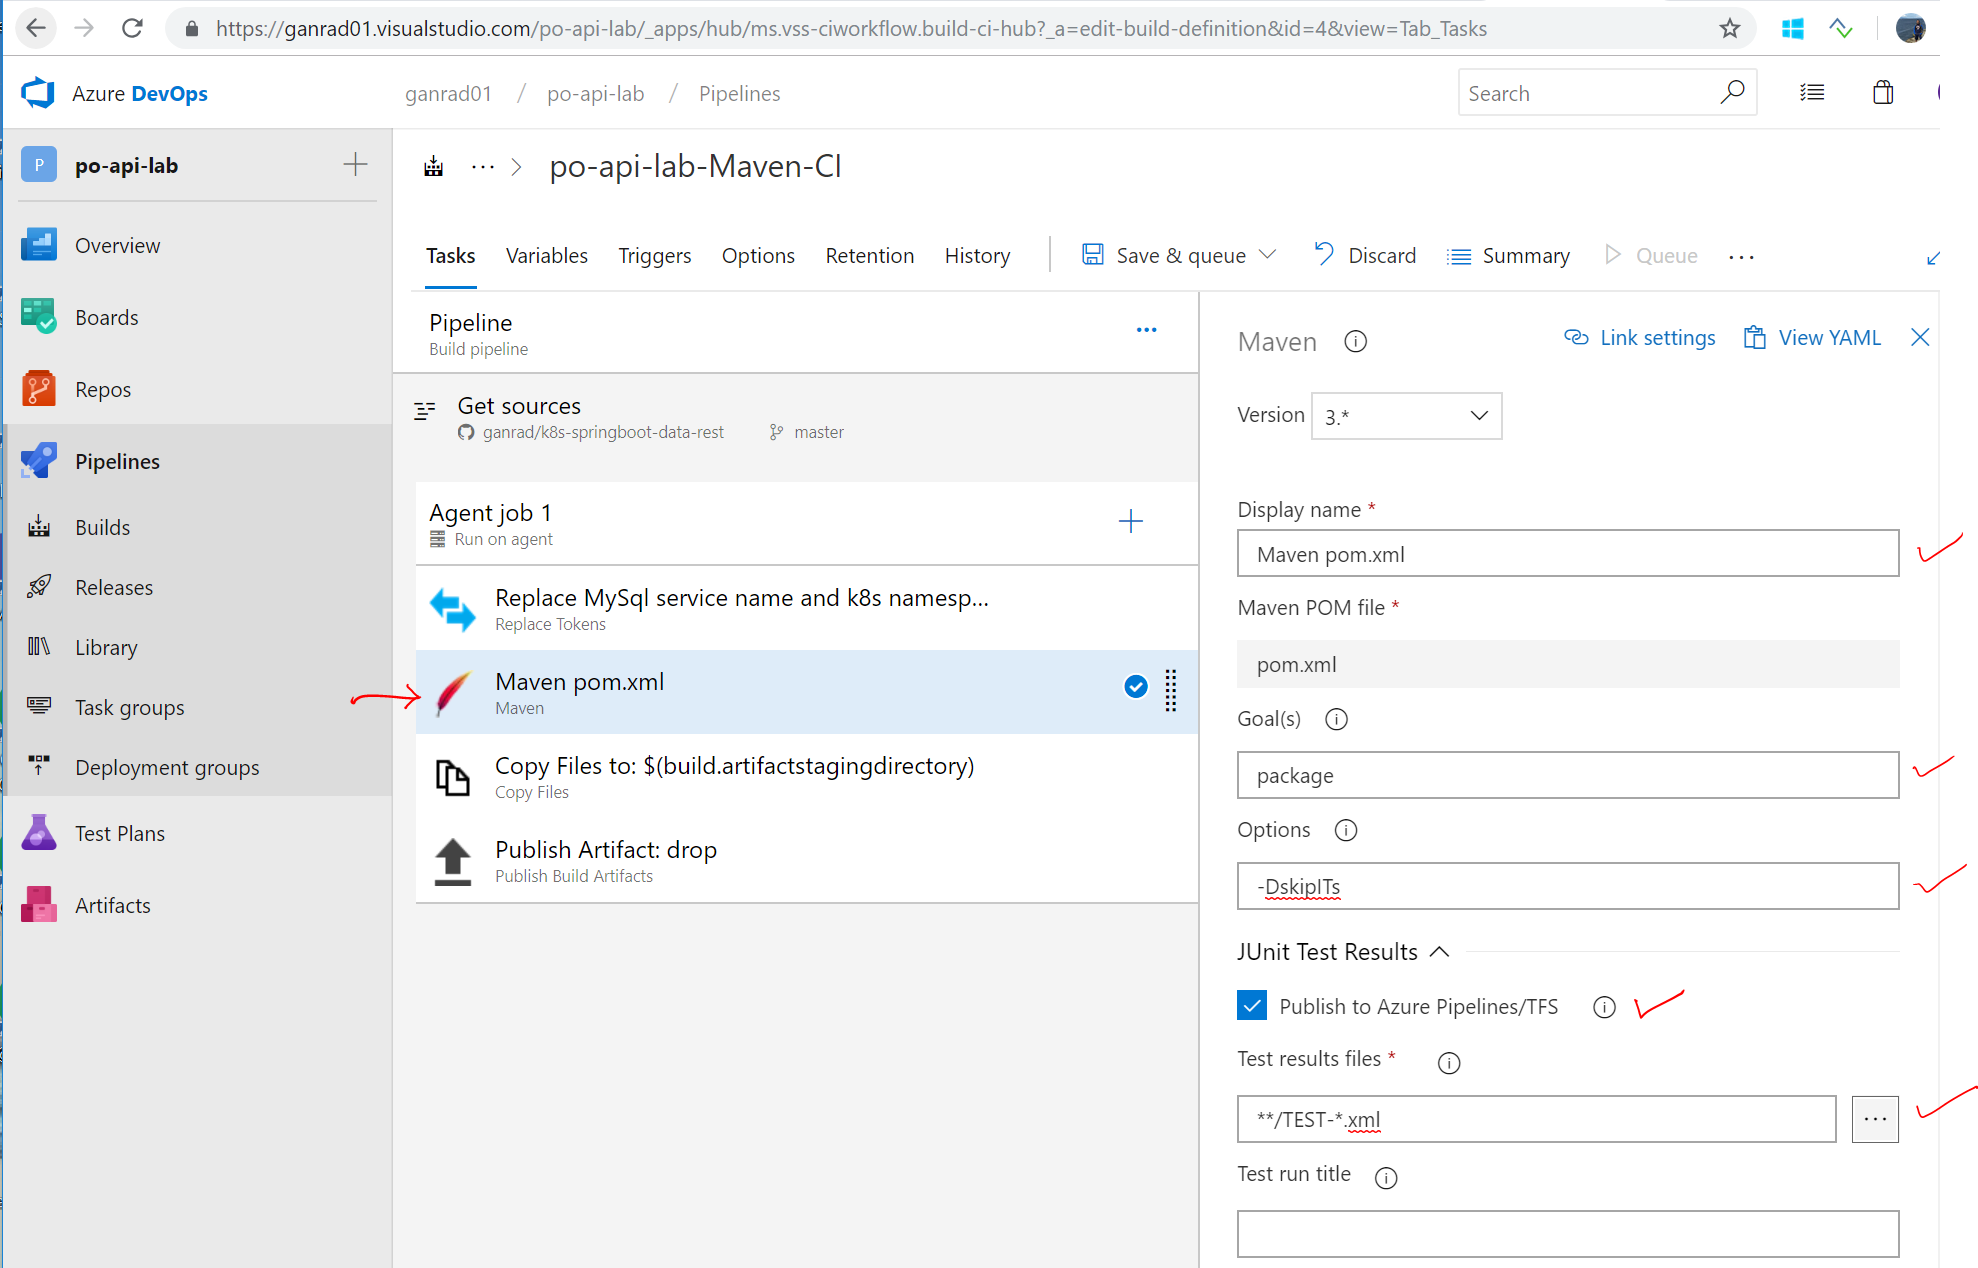
Switch back to the Tasks tab and click on the Maven task. Specify values for fields Goal(s), Options as shown in the screen shot below. Ensure Publish to TFS/Team Services checkbox is enabled.
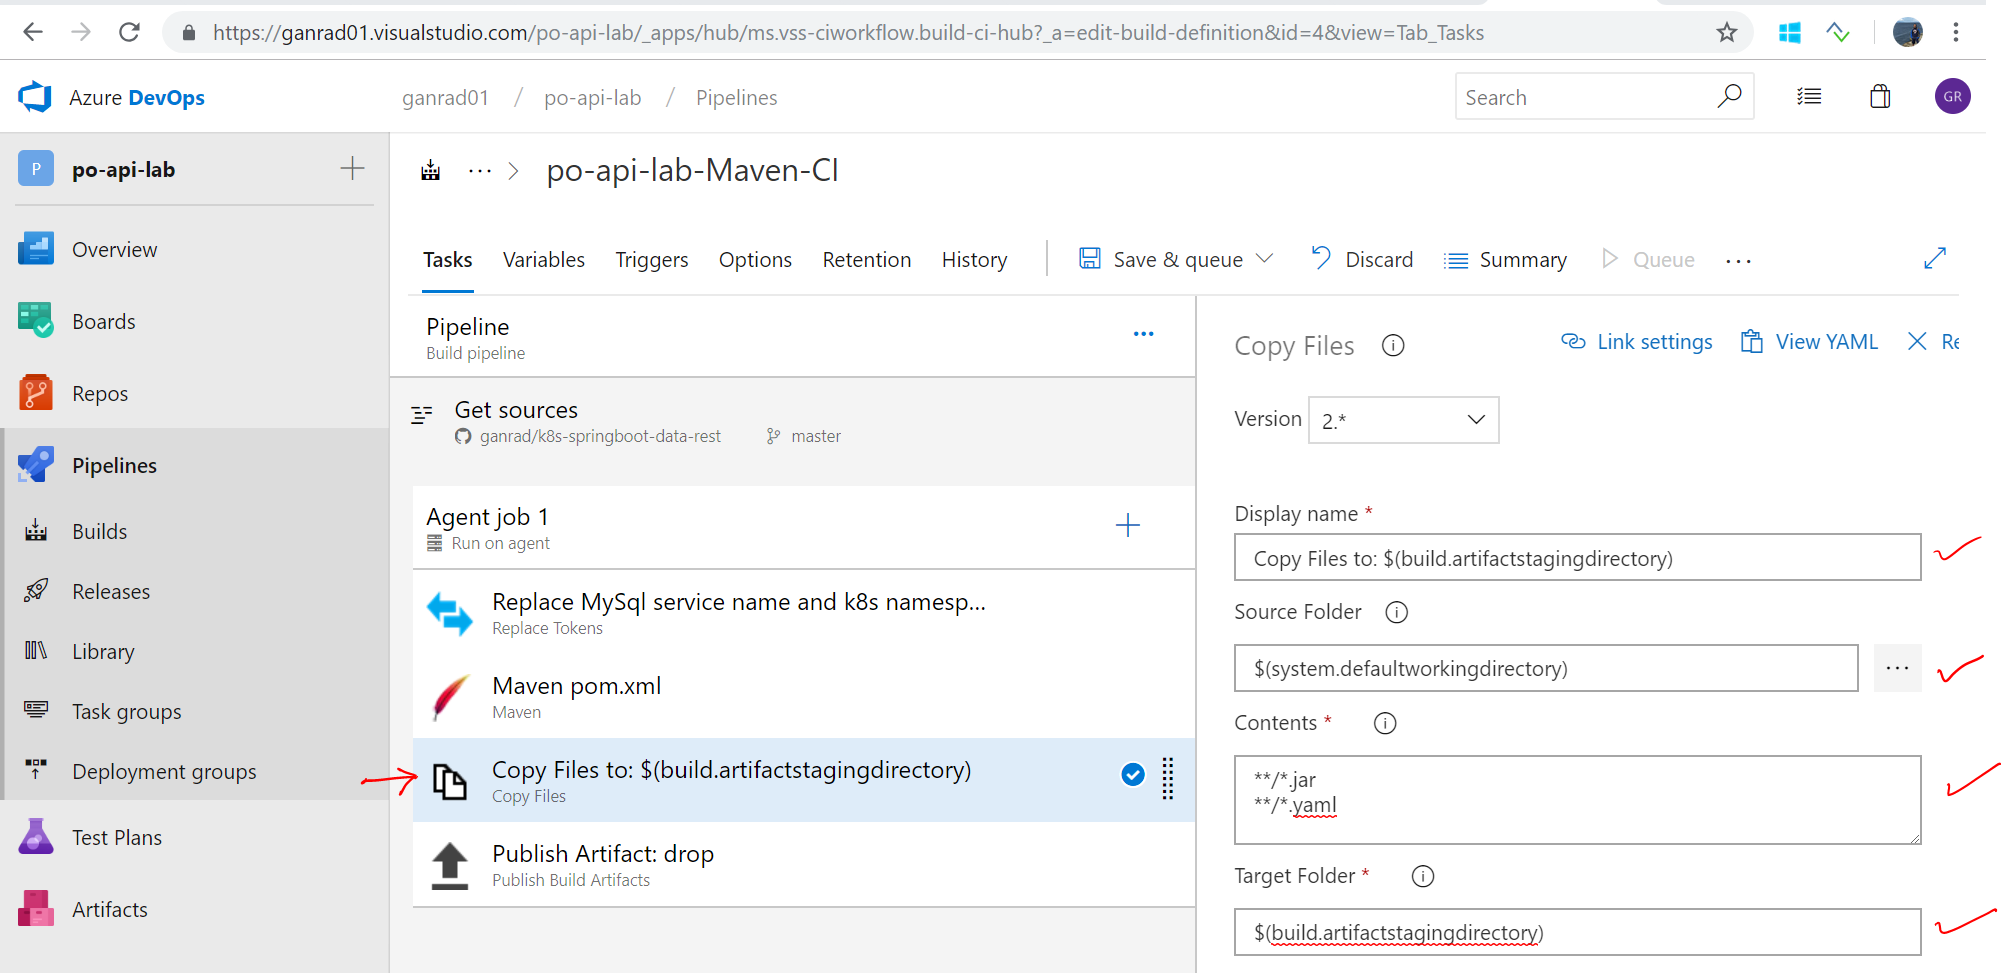
Go thru the Copy Files… and Publish Artifact:… tasks. These tasks copy the application binary artifacts (*.jar) to the drop location on the Azure DevOps server. In Copy Files… task, you will need to add **/*.yaml to the Contents field. See screenshot below.
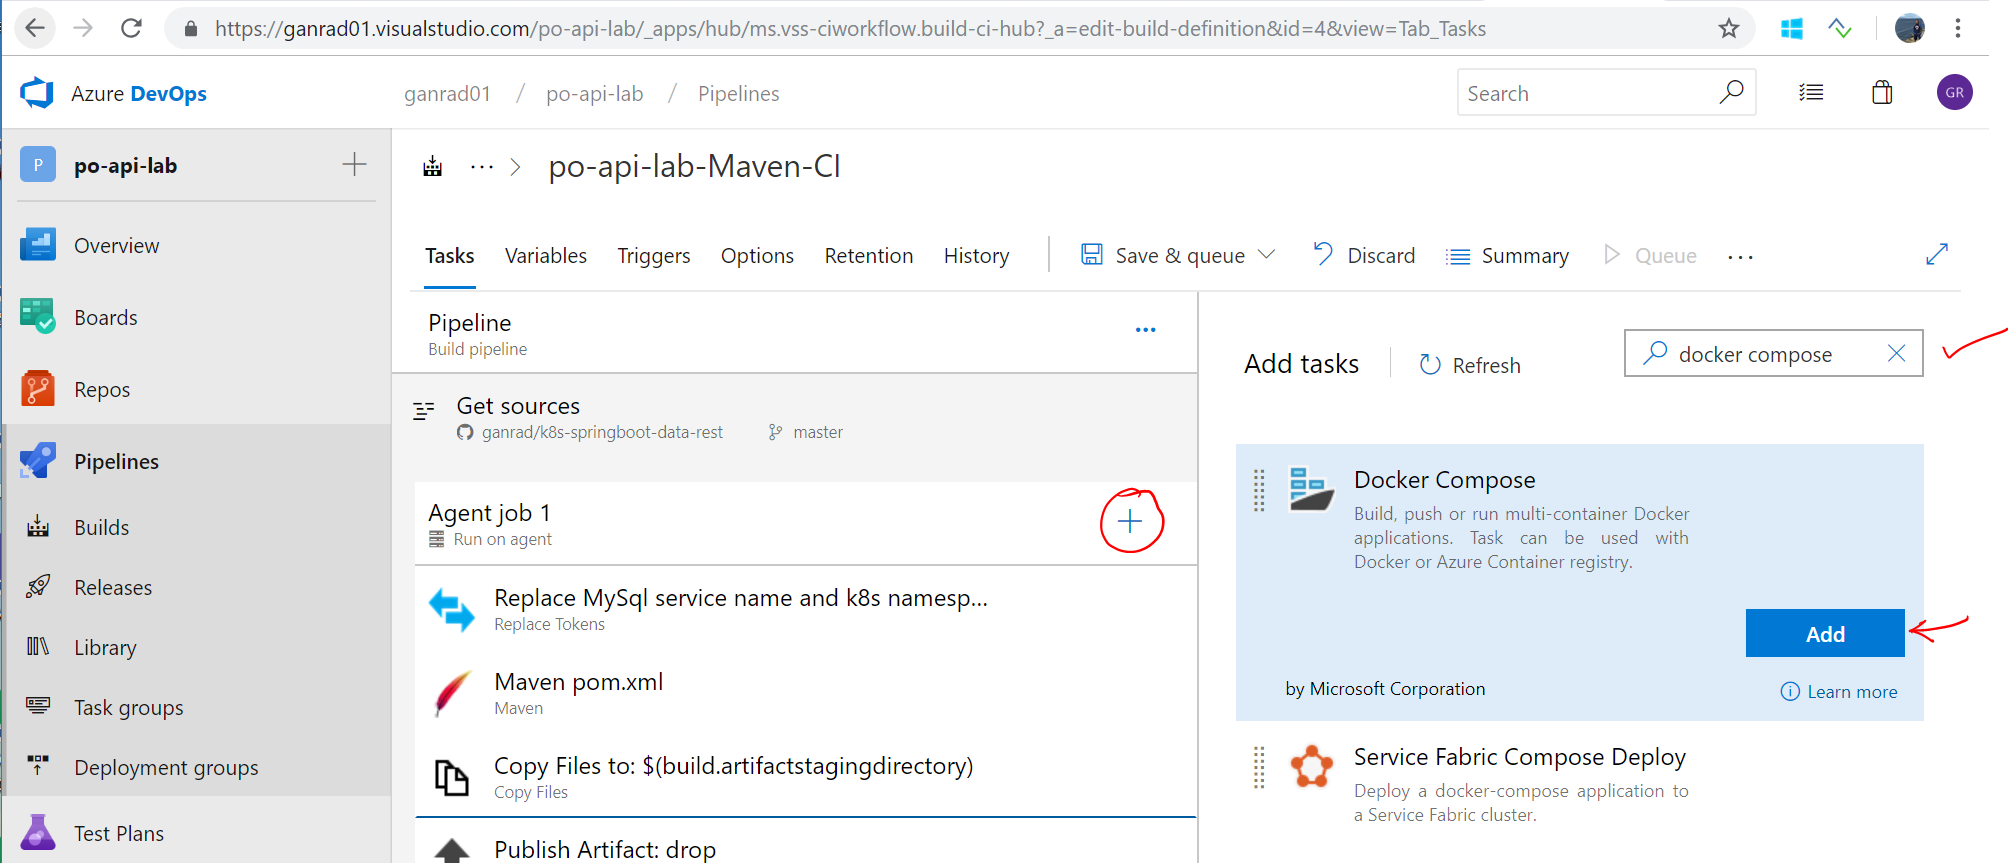
Next, we will package our application binary within a container image. Review the docker-compose.yml and Dockerfile files in the source repository to understand how the application container image is built. Click on the plus symbol besides Agent job 1 to add a new task. Search for task Docker Compose and click Add.
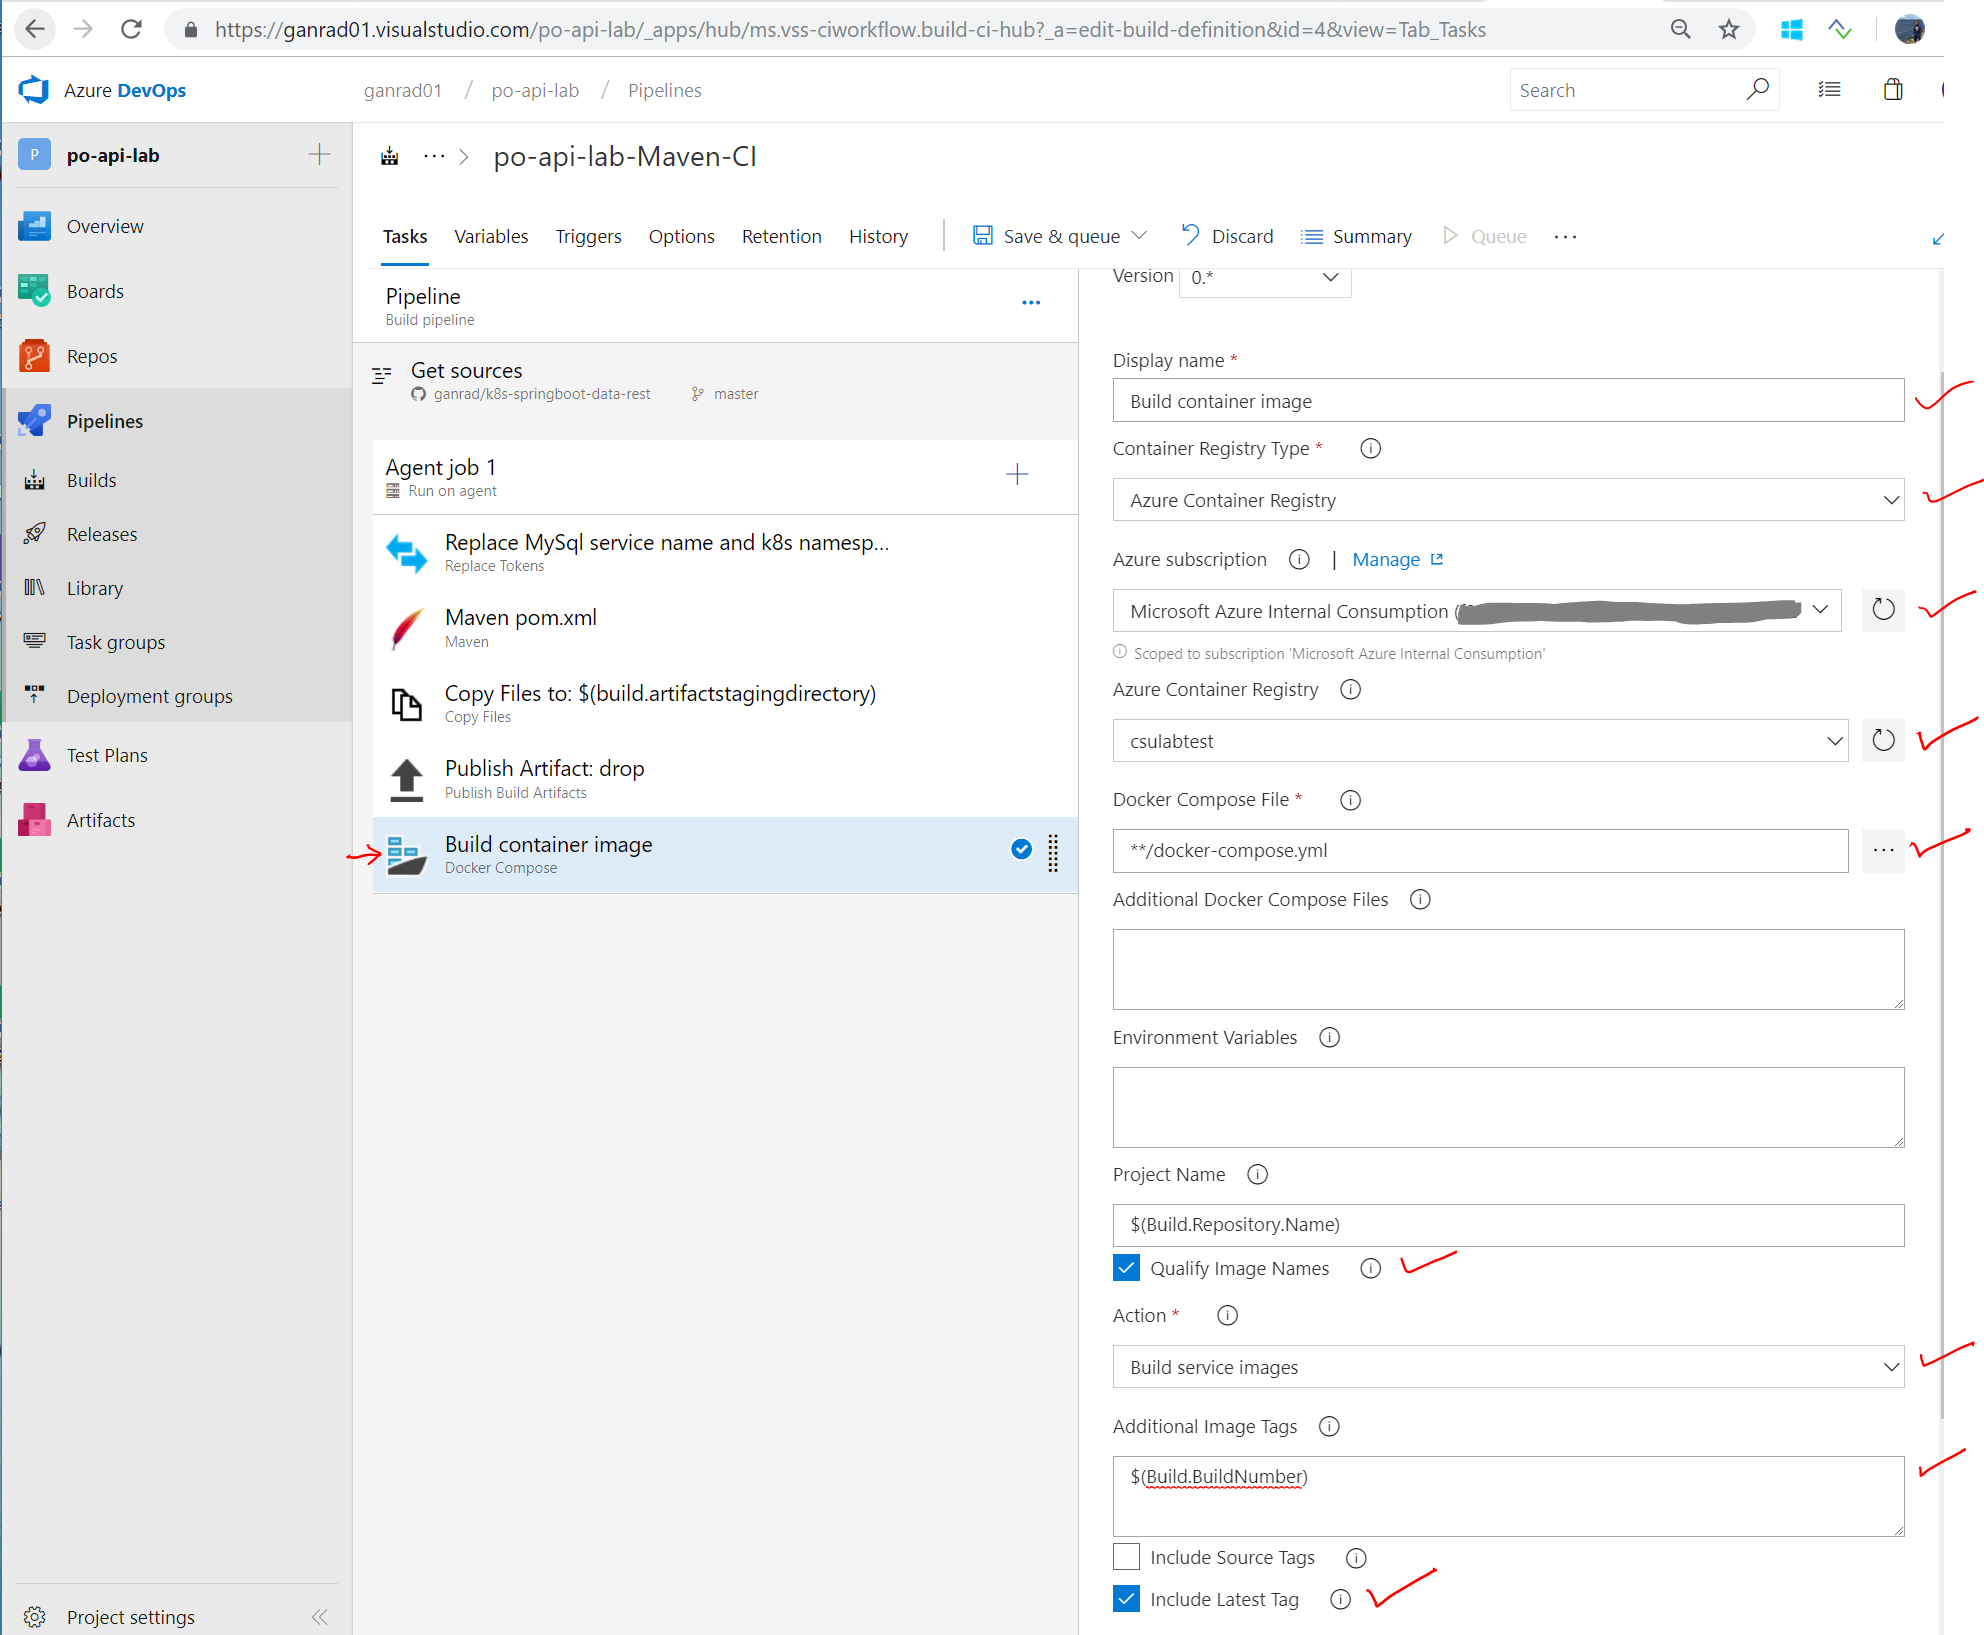
Click on the Docker Compose … task on the left panel. Specify Build container image for Display name field and Azure Container Registry for Container Registry Type. In the Azure Subscription field, select your Azure subscription. Click on Authorize. In the Azure Container Registry field, select the ACR which you created in step [B] above. Check to make sure the Docker Compose File field is set to **/docker-compose.yml. Enable Qualify Image Names checkbox. In the Action field, select Build service images and specify $(Build.BuildNumber) for field Additional Image Tags. Also enable Include Latest Tag checkbox. See screenshot below.
Once our application container image has been built, we will push it into the ACR. Let’s add another task to publish the container image built in the previous step to ACR. Similar to step [15], search for task Docker Compose and click Add.
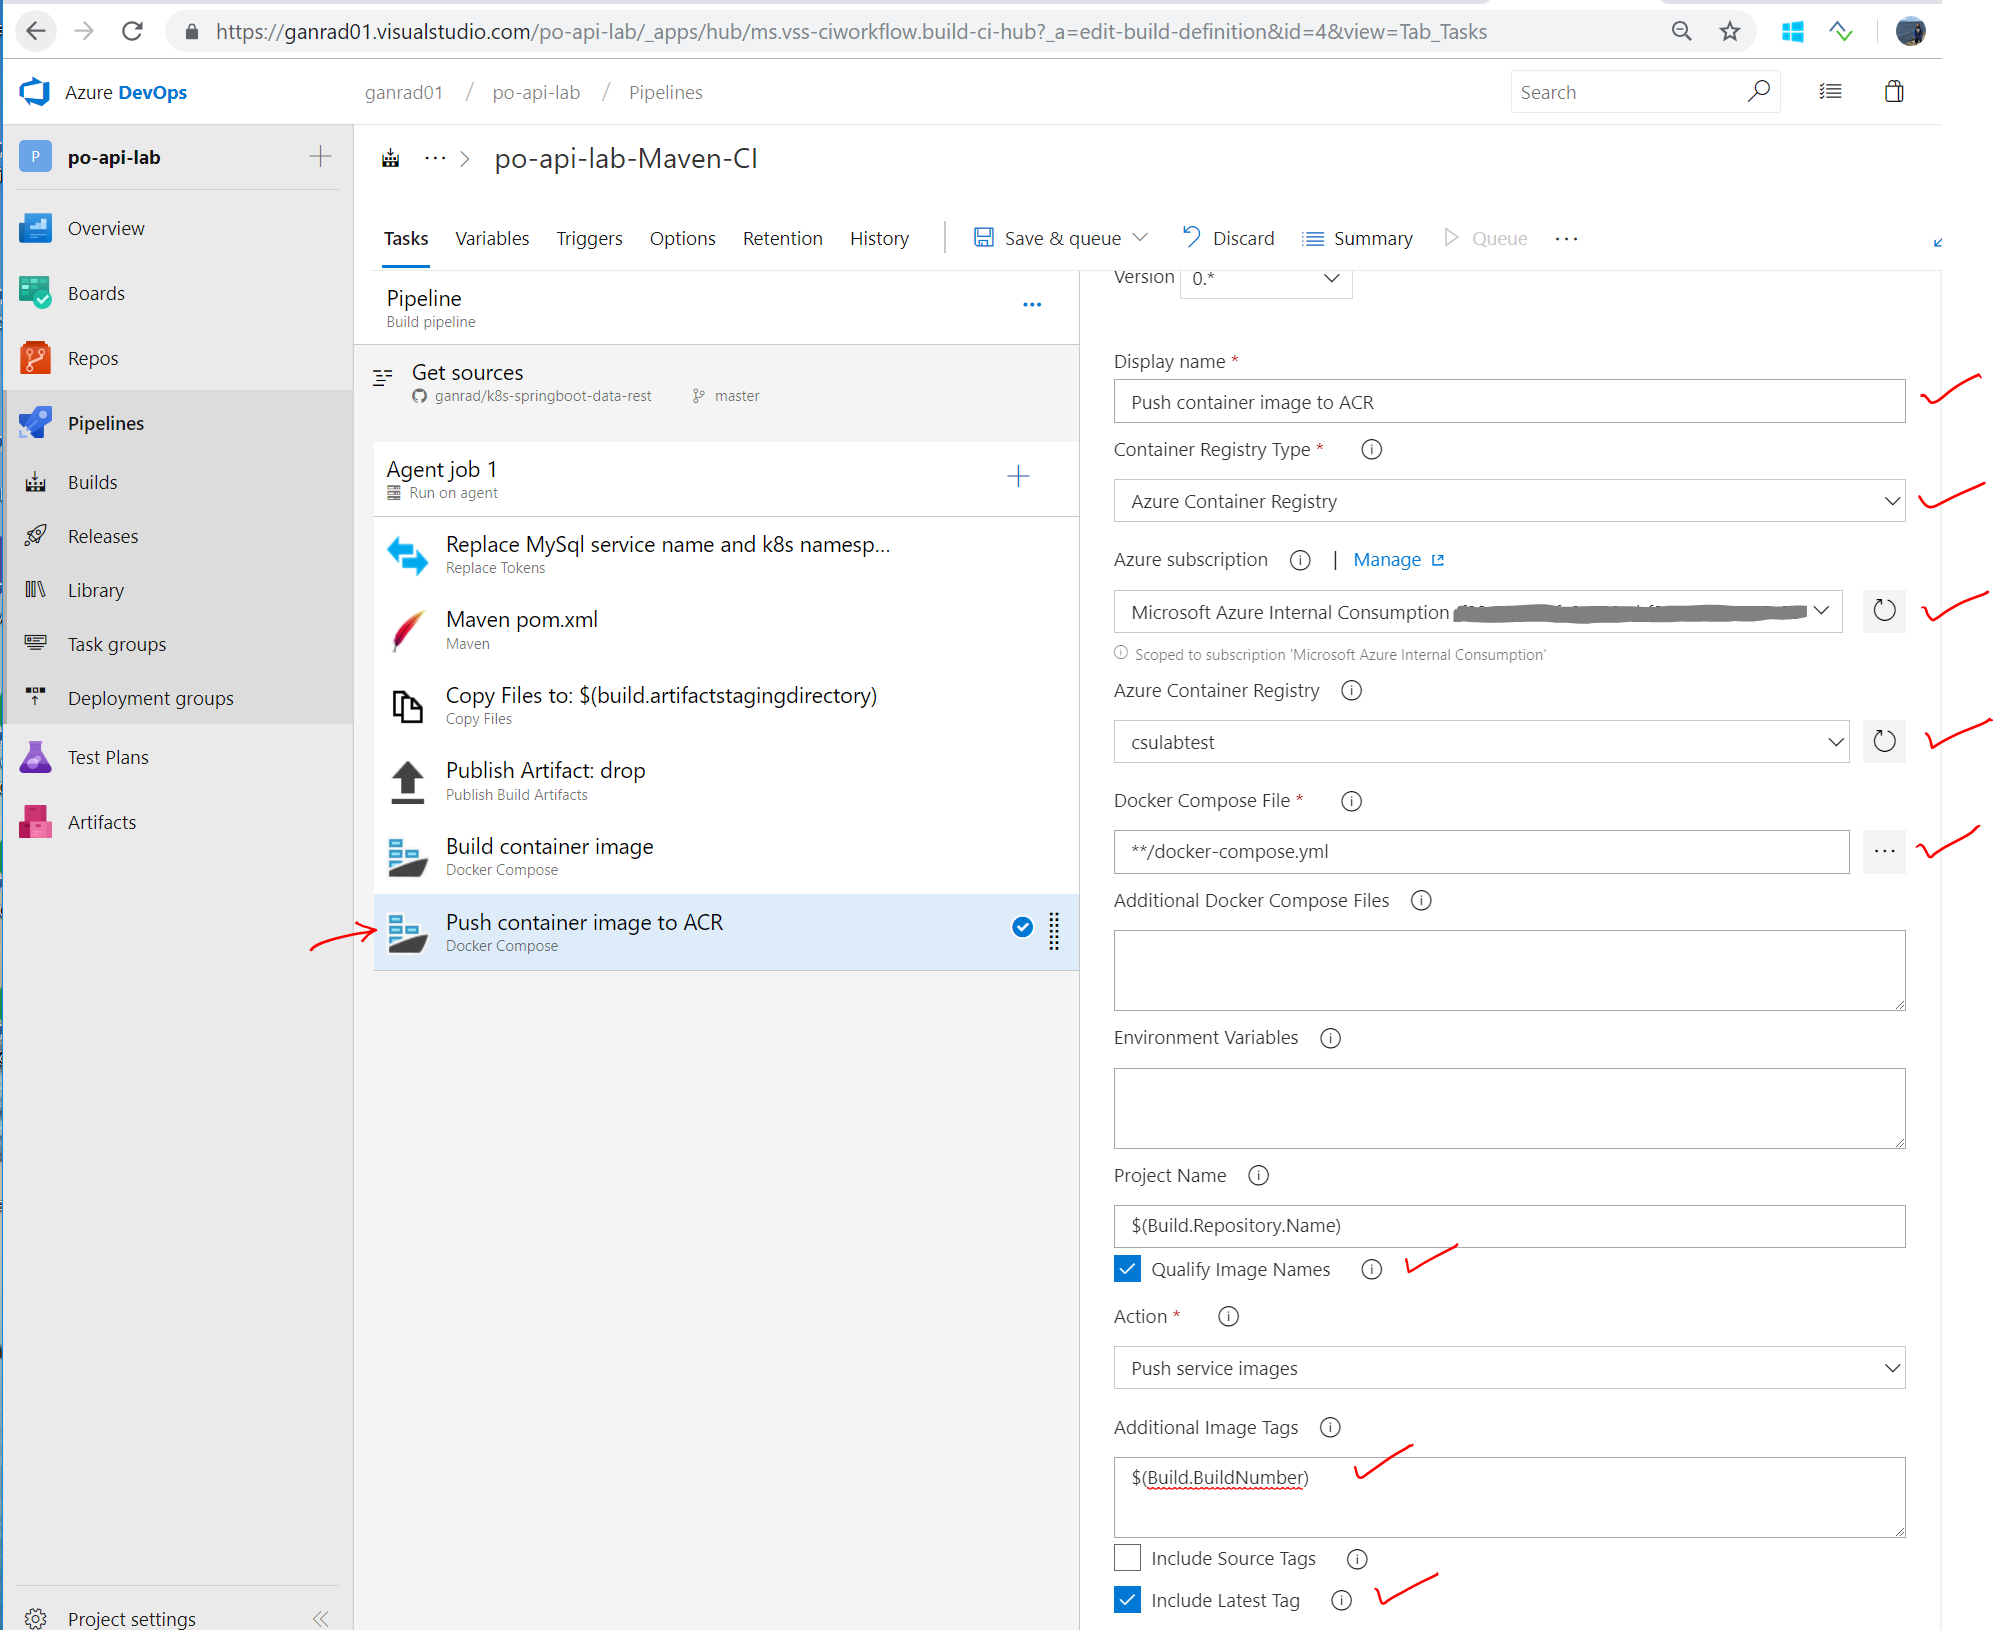
Click on the Docker Compose … task on the left. Specify Push container image to ACR for field Display name and Azure Container Registry for Container Registry Type. In the Azure Subscription field, select your Azure subscription (Under Available Azure service connections). In the Azure Container Registry field, select the ACR which you created in step [B] above. Check to make sure the Docker Compose File field is set to **/docker-compose.yml. Enable Qualify Image Names checkbox. In the Action field, select Push service images and specify $(Build.BuildNumber) for field Additional Image Tags. Also enable Include Latest Tag checkbox. See screenshot below.
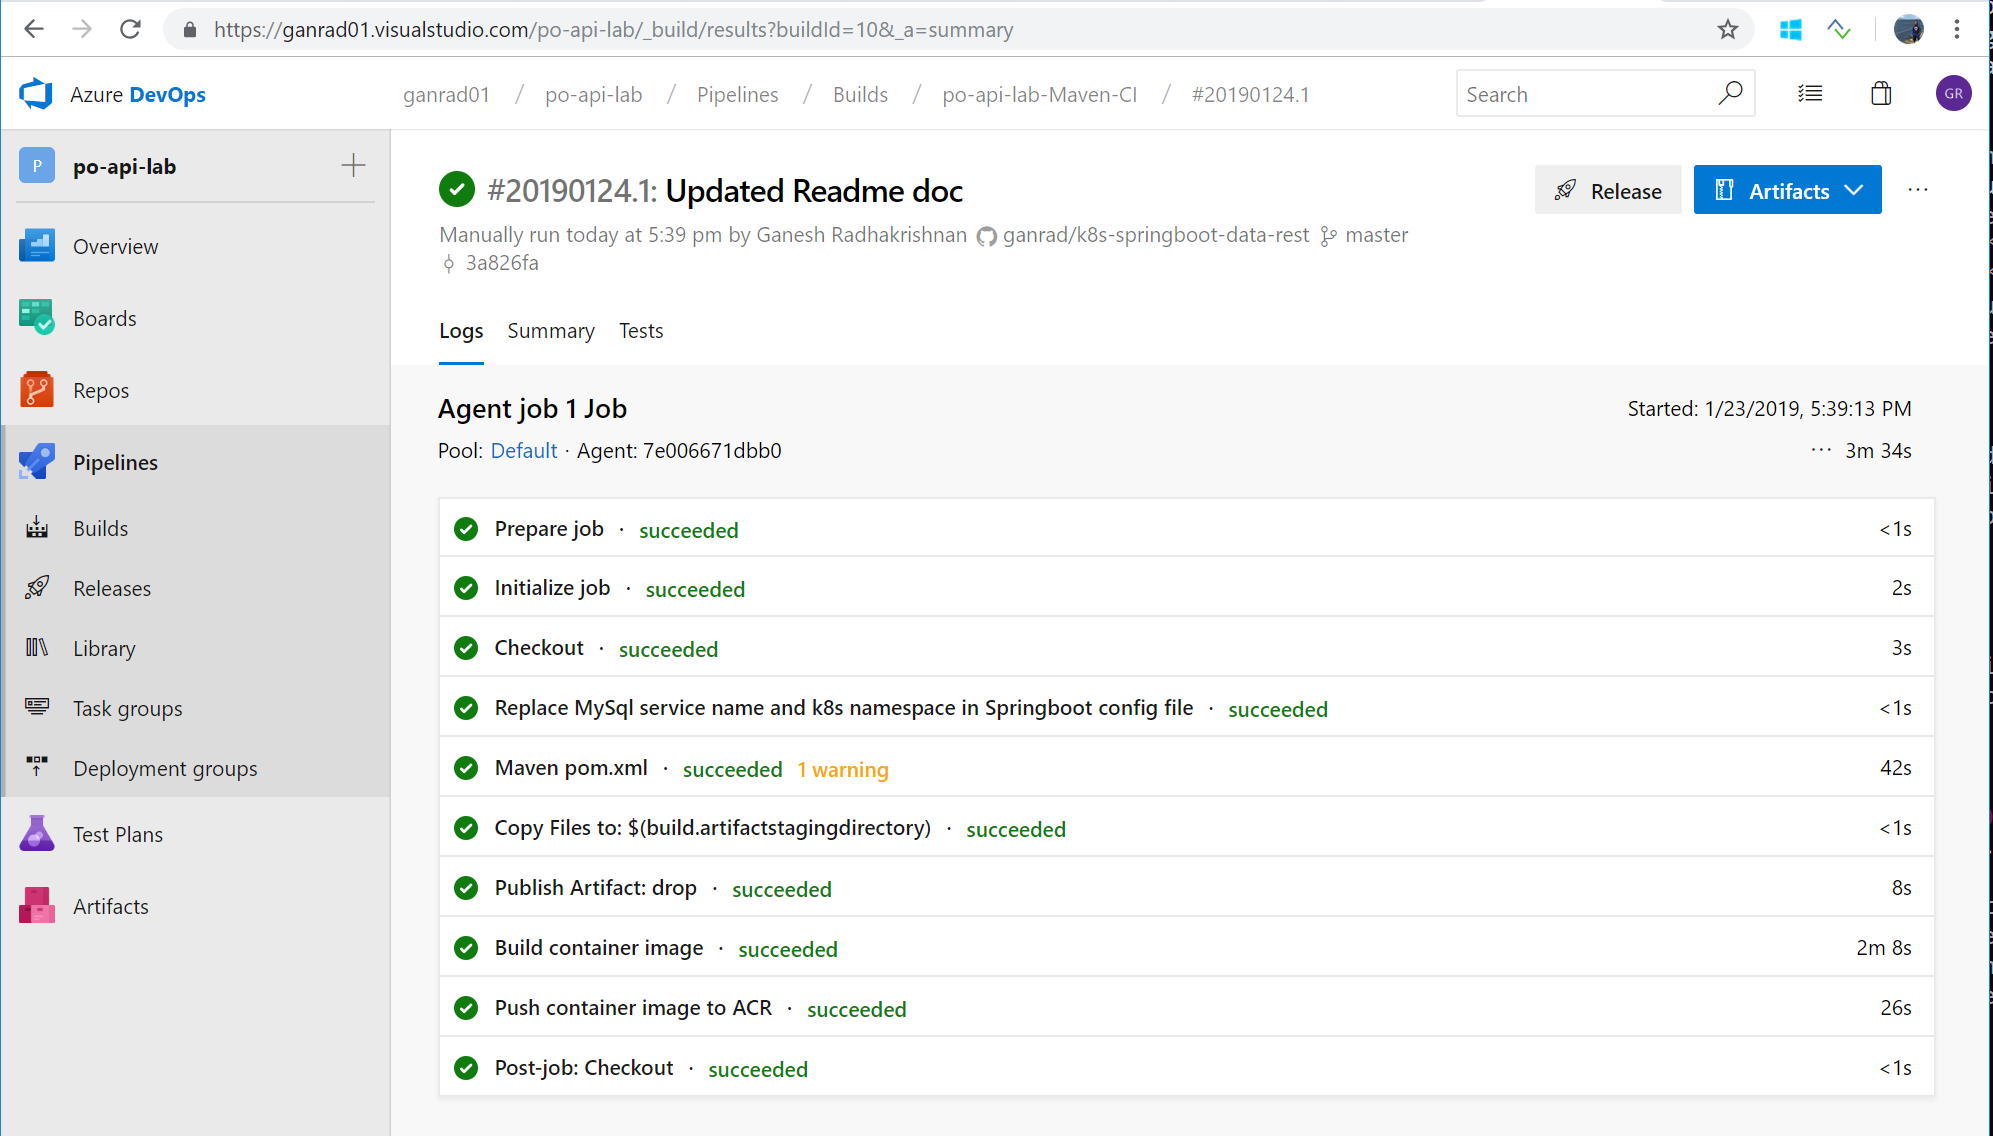
Click Save and Queue to save the build definition and queue it for execution. Click on the Build number on the top of the page to view the progess of the build. Wait for the build process to finish. When all build tasks complete OK and the build process finishes, you will see the screen below.
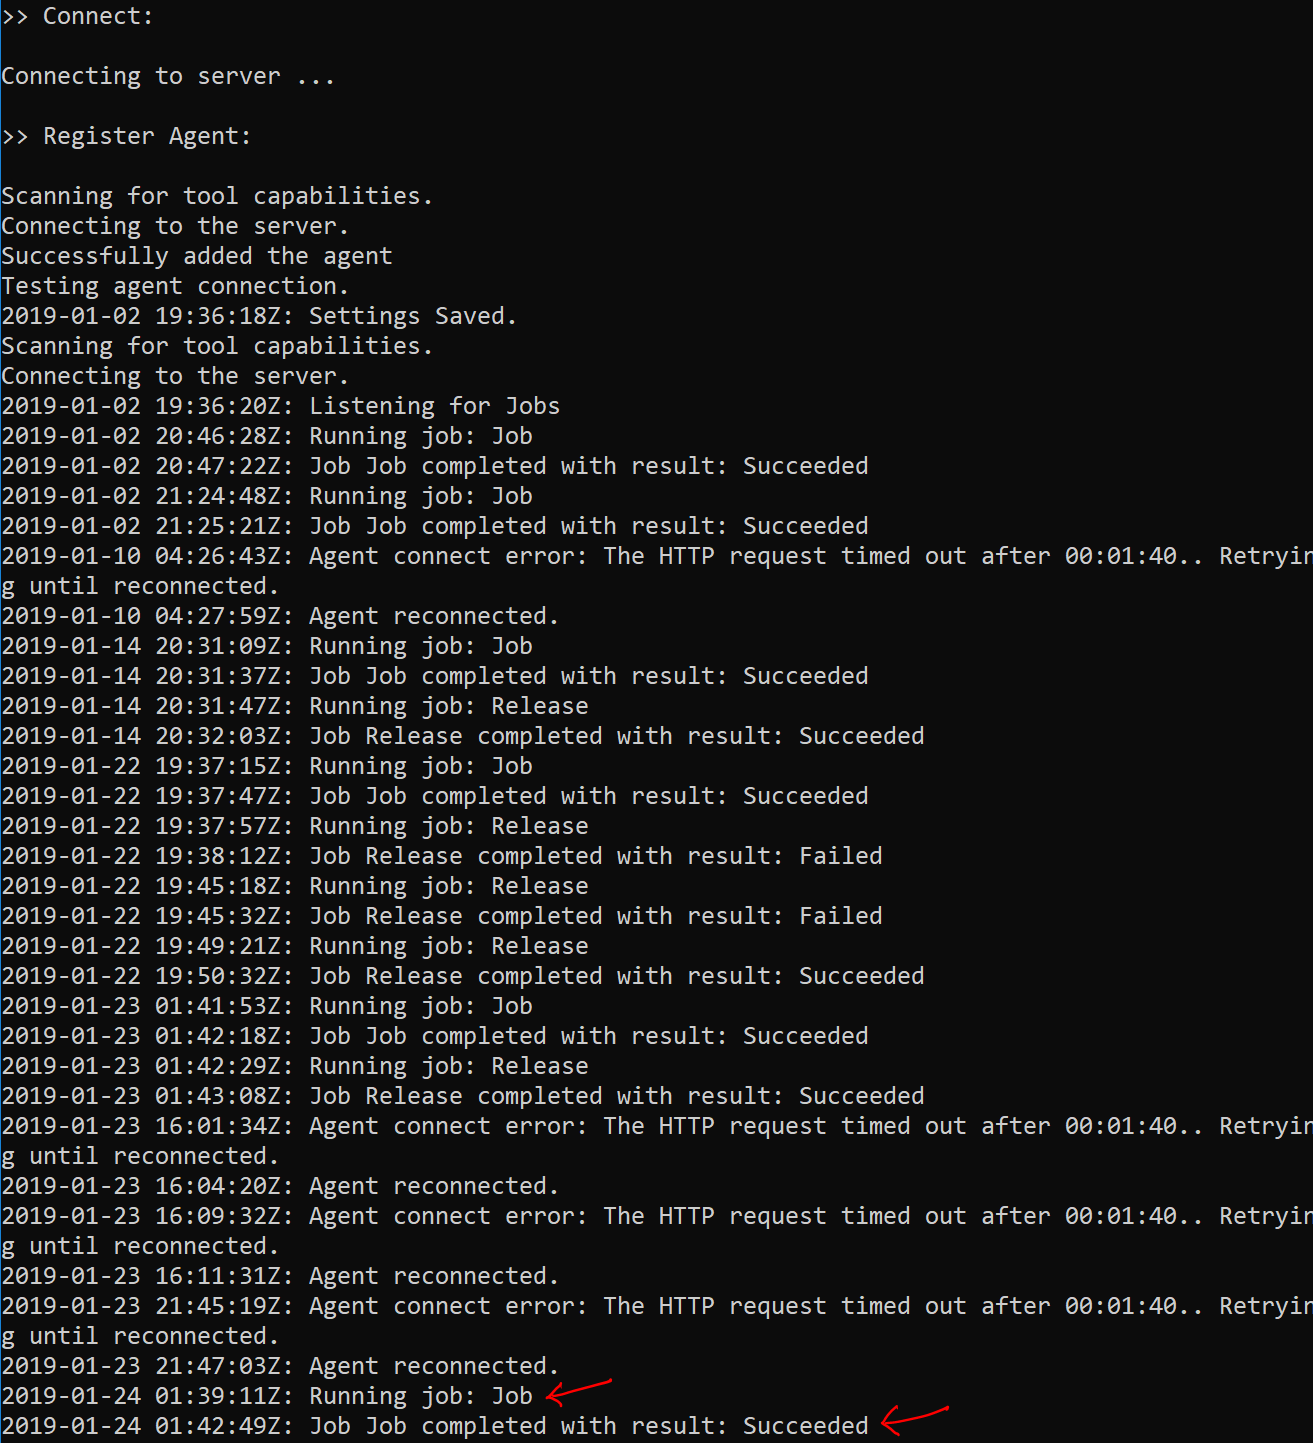
Switch to the VSTS build agent terminal window and you will notice that a build request was received from Azure DevOps and processed successfully. See below.
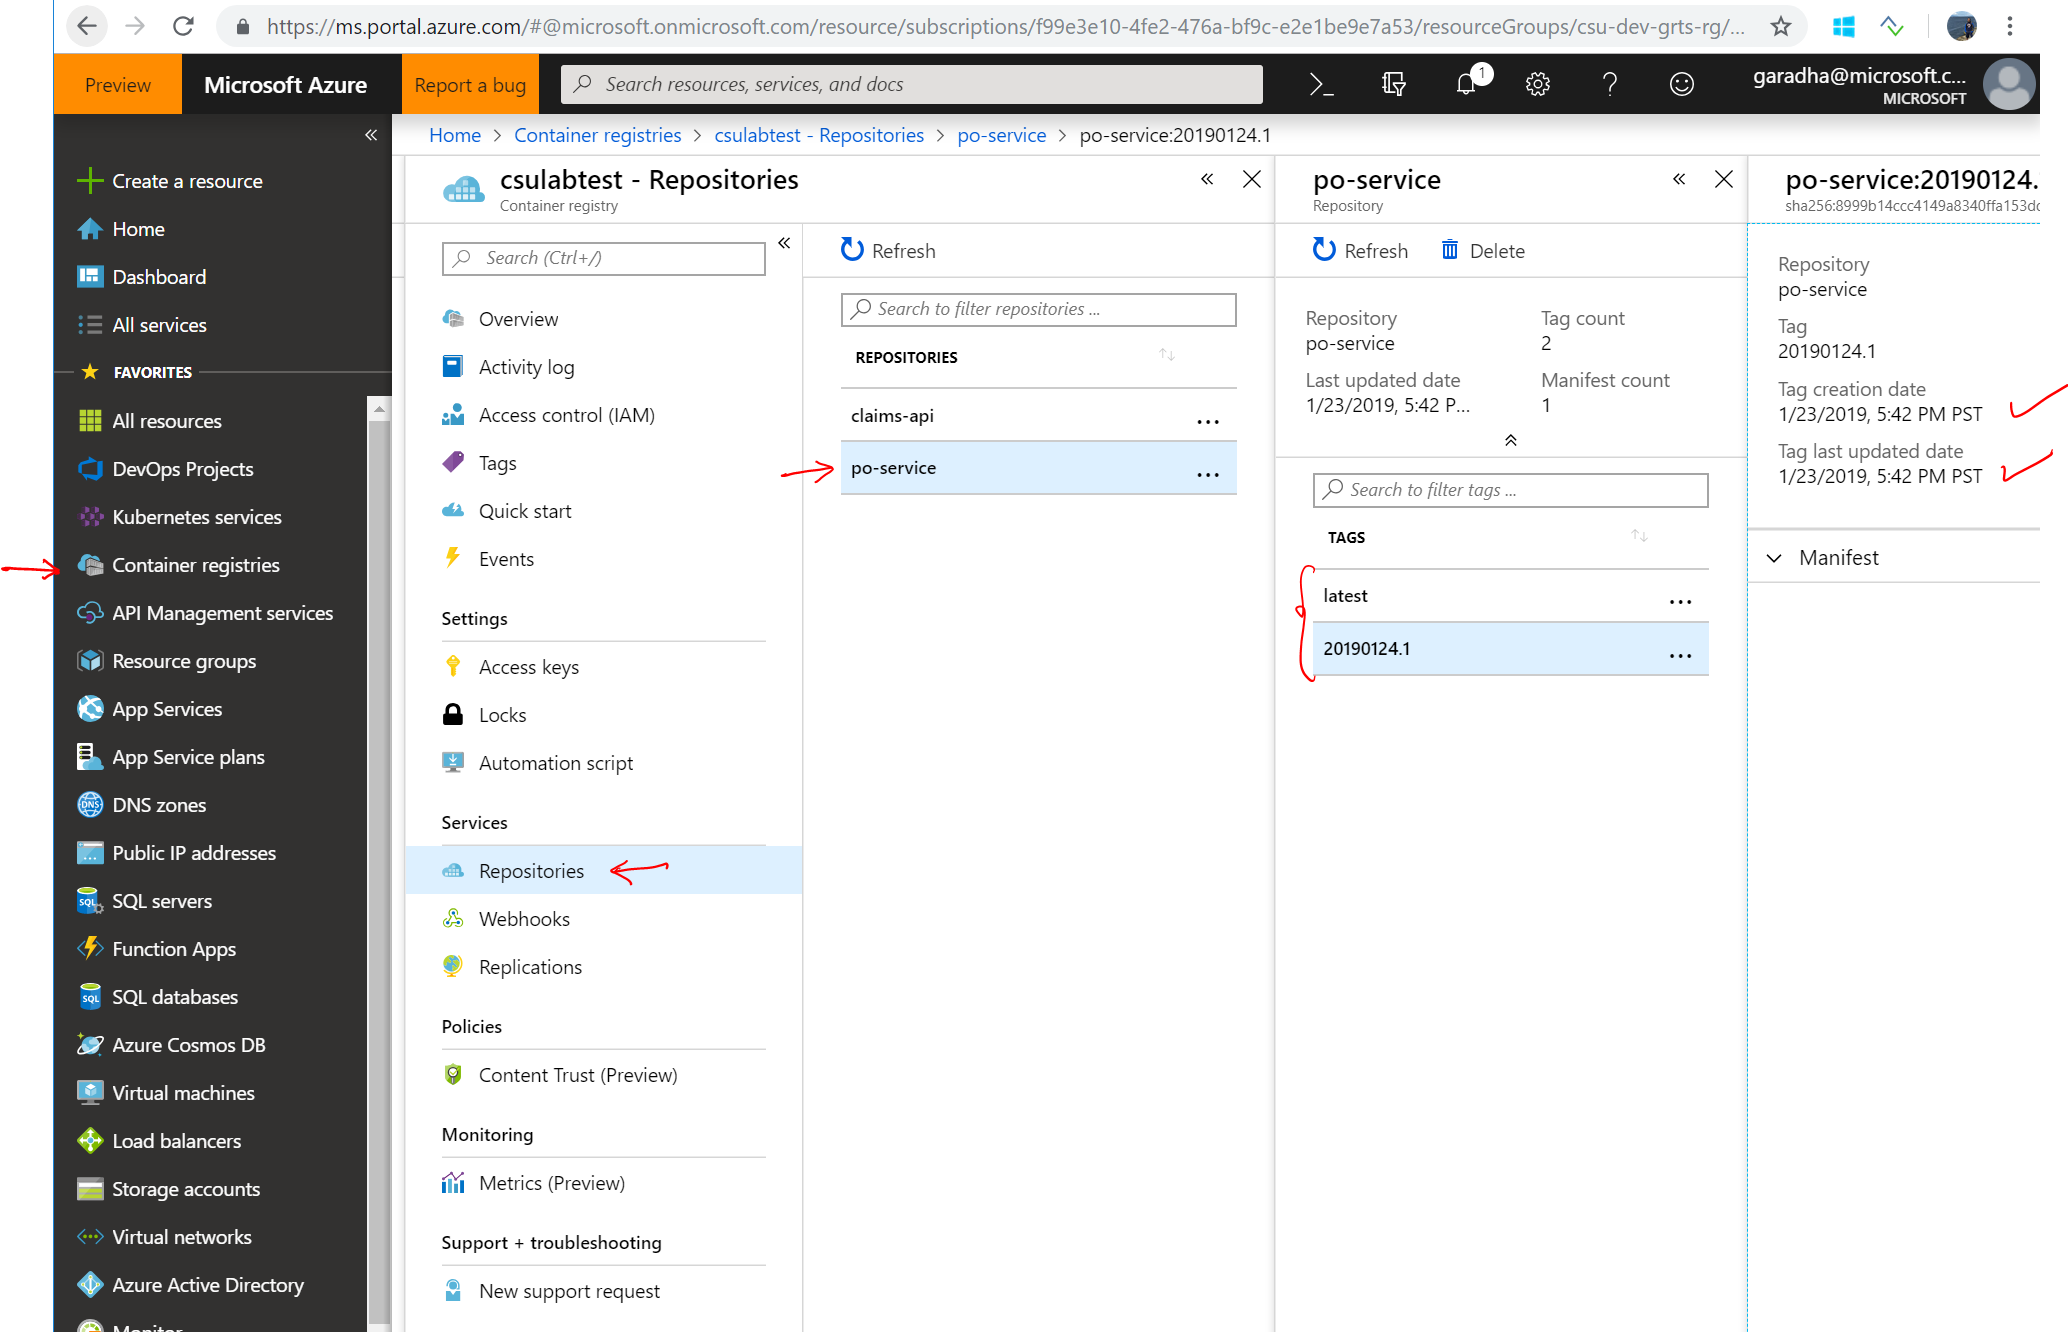
Login to the Azure portal, open the blade for Azure Container Registry and verify that the container image for po-service API microservice has been pushed into the registry.
D] Create an Azure Kubernetes Service (AKS) cluster and deploy Springboot microservice
Approx. time to complete this section: 1 – 1.5 Hours
In this step, we will first deploy an AKS cluster on Azure. The Springboot Purchase Order microservice application reads/writes purchase order data from/to a relational (MySQL) database. So we will deploy a MySQL database container (ephemeral) first and then deploy our Springboot Java application. Kubernetes resources (object definitions) are usually specified in manifest files (yaml/json) and then submitted to the API Server. The API server is responsible for instantiating corresponding objects and bringing the state of the system to the desired state.
Kubernetes manifest files for deploying the MySQL and po-service (Springboot application) containers are provided in the k8s-scripts/ folder in this GitHub repository. There are two manifest files in this folder mysql-deploy.yaml and app-deploy.yaml. As the names suggest, the mysql-deploy manifest file is used to deploy the MySQL database container and the other file is used to deploy the Springboot microservice respectively.
Before proceeding with the next steps, feel free to inspect the Kubernetes manifest files to get a better understanding of the following. These are all out-of-box features provided by Kubernetes.
How confidential data such as database user names & passwords are injected (at runtime) into the application container using Secrets
How application configuration information (non-confidential) such as database connection URL and the database name parameters are injected (at runtime) into the application container using ConfigMaps
How environment variables such as the MySQL listening port is injected (at runtime) into the application container.
How services in Kubernetes can auto discover themselves using the built-in Kube-DNS proxy.
In case you want to modify the default values used for MySQL database name and/or database connection properties (user name, password …), refer to Appendix A for details. You will need to update the Kubernetes manifest files.
Follow the steps below to provision the AKS cluster and deploy the po-service microservice.
Ensure the Resource provider for AKS service is enabled (registered) for your subscription. A quick and easy way to verify this is, use the Azure portal and go to ->Azure Portal->Subscriptions->Your Subscription->Resource providers->Microsoft.ContainerService->(Ensure registered). Alternatively, you can use Azure CLI to register all required service providers. See below.
$ az provider register -n Microsoft.Network
$ az provider register -n Microsoft.Storage
$ az provider register -n Microsoft.Compute
$ az provider register -n Microsoft.ContainerService
At this point, you can use a) The Azure Portal Web UI to create an AKS cluster and b) The Kubernetes Dashboard UI to deploy the Springboot Microservice application artifacts. To use a web browser (Web UI) for deploying the AKS cluster and application artifacts, refer to the steps in extensions/k8s-dash-deploy.
NOTE: If you are new to Kubernetes and not comfortable with issuing commands on a Linux terminal window, use the Azure Portal and the Kubernetes dashboard UI (link above).
Alternatively, if you prefer CLI for deploying and managing resources on Azure and Kubernetes, continue with the next steps.
(If you haven’t already) Open a terminal window and login to the Linux VM (Bastion host).
## Check if kubectl is installed OK
$ kubectl version -o yaml
Refer to the commands below to create an AKS cluster. If you haven’t already created a resource group, you will need to create one first. If needed, go back to step [A] and review the steps for the same. Cluster creation will take a few minutes to complete.
# Create a 1 Node AKS cluster
$ az aks create --resource-group myResourceGroup --name akscluster --node-count 1 --dns-name-prefix akslab --generate-ssh-keys --disable-rbac --kubernetes-version "1.11.5"## Verify state of AKS cluster
$ az aks show -g myResourceGroup -n akscluster --output table
Connect to the AKS cluster and initialize Helm package manager.
# Configure kubectl to connect to the AKS cluster
$ az aks get-credentials --resource-group myResourceGroup --name akscluster
## Check cluster nodes
$ kubectl get nodes -o wide
## Check default namespaces in the cluster
$ kubectl get namespaces
## Initialize Helm. This will install 'Tiller' on AKS. Wait for this command to complete!
$ helm init
## Check if Helm client is able to connect to Tiller on AKS.# This command should list both client and server versions.
$ helm version
Client: &version.Version{SemVer:"v2.11.0", GitCommit:"20adb27c7c5868466912eebdf6664e7390ebe710", GitTreeState:"clean"}
Server: &version.Version{SemVer:"v2.11.0", GitCommit:"2e55dbe1fdb5fdb96b75ff144a339489417b146b", GitTreeState:"clean"}
Next, create a new Kubernetes namespace resource. This namespace will be called development.
# Make sure you are in the *k8s-springboot-data-rest* directory.
$ kubectl create -f k8s-scripts/dev-namespace.json
## List the namespaces
$ kubectl get namespaces
Create a new Kubernetes context and associate it with the development namespace. We will be deploying all our application artifacts into this namespace in subsequent steps.
# Create the 'dev' context
$ kubectl config set-context dev --cluster=akscluster --user=clusterUser_myResourceGroup_akscluster --namespace=development
## Switch the current context to 'dev'
$ kubectl config use-context dev
## Check your current context (should list 'dev' in the output)
$ kubectl config current-context
Configure Kubernetes to pull application container images from ACR (configured in step [B]). When AKS cluster is created, Azure also creates a ‘Service Principal’ (SP) to support cluster operability with other Azure resources. This auto-generated service principal can be used to authenticate against the ACR. To do so, we need to create an Azure AD role assignment that grants the cluster’s SP access to the Azure Container Registry. In a Linux terminal window, update the shell script shell-scripts/acr-auth.sh with correct values for the following variables.
Variable
Description
AKS_RESOURCE_GROUP
Name of the AKS resource group
AKS_CLUSTER_NAME
Name of the AKS cluster instance
ACR_RESOURCE_GROUP
Name of the ACR resource group
ACR_NAME
Name of ACR instance
Then execute this shell script. See below.
# Change file permission to allow user to execute the script
$ chmod 700 ./shell-scripts/acr-auth.sh
## Update the shell script and then run it
$ ./shell-scripts/acr-auth.sh
#
At this point you will also want to save your Kube Configuation file to a known temporary location. You will need this to properly setup your Kubernetes cluster in a subsequent lab. To do this, in your Terminal, cat the kube config file and cut and paste it’s contents into another file. Save this config file to a directory location on you local workstation/PC.
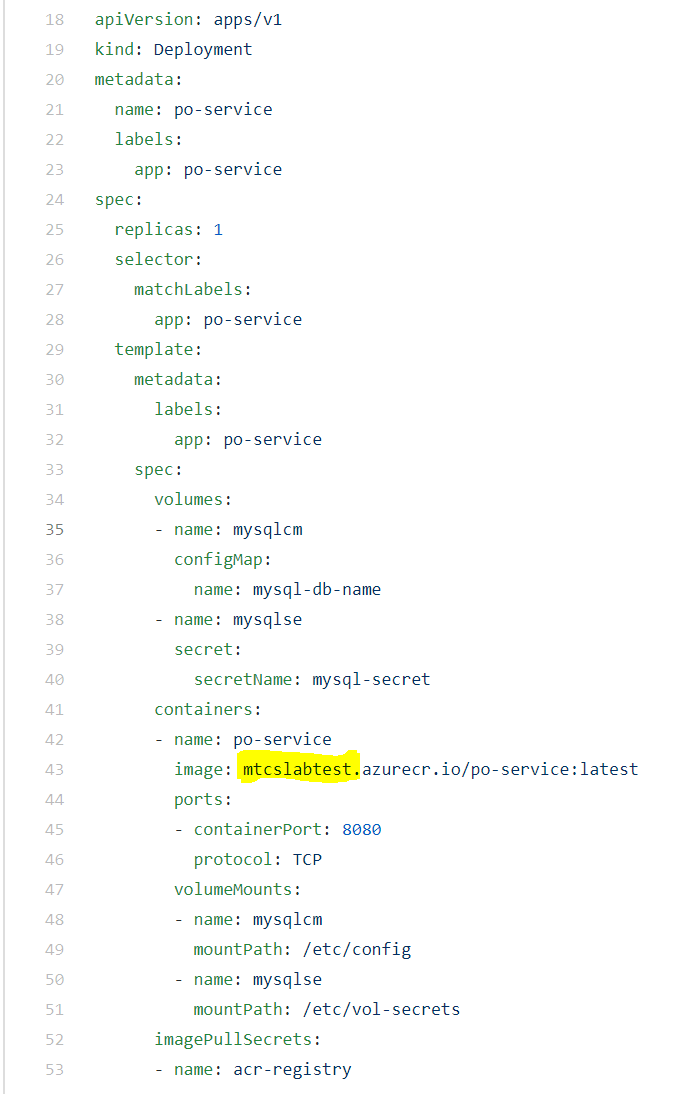
Update the k8s-scripts/app-deploy.yaml file. The image attribute should point to your ACR which you provisioned in Section [B]. This will ensure AKS pulls the application container image from the correct registry. Substitute the correct value for the ACR registry name in the image attribute (highlighted in yellow) in the pod spec as shown in the screenshot below.
Deploy the MySQL database container.
# Make sure you are in the *k8s-springboot-data-rest* directory.
$ kubectl create -f k8s-scripts/mysql-deploy.yaml
## List pods. You can specify the '-w' switch to watch the status of pod change.
$ kubectl get pods
The status of the mysql pod should change to Running. See screenshot below.
(Optional) You can login to the mysql container using the command below. Specify the correct value for the pod ID (Value under ‘Name’ column listed in the previous command output). The password for the ‘mysql’ user is ‘password’.
$ kubectl exec<pod ID> -i -t -- mysql -u mysql -p sampledb
Deploy the po-service microservice container.
# Make sure you are in the *k8s-springboot-data-rest* directory.
$ kubectl create -f k8s-scripts/app-deploy.yaml
## List pods. You can specify the '-w' switch to watch the status of pod change.
$ kubectl get pods
The status of the po-service pod should change to Running. See screenshot below.
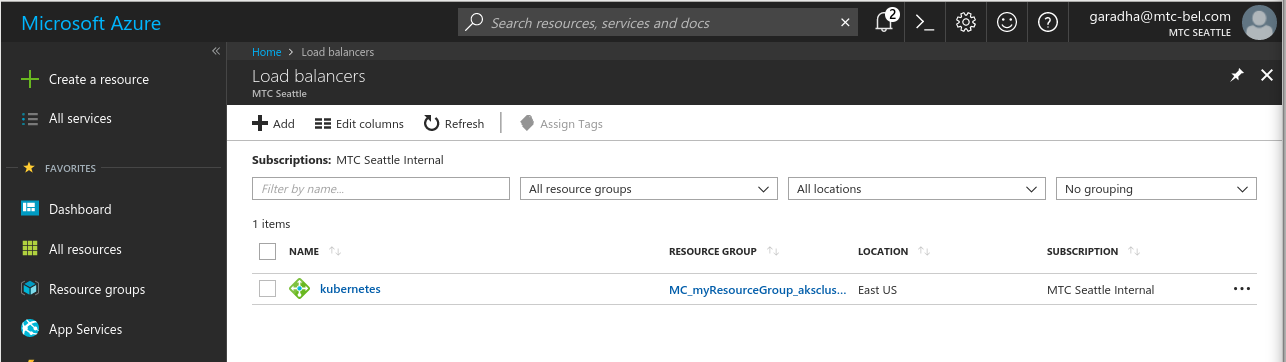
(Optional) As part of deploying the po-service Kubernetes service object, an Azure cloud load balancer gets auto-provisioned and configured. The load balancer accepts HTTP requests for our microservice and re-directes all calls to the service endpoint (port 8080). Take a look at the Azure load balancer.
Accessing the Purchase Order Microservice REST API
As soon as the po-service application is deployed in AKS, 2 purchase orders will be inserted into the backend (MySQL) database. The inserted purchase orders have ID’s 1 and 2. The application’s REST API supports all CRUD operations (list, search, create, update and delete) on purchase orders.
In a Kubernetes cluster, applications deployed within pods communicate with each other via services. A service is responsible for forwarding all incoming requests to the backend application pods. A service can also expose an External IP Address so that applications thatare external to the AKS cluster can access services deployed within the cluster.
Use the command below to determine the External (public) IP address (Azure load balancer IP) assigned to the service end-point.
# List the kubernetes service objects
$ kubectl get svc
The above command will list the IP Address (both internal and external) for all services deployed within the development namespace as shown below. Note how the mysql service doesn’t have an External IP assigned to it. Reason for that is, we don’t want the MySQL service to be accessible from outside the AKS cluster.
The REST API exposed by this microservice can be accessed by using the context-path (or Base Path) orders/. The REST API endpoint’s exposed are as follows.
URI Template
HTTP VERB
DESCRIPTION
orders/
GET
To list all available purchase orders in the backend database.
orders/{id}
GET
To get order details by order id.
orders/search/getByItem?{item=value}
GET
To search for a specific order by item name
orders/
POST
To create a new purchase order. The API consumes and produces orders in JSON format.
orders/{id}
PUT
To update a new purchase order. The API consumes and produces orders in JSON format.
orders/{id}
DELETE
To delete a purchase order.
You can access the Purchase Order REST API from your Web browser, e.g.:
http://<Azure_load_balancer_ip>/orders
http://<Azure_load_balancer_ip>/orders/1
Use the sample scripts in the ./test-scripts folder to test this microservice.
Congrats! You have just built and deployed a Java Springboot microservice on Azure Kubernetes Service!!
We will define a Release Pipeline in Azure DevOps to perform automated application deployments to AKS next.
E] Create a Release Pipeline in Azure DevOps to re-deploy the Springboot microservice
Approx. time to complete this section: 1 Hour
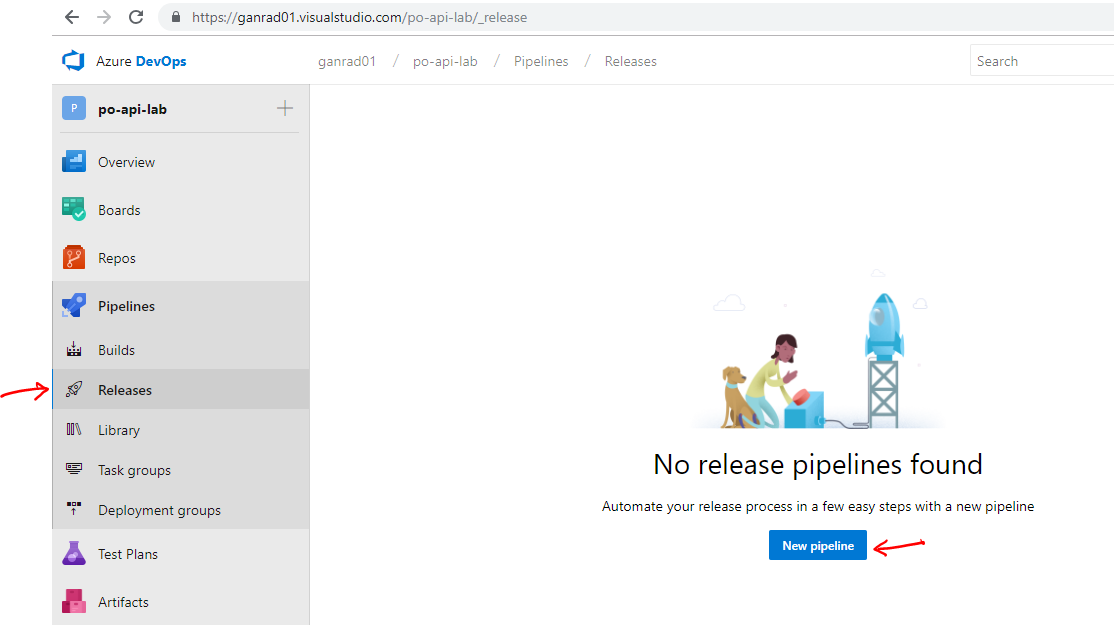
Using a web browser, login to your Azure DevOps account (if you haven’t already) and select your project which you created in Step [C]. Click on Pipelines menu in the left navigational panel and select Releases. Next, click on New pipeline.
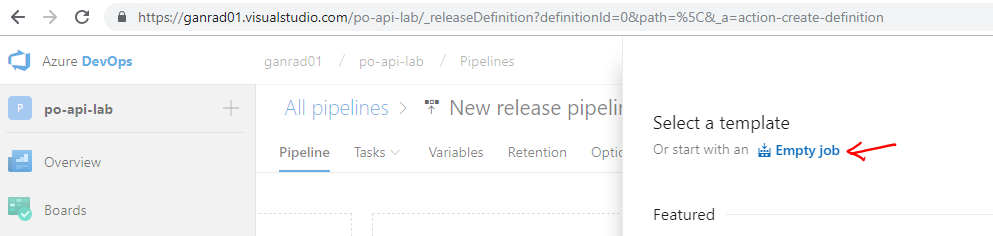
In the Select a Template page, click on Empty job. See screenshot below.
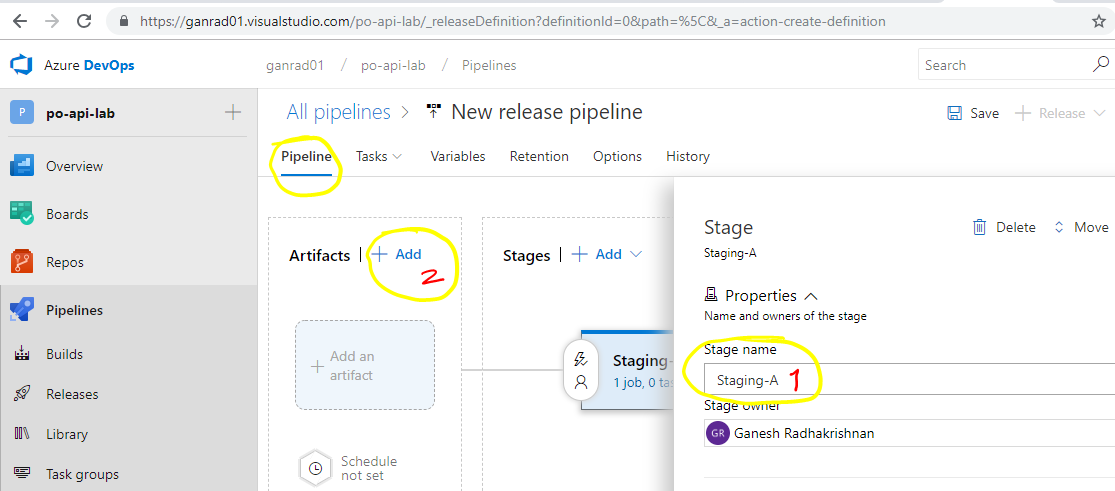
In the Stage page, specify Staging-A as the name for the environment. Then click on +Add besides Artifacts (under Pipeline tab).
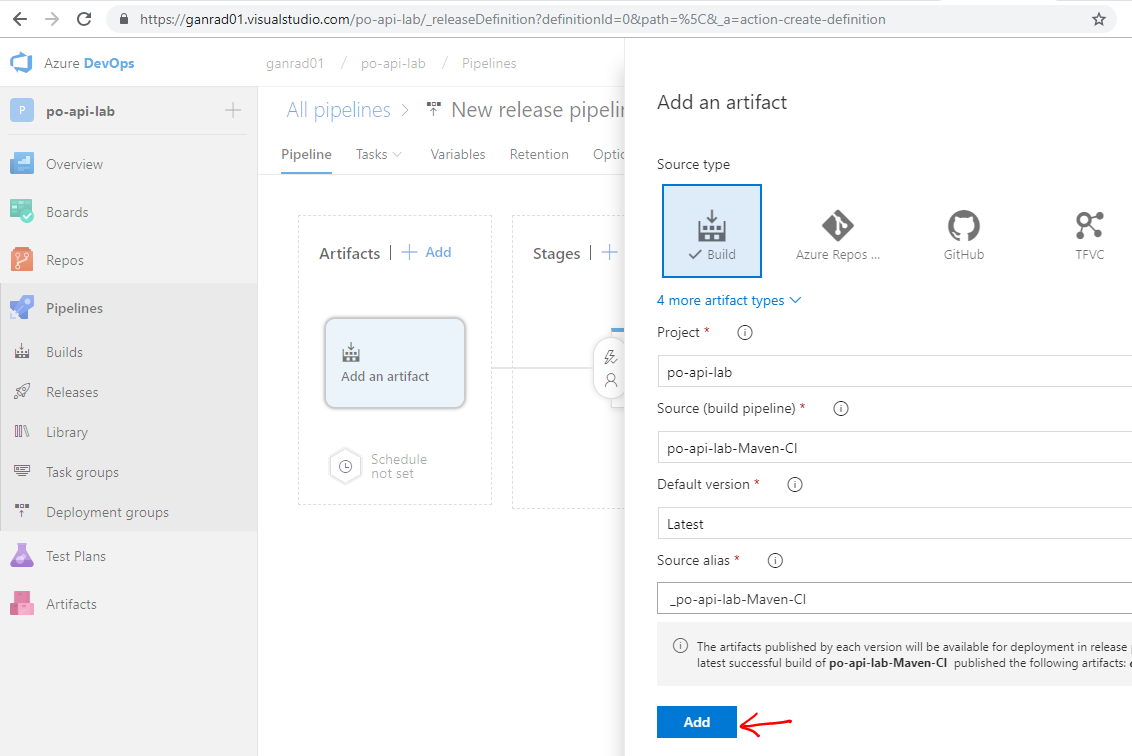
In the Add artifact page, select Build for Source type, select your Azure DevOps project from the Project drop down menu and select your Build definition in the drop down menu for Source (build pipeline). Select Latest for field Default version. See screenshot below.
Click on Add.
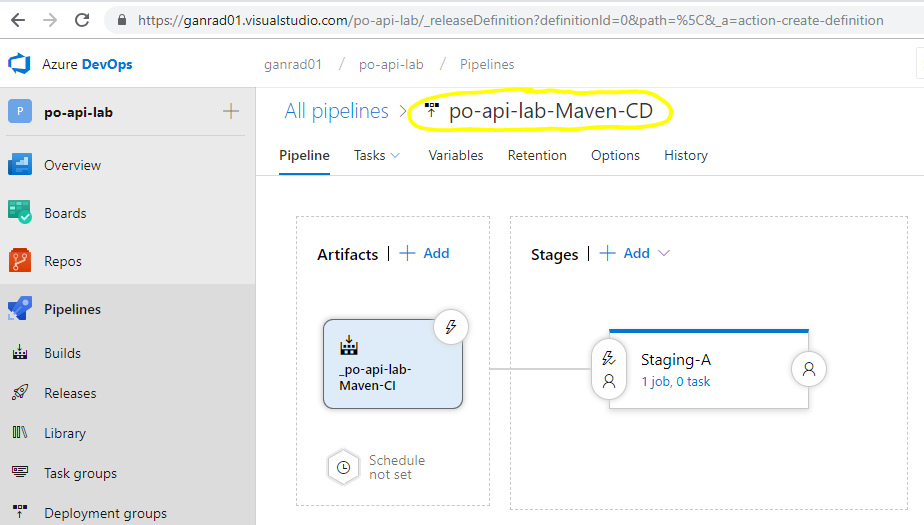
Change the name of the Release pipeline as shown in the screenshot below.
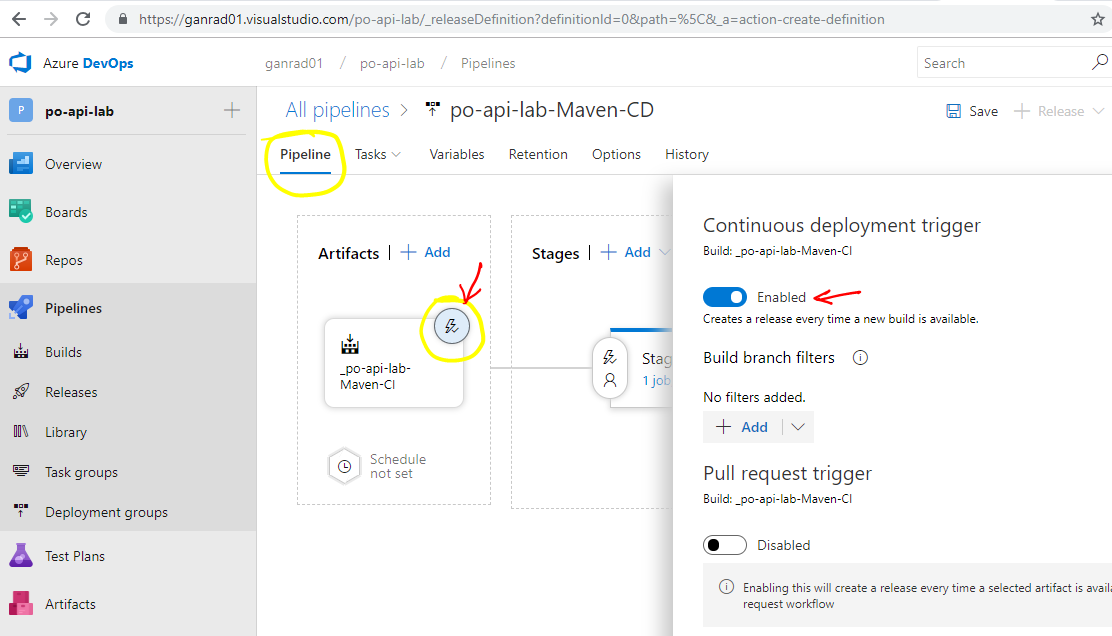
In the Pipeline tab, click on the trigger icon (highlighted in yellow) and enable Continuous deployment trigger. See screenshot below.
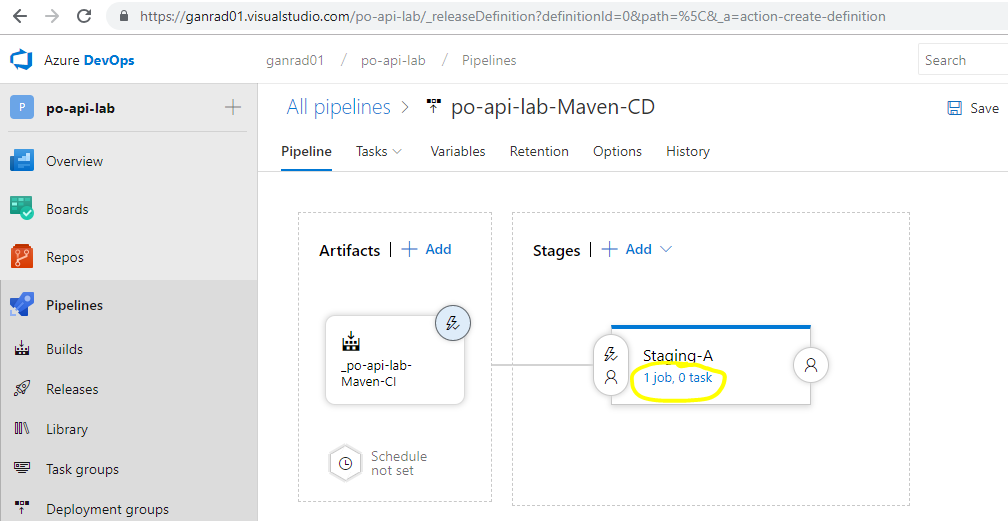
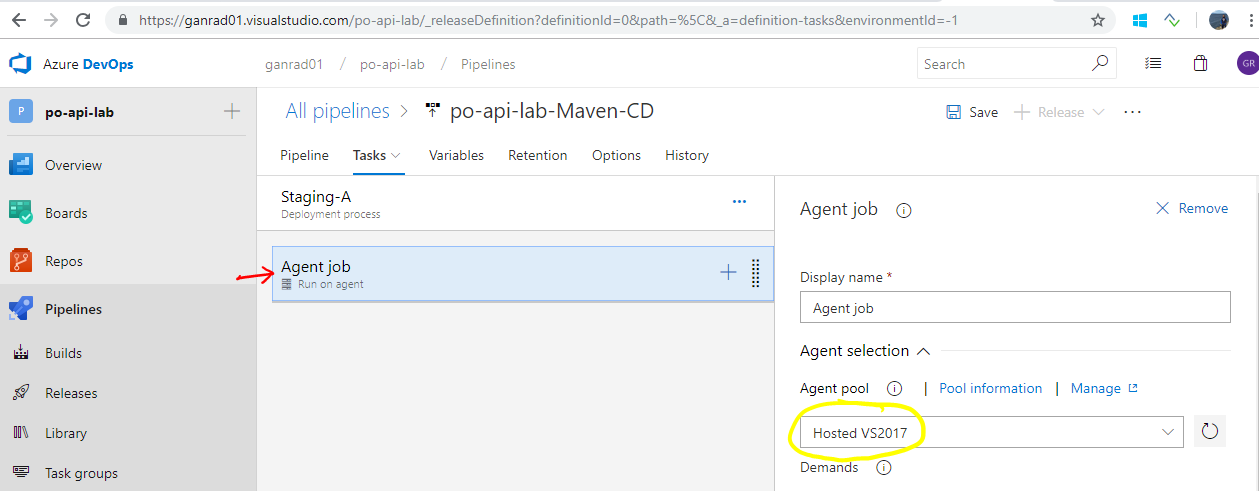
Next, click on 1 job, 0 task in the Stages box under environment Staging-A. Click on Agent job under the Tasks tab and make sure Agent pool value is set to Hosted VS2017. Leave the remaining field values as is. See screenshots below.
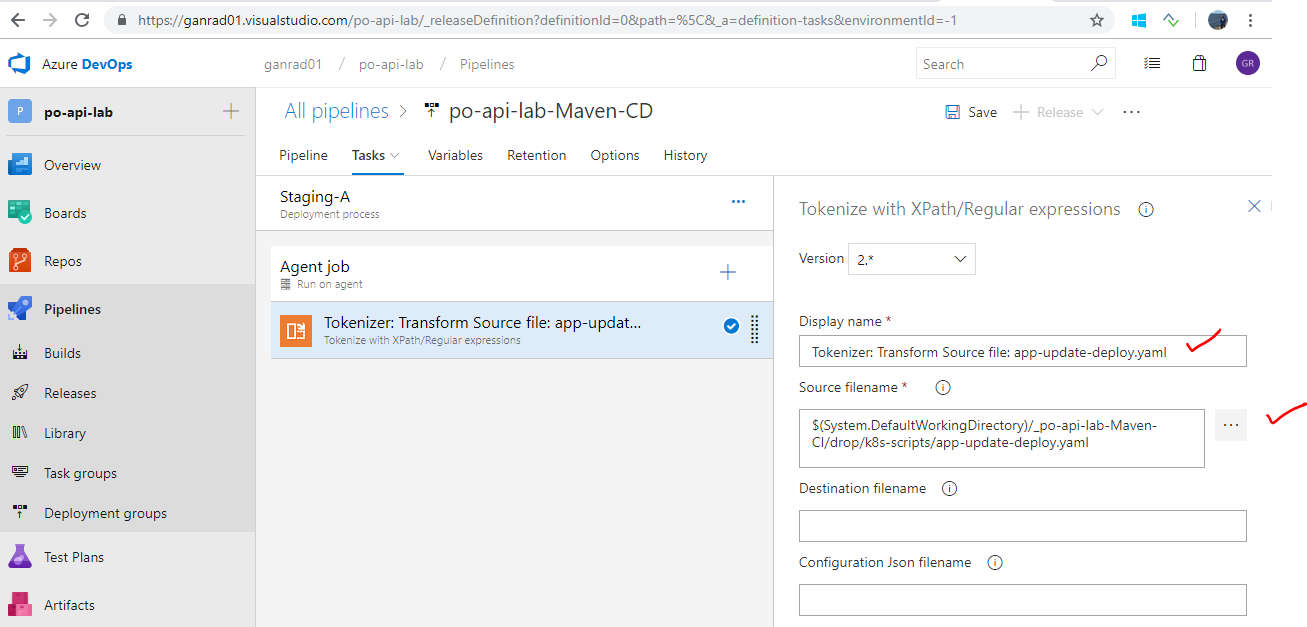
Recall that we had installed a Tokenizer utility extension in VSTS in Step [C]. We will now use this extension to update the container image Tag value in Kubernetes deployment manifest file ./k8s-scripts/app-update-deploy.yaml. Open/View the deployment manifest file in an editor (vi) and search for variable Build.BuildNumber. When we re-run (execute) the Build pipeline, it will generate a new tag (Build number) for the po-service container image. The Tokenizer extension will then substitute the latest tag value in the substitution variable.
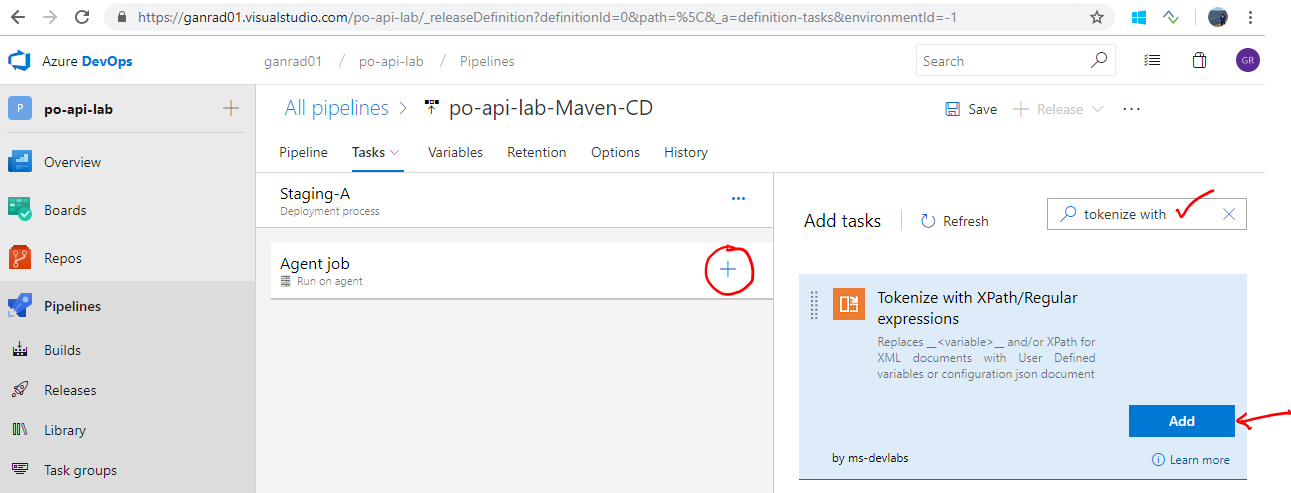
Click on the ** + ** symbol beside Agent job and search for text Tokenize with in the Search text box (besides Add tasks). Click on Add. See screenshot below.
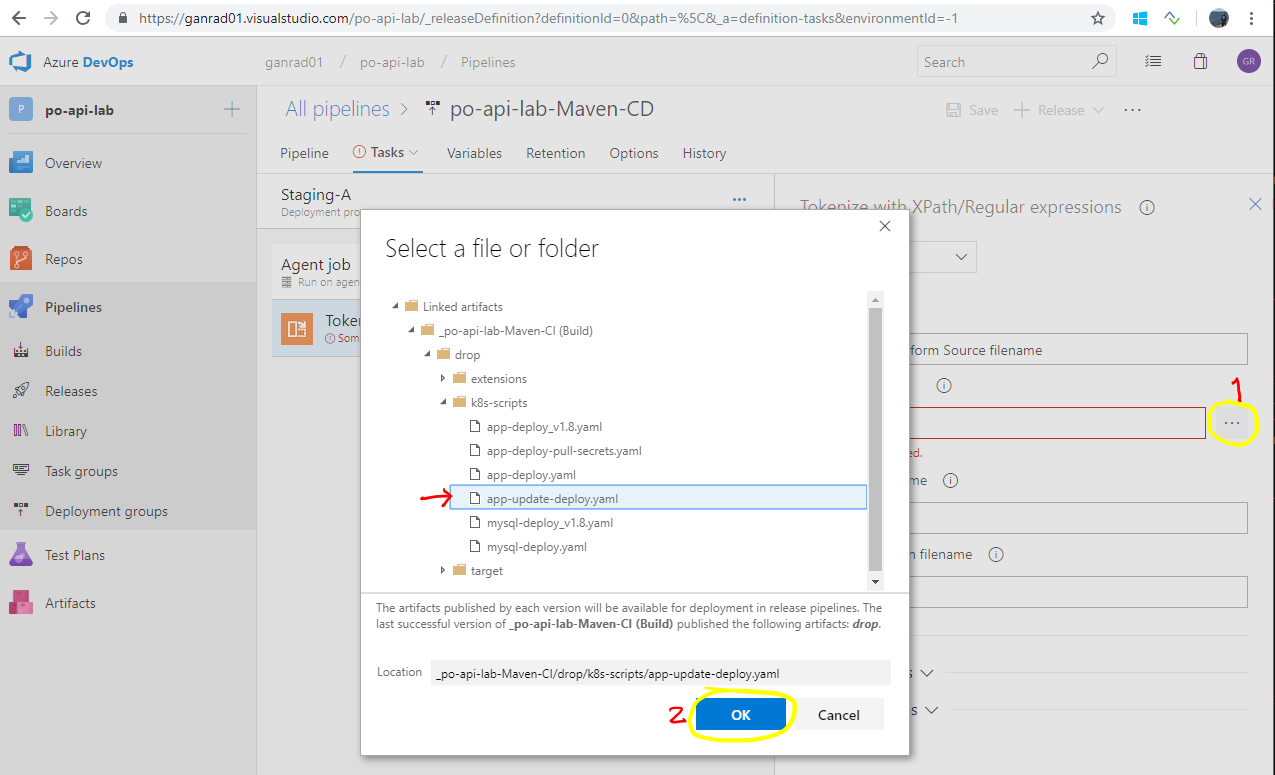
Click on the Tokenizer task and click on the ellipsis (…) besides field Source filename. In the Select a file or folder tab, select the deployment manifest file app-update-deploy.yaml from the respective folder as shown in the screenshots below. Click OK.
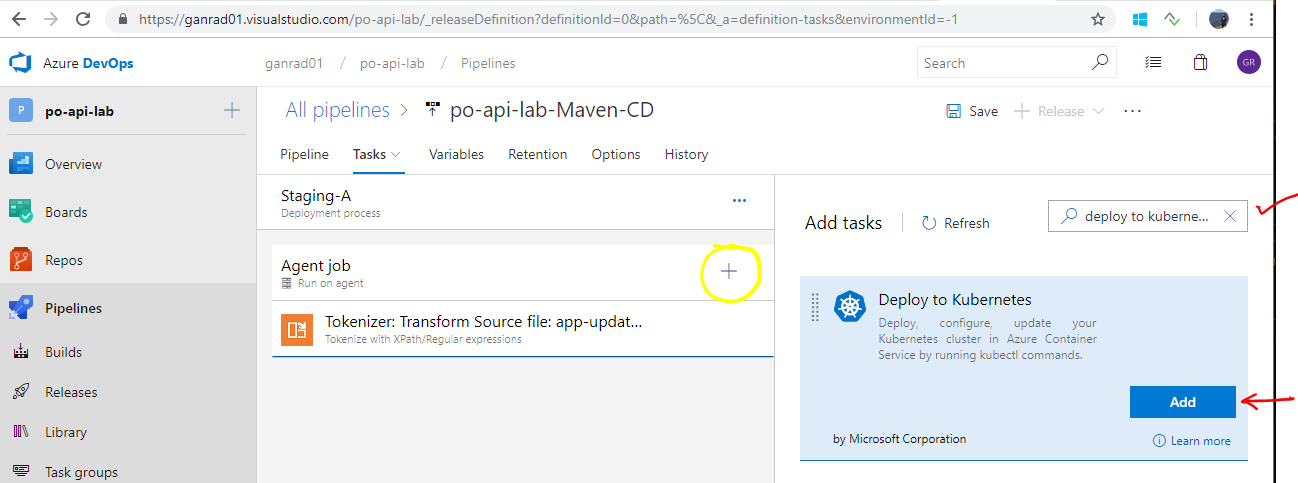
Again, click on the ** + ** symbol beside Agent job and search for text Deploy to Kubernetes, select this extension and click Add. See screenshot below.
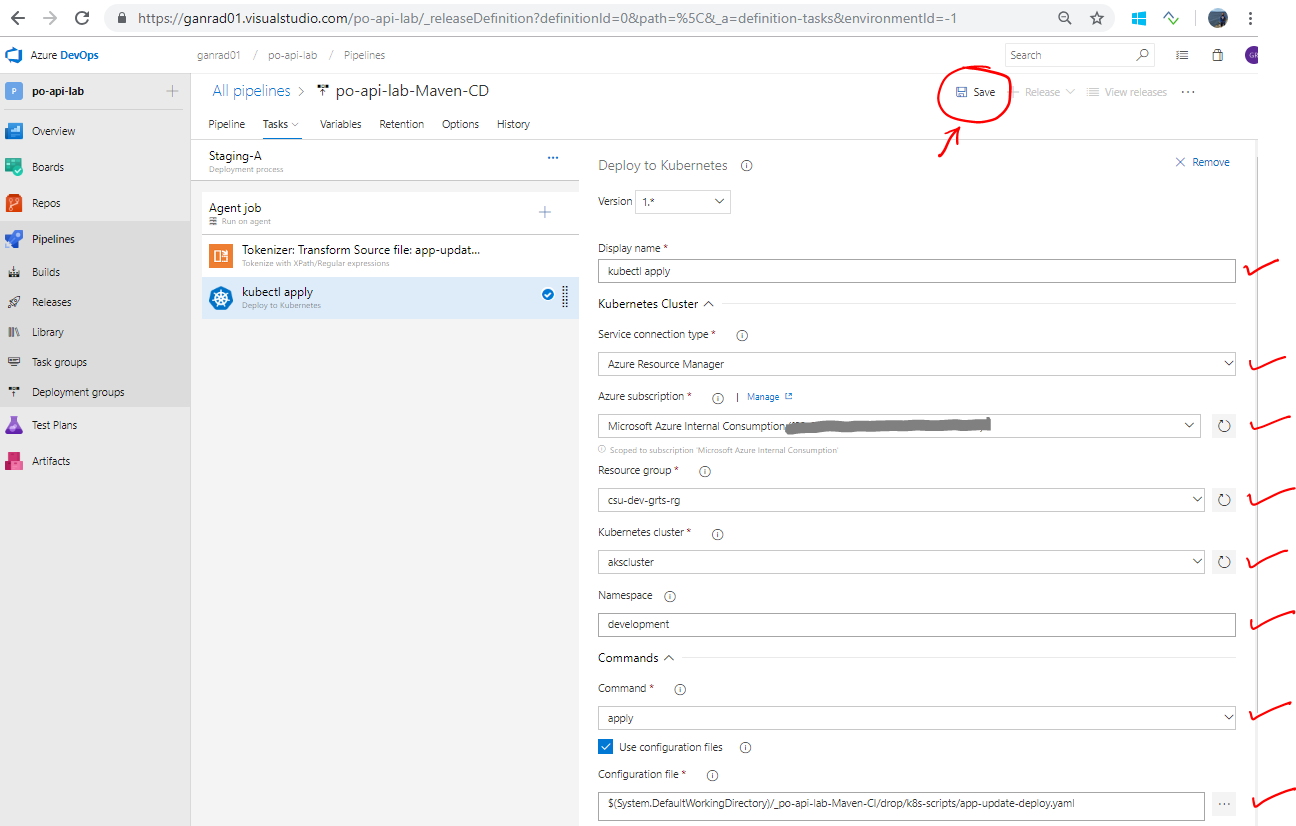
Click on the Deploy to Kubernetes task on the left panel and fill out the details as shown in the screenshot below. This task will apply (update) the changes (image tag) to the kubernetes Deployment object on the Azure AKS cluster and do a Rolling deployment for the po-service microservice application.
If you do not see your Kubernetes Cluster in the drop down menu, you will need to add it. You can select +NEW and then fill out the information. You will need the API Address, which you can find if you view your Kubernetes Cluster within the portal. It will look similar to akslab-ae1a2677.hcp.centralus.azmk8s.io Be sure to add https:// before it when pasting it into Azure DevOps for Server URL.
Additionally you will need your Kubernetes Configuration file from earlier. Simply copy the contents in full to the KubeConfig section.
After filling out all the field values (as shown), click Save on the top panel. Provide a comment and click OK.
We have now finished defining the Release pipeline. This pipeline will in turn be triggered whenever the build pipeline completes Ok.
In the po-service deployment manifest file ‘./k8s-scripts/app-update-deploy.yaml’, update the container image attribute value by specifying the name of your ACR repository. You can make this change locally on your cloned repository (on the Linux VM) and then push (git push) the updates to your GitHub repository. Alternatively, you can make this change directly in your GitHub repository (via web browser). Search for the image attribute in file ‘app-update-deploy.yaml’ and specify the correct name of your ACR repository (eg., Replace ACR_NAME in ACR_NAME.azurecr.io).
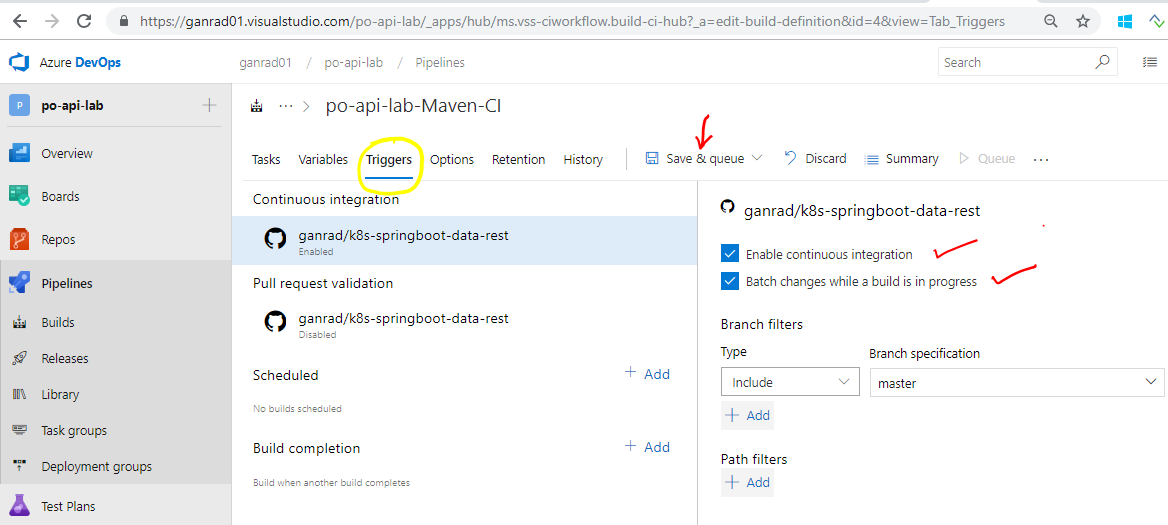
Edit the build pipeline and click on the Triggers tab. Click the checkbox for both Enable continuous integration and Batch changes while a build is in progress. Leave other fields as is. Click on Save & queue menu and select the Save option.
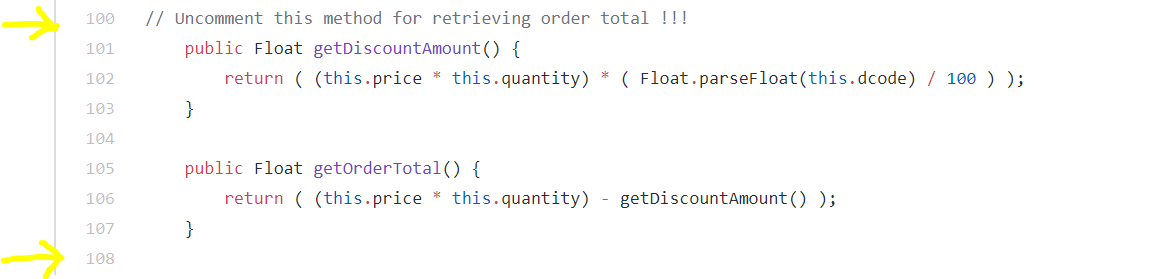
Modify the microservice code to calculate Discount amount and Order total for purchase orders. These values will be returned in the JSON response for the GET API (operation).
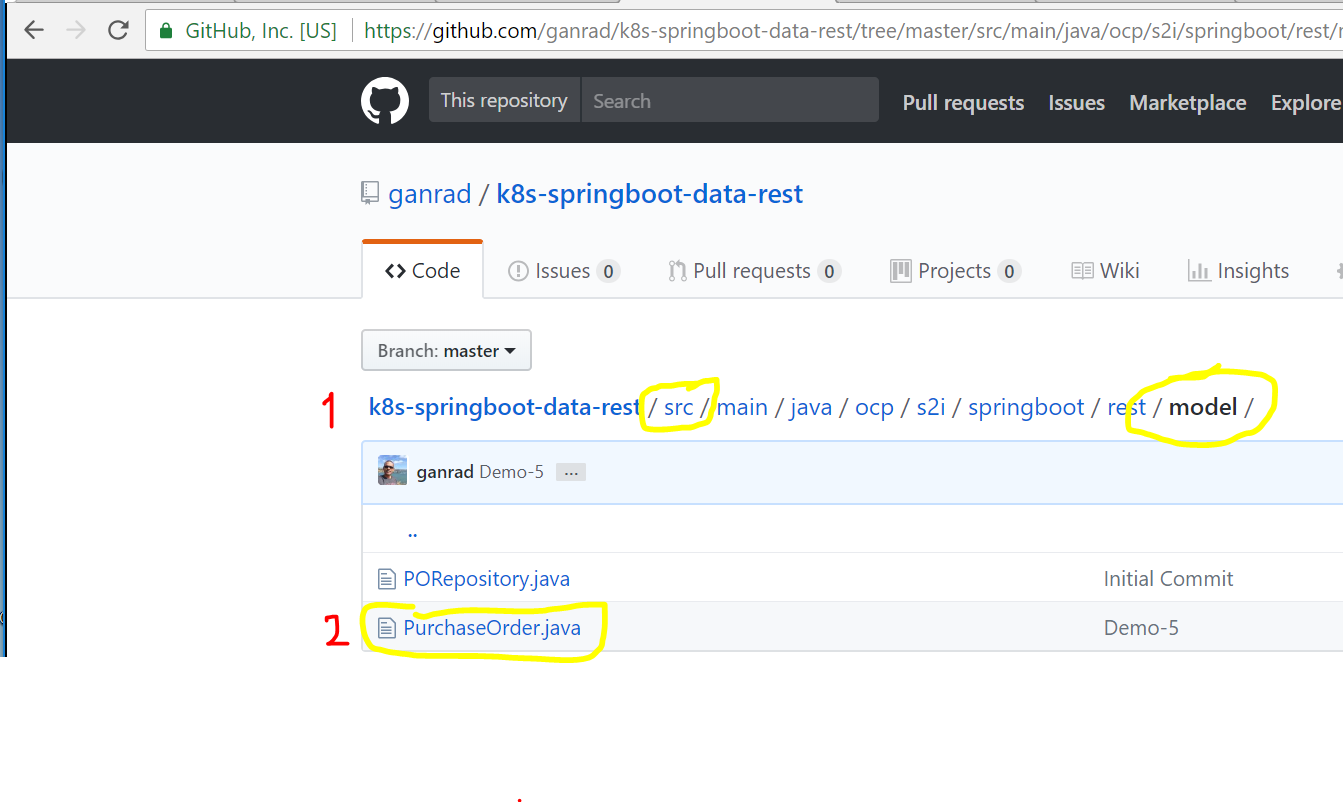
Update the src/main/java/ocp/s2i/springboot/rest/model/PurchaseOrder.java class in your forked GitHub repository by using one one of these options.
Use Git CLI to update this Java class in your cloned repository on the Linux host. Then commit and push the updates to your forked GitHub repository.
Alternatively, update this Java class using the browser by accessing your forked GitHub repository.
The changes to be made to the Java Class are described below.
Open a web browser tab and navigate to your forked project on GitHub. Go to the model sub directory within src directory and click on PurchaseOrder.java file. See screenshot below.
Click on the pencil (Edit) icon on the top right of the code view panel (see below) to edit this file.
Uncomment lines 100 thru 108 (highlighted in yellow).
Provide a comment and commit (save) the file. The git commit will trigger a new build (Continuous Integration) for the po-service microservice in Azure DevOps. Upon successful completion of the build process, the updated container images will be pushed into the ACR and the release pipeline (Continuous Deployment) will be executed. As part of the CD process, the Kubernetes deployment object for the po-service microservice will be updated with the newly built container image. This action will trigger a Rolling deployment of po-service microservice in AKS. As a result, the po-service containers (Pods) from the old deployment (version 1.0) will be deleted and a new deployment (version 2.0) will be instantiated in AKS. The new deployment will use the latest container image from the ACR and spin up new containers (Pods). During this deployment process, users of the po-service microservice will not experience any downtime as AKS will do a rolling deployment of containers.
Switch to a browser window and test the po-Service REST API. Verify that the po-service API is returning two additional fields (discountAmount and orderTotal) in the JSON response.
Congrats! You have successfully used DevOps to automate the build and deployment of a containerized microservice application on Kubernetes.
In this project, we experienced how DevOps, Microservices and Containers can be used to build next generation applications. These three technologies are changing the way we develop and deploy software applications and are at the forefront of fueling digital transformation in enterprises today!
Next, continue to explore other container solutions available on Azure. Use the links below.
Proceed to the sub-project Jenkins CI/CD to learn how to implement a Continuous Delivery pipeline in Jenkins to build and release the po-service microservice to AKS.
Proceed to the sub-project Automate with Azure PaaS to learn how to build and deploy a containerized microservice application using only Azure PaaS services. Learn how to refactor the po-service microservice to persist Purchase Order data in a Azure database for MySQL (managed) server instance. This sub-project will also detail the steps for deploying the po-service microservice on Azure Container Instances.
Proceed to the sub-project Manage APIs to learn how to secure, manage and analyze Web API’s using Azure API Management Service. This sub-project will describe the steps for securing the API’s exposed by po-service microservice using Azure APIM PaaS.
Appendix A
In case you want to change the name of the MySQL database name, root password, password or username, you will need to make the following changes. See below.
Update the Secret object mysql in file ./k8s-scripts/mysql-deploy.yaml file with appropriate values (replace ‘xxxx’ with actual values) by issuing the commands below.
# Create Base64 encoded values for the MySQL server user name, password, root password and database name. Repeat this command to generate values for each property you want to change.
$ echo"xxxx"| base64 -w 0
# Then update the corresponding parameter value in the Secret object.
Update the ./k8s-scripts/app-deploy.yaml file. Specify the correct value for the database name in the ConfigMap object mysql-db-name parameter mysql.dbname
Update the Secret object mysql-sql in file ./k8s-scripts/app-deploy.yaml file with appropriate values (replace ‘xxxx’ with actual values) by issuing the commands below.
# Create Base64 encoded values for the MySQL server user name and password.
$ echo"mysql.user=xxxx"| base64 -w 0
$ echo"mysql.password=xxxx"| base64 -w 0
# Then update the *db.username* and *db.password* parameters in the Secret object accordingly.
Troubleshooting
In case you created the po-service application artifacts in the wrong Kubernetes namespace (other than development), use the commands below to clean all API objects from the current namespace. Then follow instructions in Section D starting Step 6 to create the API objects in the ‘development’ namespace.
In case you want to delete all API objects in the ‘development’ namespace and start over again, delete the ‘development’ namespace. Also, delete the ‘dev’ context. Then start from Section D Step 5 to create the ‘development’ namespace, create the API objects and deploy the microservices.
# Make sure you are in the 'dev' context
$ kubectl config current-context
## Switch to the 'akscluster' context
$ kubectl config use-context akscluster
## Delete the 'dev' context
$ kubectl config delete-context dev
## Delete the 'development' namespace
$ kubectl delete namespace development
A few useful Kubernetes commands.
# List all user contexts
$ kubectl config view
## Switch to a given 'dev' context
$ kubectl config use-context dev
## View compute resources (memory, cpu) consumed by pods in current namespace.
$ kubectl top pods
## List all pods
$ kubectl get pods
## View all details for a pod - Start time, current status, volume mounts etc
$ kubectl describe pod <Pod ID>
Sexuality Traits is a mod aimed at player control for sexuality assignment and adding a straight trait
This mod features:
-A straight trait for heterosexual pawns
-An additional trait slot used only for sexuality assignment (works with mods which add more trait slots)
-A settings screen which allows the user to change what percentage of pawns generate with each sexuality. By default these settings are as follows: 50% Bisexual ; 20% Gay ; 20% Straight ; 10% Asexual. Of course if users want to change this, they are able to.
-Settings to disable romance attempts between pawns who aren’t allowed to date one another.
In case of any feedback or bug reports, please utilise the comment section of the mod on the Steam workshop.
Possible issues:
-Immersion breaking when using altered carbon, this likely cannot be fixed without extensive coding and memory for a pawns prior body’s gender kept in the game. However this is already a base issue with altered carbon and the vanilla traits.
Fitz – Possible crashing with all DLCS installed.
Known errors:
-none, currently!
All coding done by the wonderful Taranchuk from the Rimworld Mod Market.
See if the the error persists if you just have this mod and its requirements active.
If not, try adding your other mods until it happens again.
Post your error-log using HugsLib or the standalone Uploader and command Ctrl+F12
For best support, please use the Discord-channel for error-reporting.
Do not report errors by making a discussion-thread, I get no notification of that.
If you have the solution for a problem, please post it to the GitHub repository.


 https://github.com/zhenyatos/gsls-svm